Backdrops.....Do They Matter (To Me)

So, the bigger question I need to ask myself is, do backdrops really matter for me, or more to the point, can backdrops be “faked” when needed using what is around, some post processing, creative thinking or using “A” to become “B, C, D” etc?

Processing.

Post processing is of course the standard way of creating backdrops of any type after the event. A little Photoshop or similar and away you go. This has a few issues for me, not the least of which is, I do not actually have Ps loaded these days, shunning all things Adobe, but ON1 has a background tool available as well as many others, so no real issue. The other thing is that I think I would like to see the results in camera, rather than in my head.

Removal.

Simply taking the background out of the equasion is also easy. Shallow depth, manipulation of light and shooting angles can all help to remove the background as an element. Black is the prime example. Black makes the subject stand on their own, no distractions, no gimmicks, as there is literally nothing other than the symbolism of black and the subject in the image.

White is similar, but black is king. When I was crash-coursing flash, the bulk of the environmental portraitists I came across use DOF and lighting, but not backgrounds. Those who did use backgrounds, did not always and often applied the same techniques with or without.

All about the person. This could easily enough have a little colour added, maybe even with some shape and be achieved in almost any environment, even outside on a sunny day.

Using soft focus blur or Bokeh, is also a tried and true method, heavily drawn from natural light styles and creates interesting backdrops out of bad ones (when blurred) using compression and fast glass. MFT format is less easily blurred, but there is plenty if you go about it properly.

Standard non-studio portraiture.

Staging.

An alternative to removal is to use the elements you want to tell a story. This is much like setting a stage for cinema. Storytelling portraiture is a style in itself and goes back to my roots, dreaming of being a National Geographic shooter, but may not always be possible.

A combination of using the enviroment balanced with blurring it out.

Basic Manipulations.

Changing colours and tones is easy enough, with several methods available. If I take the cinematography path, then just making the main subject the brightest element in the frame is probably enough. This means all my portrait shoots would be light dependant, not background dependant, which is closer to my standard method, natural light candid shooting.

This has bought me to a revelation, belatedly.

Replacement.

Textured backdrops do one main thing, they allow you to include the backdrop in the image as a strong element of the image, sometimes a near equal partner. The backdrop in effect replaces a connection to environement or a void with its own statement.

Of the above, the only one I cannot do right now to a satisfactory level is the textured backdrop used as a partner in the image, so the question is, do I need it or can a combination of the above, be enough?

This is a style, it is a recognised look, is it me? Annie Liebovitz, Joel Grimes, Glyn Dewis, Rory Lewis and many, many others make their living from backdrop style shots, I don’t, but it does not hurt to know a little more about it.

For me, black is cleaner, easier and more relevant and I do not need to produce large bodies of work in this style. One well practiced and applied look is enough. When black is not relevant, the subjects environmet probably is. So, either a complete removal of outside influences or an equally complete embracing of them, but no replacing with a stylised outsider.

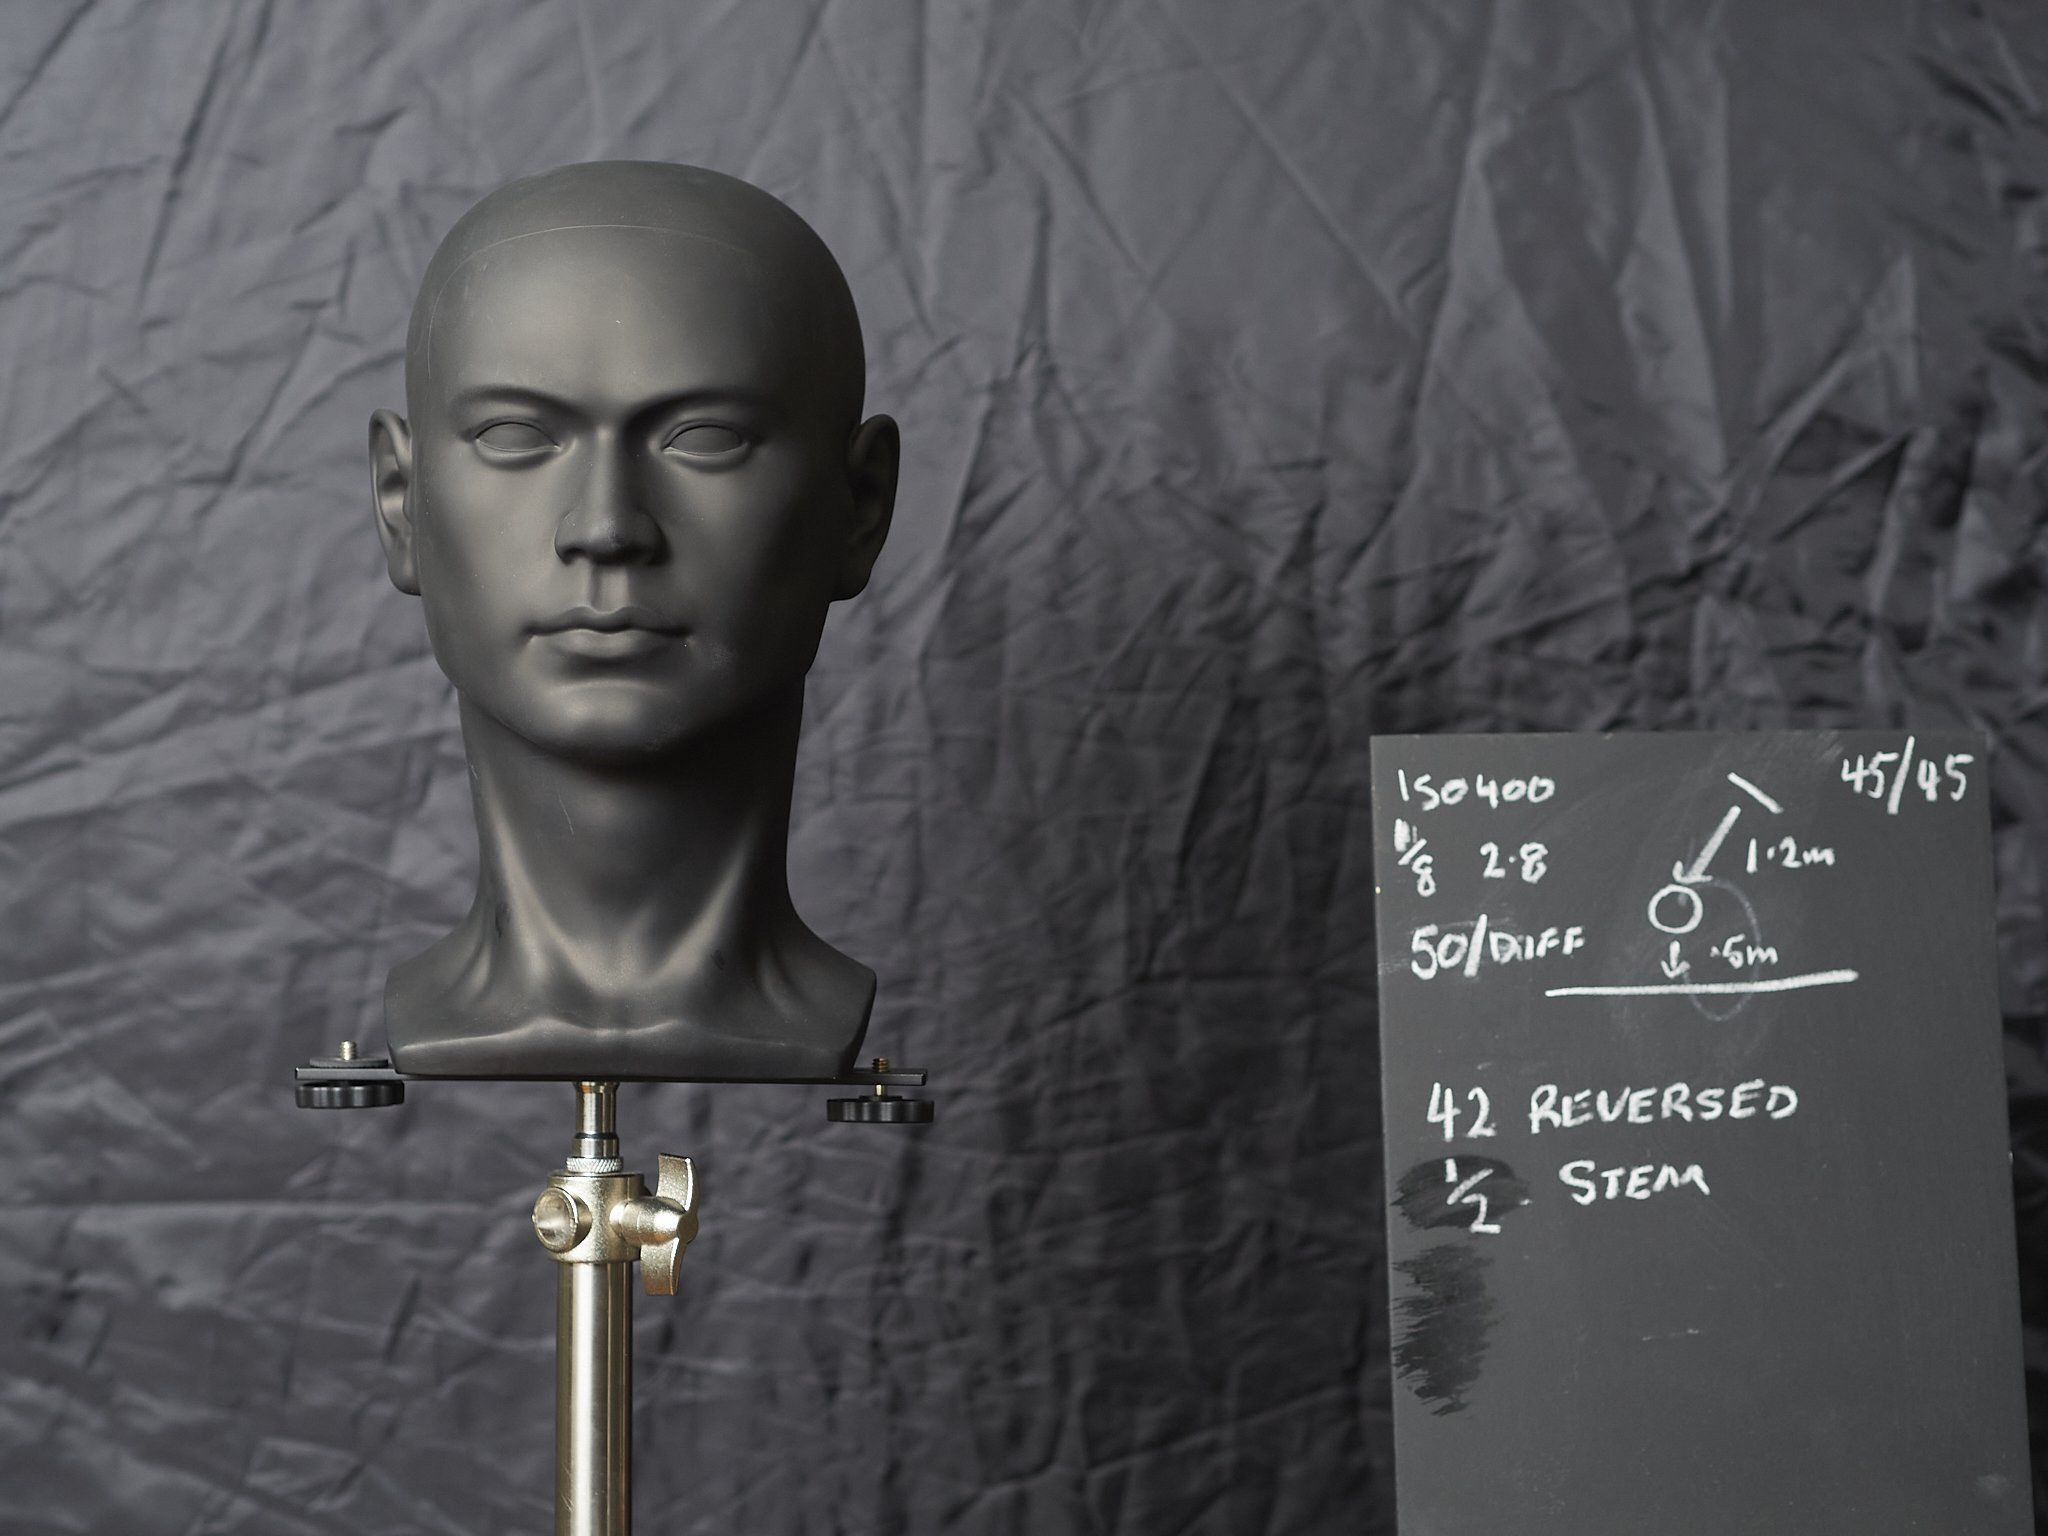
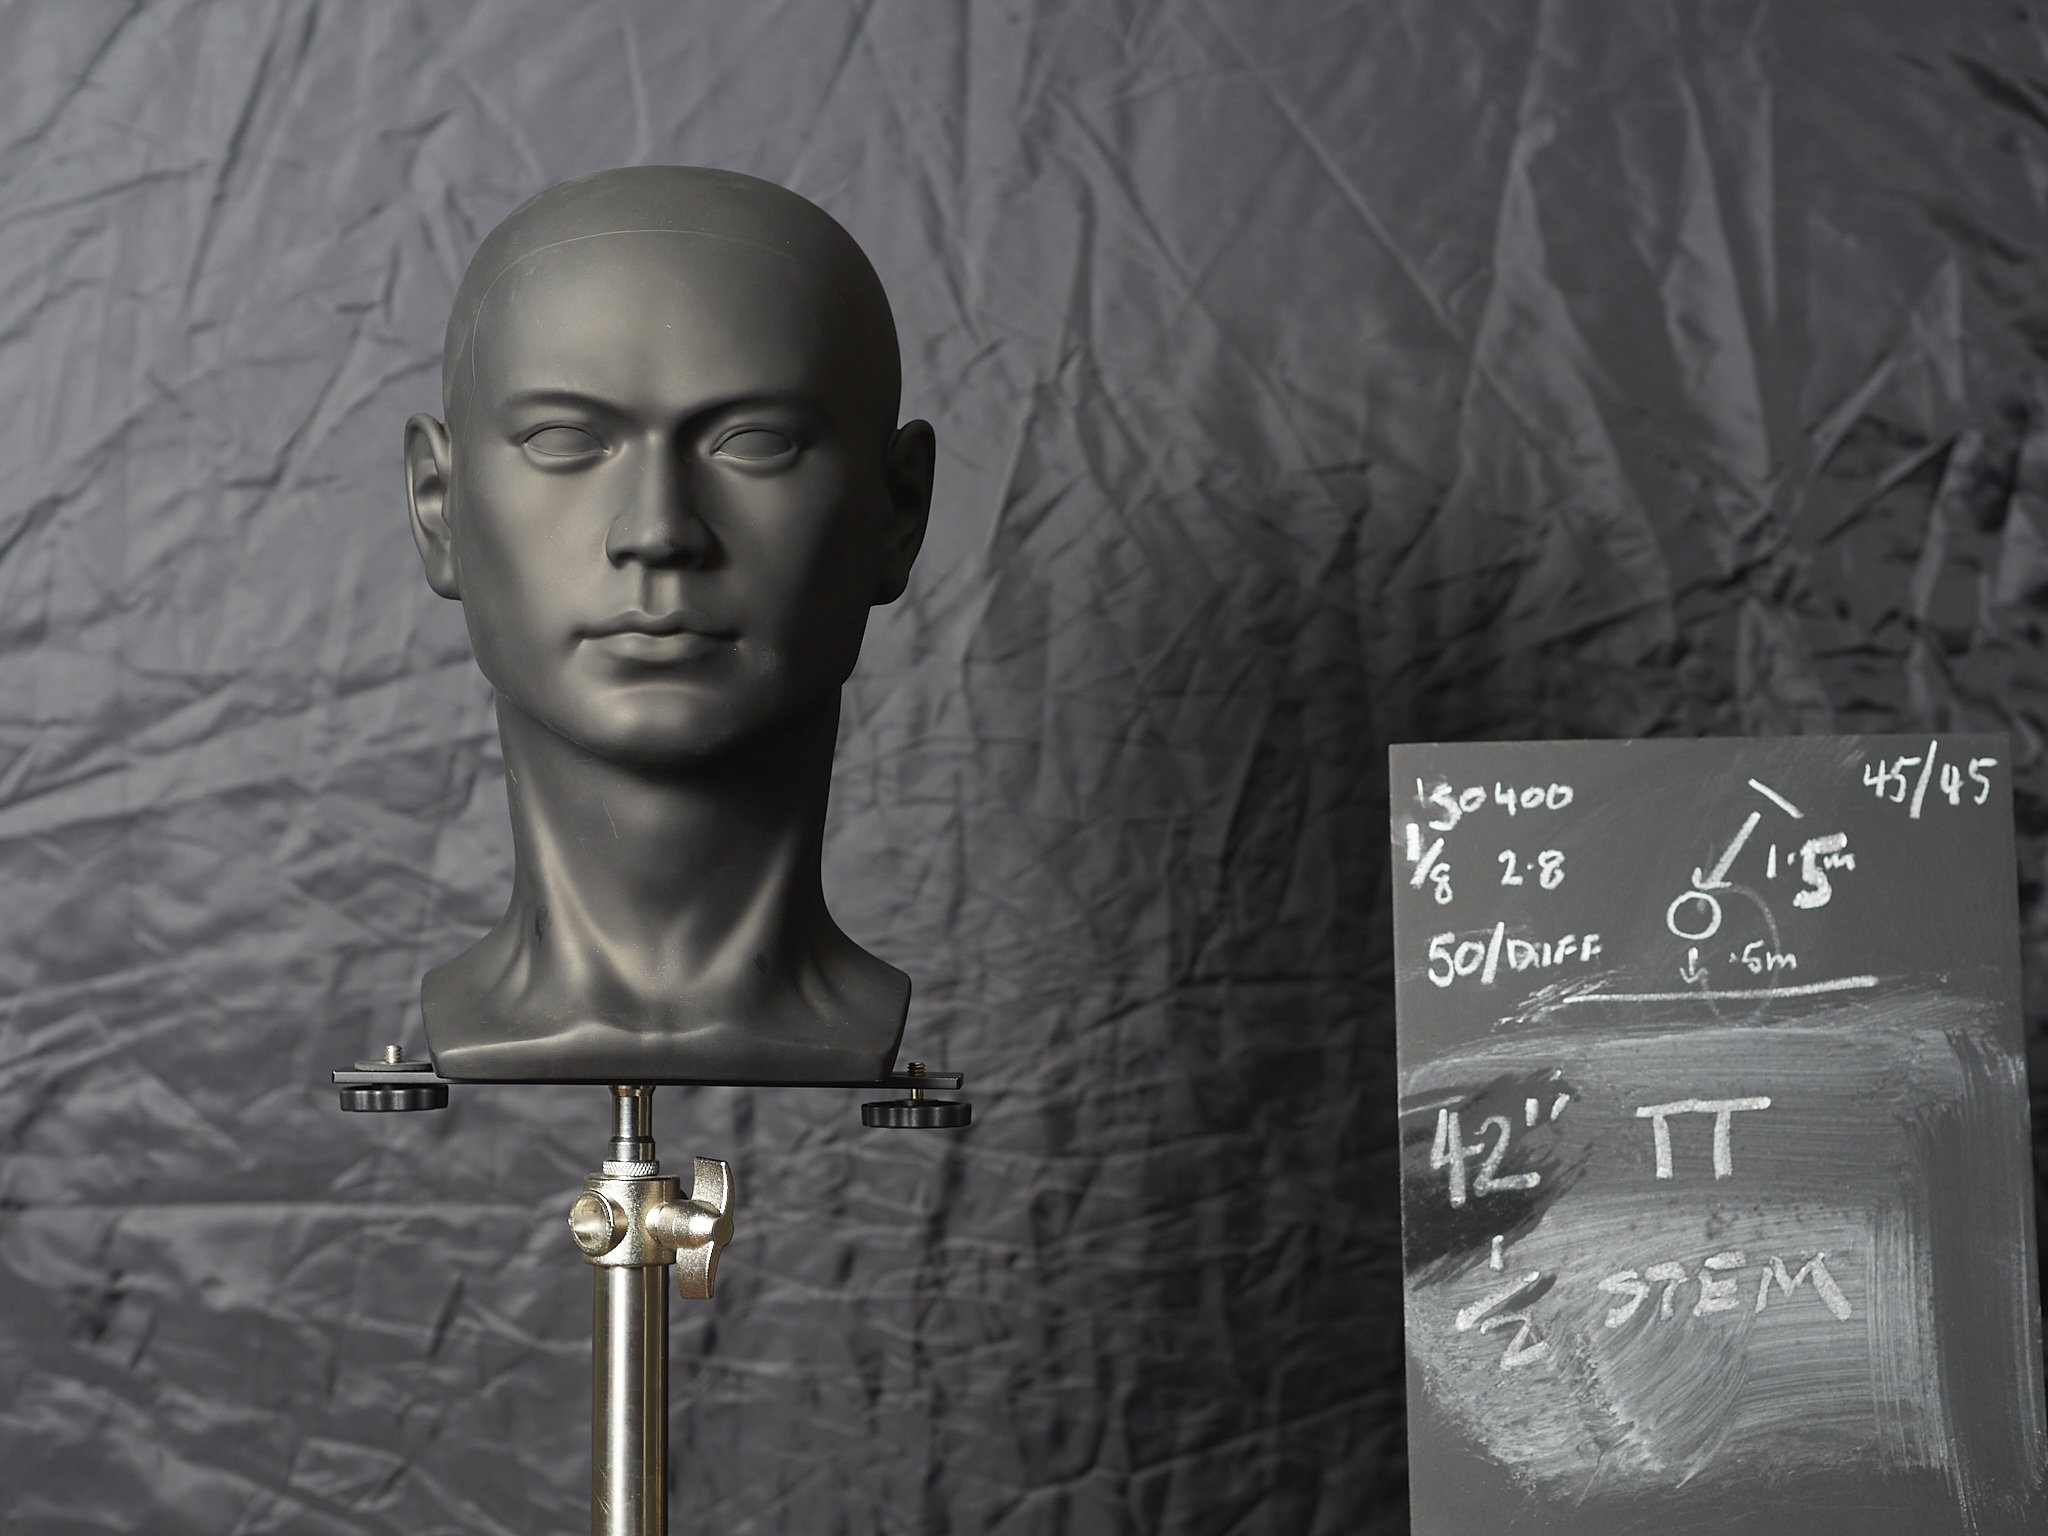
Possibly a plain grey as a base for formal portraits, but then I am half way to the pewter Lastolite anyway.

In my wife’s words, I can dabble in a lot of areas, master a few, but some can be let go. If asked, yes I can do this style, but my way, within my self imposed limits.

Final thought is to fore-go a better backdrop at this point.

My studio is allowing me to explore lighting techniques, but as for better backdrops, I will stick to using what I know and cut out the traditional portraitists path. The reality is, I have never been that guy and likely never will be. If I suddenly need to be up-geared for a student ID shoot or similar, I will simply get the balck/grey Lastolite and apply the skills I have learned.

My money, should I spend any is likely better spent on a modifier to fill any perceived holes in my kit. The only one i can think of is a large white brolly, like the Godox 165cm parabolic white with lining. This calls to me, being a better version of the type I like best.

Door closed, for now.


Backdrops Redux

Looking at this backdrop thing logically after a nights sleep and more time on the net and after breaking down my likely uses, preferred looks and processes and aiming for maximum versatility, my thinking has drifted towards doing it the best I can, just once, then see how it goes.

The Lastolite 1.8x2.1 collapsibles seem to be the undisputed kings of this space. They are expensive, but looking at several other options, maybe they are not as dear on balance as I first thought.

Quality.

They win here pure and simple. The stitching, fabric and frame are all top notch. No other brand seems to come close, even with cost to performance ratios considered. Apparently, the heavier ring also folds more easily.

Price and value.

At about $175-200au per side, you want to get it right. This is a lot for a mistake or poorly thought through idea, but less paid for less is just as wasted if the quality and look are not there (I would rather have an item that is genuinely good, just rarely used, that a junk one, never used and the reality is, one good job and it’s paid for).

I am borderline on backdrops, only really responding to the top end ones, so it’s do it right or don’t do it at all. The cost is also a little less odious when freight comes into the equasion. X-Drop, Kate, Westcott etc are all potentials, but often when freight is calculated, the difference becomes even less. They are also the biggest and squarest, being genuinely useful horizontally deployed, effectively making them 4 backdrops in one.

Colours and textures.

This brings up the issue of limited choice and colour/texture fidelity. The Lastolites are in set combinations, but there are two I like and one in particular that is nearly ideal, but Kate has a few better combos, assuming they are what they look to be (not always the case and few examples I can trust). Lastolites are heavily used by top pro’s, so lots of very nice images available and no complaints of inconsistency.

My preference is for a very subtle texture or a very natural one. Most have overtly stylistic textures, that can be worked around, but they should be abke to be worked with. The Kate I have for example, really only works for me whan blurred out, which is not really what I was after.These, like top end hand painted ones, are clearly good enough to have the subject hard up against them, which many of the cheaper ones prohibit.

Use.

The collapsible type, especially the Lastolites with their very flat edges (they are bigger and squarer than most) seem the most convenient all round. Their shape means a wall or single stand with a clamp (or their magnetic bar), is all that is needed. If going horizontal, you can use two stands or sit it on a table, but that is all that is needed.

The X-Drop is an aparatus in it’s own right and cannot do horizontal (?-not seen it done) and their textures don’t go sideways either. The oval Neewers and Kates are also less horizontal or floor/wall friendly than the Lastolites effectively making them about 1/3rd smaller and less versatile and the cloth type need a cross-bar supported by two stands and a bunch of clamps to do the job.

My choice.

The Walnut/Pewter looks to be the one. The Walnut is a slightly cool take on antique browns and the texture is quite natural and uneven rather than obviously repetitive (a bit like an old decaying wall). Being the size it is and slightly graduated, I think different looks could be found with subtle shifts of the backdrop and the colour seems to display warm to neutral reds/browns and some cool metallic silver/blues also. With some post, I think this has many nice looks including warmer ones like the Olive/Tobacco to cooler ones and I feel it will like mono as well and match well with old floors or concrete equally.

The Pewter side appeals even more because it looks to be quite tightly textured and mildly graduated. This I really like, being more of a fan of the Oliphant super layered-to the point of only hinting at texture-look. It is a cold green-grey colour, but that is easily fixed and the texture is subtle enough that I think it sits perfectly between flat grey and textured. Lightening and darkening the grey are easily achieved with simple light control and colour can be very subtly shifted with RGB LED’s, strobes or more likely a tiny bit of post. I really like the idea of it being only just exposed above black with the option of the slightest hint of a red, green or blue added.

If I want balck, anywhere will do, if I want white, then a wall can be splashed with light, but texture is harder.

Below are three examples of simple processing from grey, all much stronger and clumsier than I would do with the more subtle Lastolite, but you get the idea.

The two below are the result of different amounts of light on the background itself.

So, a universal “antique” look with plenty of versatility and a lightly textured neutral grey with even more versatility.

Others I like, but would struggle with if I had only one are the Tobacco/Olive, possible a better choice for a portrait only business, Ink/Sage, but feel with both colours, some colour shifts on the Pewter would likely achieve something close and the Red/Aubergine. I love the red, struggle with the purple and would likely only buy it as a third or fourth option and again, dark red is possible with the Pewter. Kate also has a storm Grey and Red for $170au which would likely be fine for occassional use.

I almost pulled the trigger on the Westcott Grey/Chroma 5x6.5, but for the reasons mentioned above held off. For twice the money I get twice the useable backdrop colours (chroma does not appeal), better quality, better colours/textures and cover a bigger area.

The big queston now is, do I really need it at all?

Backdrops..........What To Do?

Afer a lot of light tests, some format pondering and experimentation, I am now at the point where I need to choose a background style. This is not as easy as you may think. Choosing a background is tough enough, choosing whether you even want one or not is harder.

This is a question of style.

Doing my usual deep dive into the subject, and not for the first time, I have become a little numb to the whole thing. Lots of models, lots of ideas, nothing that really grabs me. The biggest question I guess is, do I really want to be this photographer?

The studio has been great, scratched an itch that was a long time needing to be scratched, but realistically it was a practical move to help me experiment with my environmental portrait and work processes, not a passion in its own right. I love portraiture, but I am not sure I love this type of portraiture, nor will I chase the subject matter that will make it worth while. Maybe for the odd project, probably for work, but video and other stills projects are more distracting.

Like a lot of things in my life at the moment, I need to “be across” this, but I have to resist getting carried away, as it is not needed at a higher level. It is however, good to master the basics, because like all things, skills bleed into each other. I feel it needs to be done professionally , but efficiently. This is not an area that will take well to a poor-mans implementation, as the crasks will show, so a simple, repeatable, classy look, with no gimmicks, no junk level gear or short term styles.

Textured.

This is the knee-jerk ground zero. All (most) portrait photographers start here and there are lots of options. I have a Kate grey graduated texture that has been (literally) hanging around for a few years waiting to be used and it is versatile if a little heavy on the gradation, but it can be quite effective especially with a little Capture 1 masked brushing.

The base grey first, then some density control, then changed colour using colour temp and a little manipulation from there (apologies to my wife for the poor image). These were all achieved with the brush tool and its mask, white balance controls and a little saturation adjustment. The pure black needs some work, but the others are quite natural. I especially like the more muted and darker ones.

I only really like a couple of these as they all feel a little heavy handed, but for examples they were easy enough, each taking only a few seconds after the initial brush and mask.

It is also easy to change the background density, simply based on light placement. Black and white are only a small step further away.

I already have this Kate one and may look at a few more for $50au, just for the different textures. They are hard to get wrinkles out of for free hanging, but with clamps, tighten up well.

My only real issue with textured is the distracting way it shares the space with the subject.

Texture does look good, but is that at the expense of maximum focus on the main reason you are here, the human subject? I have seen countless examples of beautiful people in front of these lovely (or sometimes not so lovely) textured drops, but tend to prefer the less process dominated ones of people and I have noticed, the top end ones are usually less textured looking. The Oliphant drops used by Leibovitz etc are nearly texturally smoothed out to being non-textured, just hinting at texture like an antique wall or tapestry, which is why they cost so much.

I think I actually prefer a plain backdrop, one that compliments the person, their clothing and their story, rather than a textured one that shares the composition, sometimes dominating it. This is based also on my preferrence for a dark, almost black shade with just a hint of colour showing through.

Basic black.

This is a project or subject specific style and one that I love and can implement any time, anywhere. It is basically backdrop agnostic (irrelevant even), but can be over used. I see no need to buy a black backdrop, so this would be using any one I have with lighting control.

Clean white.

White, with colour manipulation using gels, RGB LED’s or post processing (see above). With lighting, white is cleaner and more briliant.

Neutral grey.

Less brilliant than white, so less responsive to gels and LED’s, a grey will produce a good deep colour base and will post-process well, again as above. This is probably my best option. It is also possible to add texture to these, with the grey as a consistent base, so I could shoot now and process to taste later.

Westcott make a 5x7 grey/green and a solid grey for their X-drop system, that are both high quality and well priced as well as offering a Glyn Dewis textured grey for the X-Drop system (the whole lot coming in at about the cost of a Lastolite collapsible).

One of my favourite Rory Lewis images is of an Italian Army officer in her Khaki uniform. He used a grey background, that looks slightly olive in the shot, matching her uniform and complexion perfectly. It would be easy enough to use a solid grey and subtly shift it to a different colour with the above tools.

Another option with any of the plain backdrops is to shoot uneven light at them, using shadows, even light streak textures to break up their flatness.

The environment.

Here is where things get fun. I had settled on the square format for some of my portraits, as I feel this is the most interesting and the least demanding compositionally. I love the democratic square. It can be a little limiting for larger subjects and busy compositions as it shrinks things, but otherwise it is just right.

So, what if I composed a portrait like a movie set in wide screen, with supporting elements shaping the subjects environment? This would mean backdrops as we know them are irrelevant.

This plays into a couple of interesting areas for me. Cinematigraphy is my current crush, even more so than portraiture, which is more of a preparation thing, and the dressing of a scene can be reliant on constant lights as well as flash, again a strong area at the moment.

So, where are we now?

I can use any plain wall for a black or near black background or any other colour using lights or post, my Kate textured for the same and my environment blurred out or used as a stage, all based on context and subject.

I don’t feel I will over do backdrops. They are great for some, but just have not clicked with me yet. I think lighting will be more useful, so more tests, hypotheticals and out of the box thinking, but I may pick up a cheap Neewer grey/blue 5x7 or the Westcott in the same so I have a guaranteed wrinkle free option and maybe another Kate in a less overtly textured pattern. The Chroma-key may also be useful for video.


More Butterflies

Three takes on Butterfly lighting.

The 42” white reversed with diffused flash at full stem, 45 degrees to the front with a 60cm silver reflector under the chin. Very soft and even, but quite inefficient.

The 42” as shoot through with diffused flash at full stem 45 degrees to the front with a 60cm silver reflector under the chin. Slightly more brilliant/harsher, about two stops brighter.

The 4’ octa, overhead and feathered backwards with a flash fired into a silver reflector under the chin. This was brightest (almost ran out of options to reduce power), most dramatic and (physically) intimidating, but has the nicest skin tones. It also had the benefit of a single clean catch light.

Of particular note is the hair highlights, or in the first case, lack of and the more three dimensional look of the 4’ octa.

First option for dreamy-flat, second for work horse-safe, third for the most dramatic-pro look.

Also, a little try out of a blue background using one of my white walls.

Neewer 480 RGB at about 90%.

Something To Explore

Using the EM1’s in super high res mode (80mp RAW), gives me some obvious advantages in resolution, maybe some tonal and gradation advantages, a known ISO advantage and maybe, just maybe a feeling of an image being “bigger”.

The big issue is, no flash, becasue the mode uses silent shutter and pixel shift.

I just ordered what seemed to be a great bargain, maybe one with a catch or two, but theoretically a solid increase in constant panel lighting for my studio.

I picked up two NL140 Neewer LED panel lights, based on (1) seeing them cheap at about $63 for 50w units, (2) finding a good and honest review of them and (3) seeing that the price was under half the Neewer retail and (4) the seller was a rare ebay 100%-er. I have never seen these before, but they seem to be tapping into the newer LED designs.

They can run on a V-mount battery or an NP to V-mount adapter, but I won’t bother for studio use.

The next review I watched, after the purchase was despatched showed an easy fix for a common problem with these blowing out a capacitor regularly, but it was an easy fix and for studio use, it should not be an issue (my studio power supply is voltage regulated to protect the computer). My gut says these may be a double edged sword, a bit of a new and flawed but potentially potent design, but for my uses, I will make them work.

With these, I have roughly 350-450w total, constant light, with 120w allocated to the studio specifically (the two NL’s and a 216 mini panel) and the COB lights and 3 battery powered LED panels for field use. This is plenty (actually still too much) for my little space, so it should let me shoot in high res mode with the EM1x hand held or the EM1 mk2’s from a tripod.

Butterfly's Are Paramount

Butterfly or Paramount lighting is a style I am drawn to, so I gave it a go.

A 4’ Godox octa just above Meg* and a small reflector (soft silver), with a hand held flash fired into it for fill. The flash units were at their lowest settings (1/128), with the maximum zoom width setting and dome diffusers attached to weaken their effect and still they were close to too much. The fill created the catch light, the diffuser is a nearly invisible soft blob at the top. I also tried the K & F Black Mist.

Gently, almost gingerly in search of a signature style to call mine (can’t force it, just follow the little voices until it feels right), I also went back to an old favourite, the square format, which I think for portraiture is the “right” shape.

Horizontal has the advantage of camera “rightness” and always allows cropping, but tends to enforce rules of composition, while a vertical or portrait orientation definately forces compositional realities and can feel cramped and “done”, while a square lets you frame as you wish within the unbiased frame after being originally shot as a rectangle. It is directly opposed to the wide screen 16:9 or wider used for video, so it seems I am drawn to extremes.

I will try this again with the 42” brolly in both shoot through and reversed configurations. Straight through is apparently close to a beauty dish in effect, a butterfly favourite, but the reversed may add the extra softness I want without losing brilliance.

*

*Something I have noticed since setting up the studio is, nothing is wasted. I stripped a plastic thread on one of my favoured Bowens S-Clamp flash holders trying to hold the huge octa’s stem, so I employed one of the older slip-on types, the ones that are to blame for several dropped flash units (along with me I guess). These use a metal on metal locking screw and it held. Nothing wasted.

Happy Birthday Daisy

Daisy is three (young adulthood in dog years).

Big day for us, probably not her (she lives in the moment, more than for the day).

She clearly dressed up for the occasion.

Her sister, Lucy, aka “Luce the Goose”, aka “get down off there”, aka, “Big Gooner”, is a touch older, but unfortunately we are only guessing, so in lieu of a “Horses Birthday”, we gave her December 1.

Lighting, The Big Question

What I need to ask myself now, with so much at hand, is what is my best quality light?

This is of course a tough question to answer with only one answer, but if I am tasked with creating the best possible light (light source, modifier and application), what would that be?

I like certain mods for their versatility and I have a plethora of light to push through them, especially for stills (theoretically 7x gn 60 flash units and about 350-400w of constant light via 3 Cob and 6 LED’s of various types), but quality over quantity is the key.

Rory Lewis is a good example, a photographer I discovered recently, he can produce perfect light using just a decent light and a mod as simple as a shoot through brolly, 80cm soft box or deep silver reflected. I have these and more, so surely I can produce something in the same class.

From a big 4’ Neewer soft box with no extras.

To be fair, I have only been tooling around in this arena for a while (if you do not count a stint years ago as a pro’s assistant), probably getting lucky more than I should, becasue I know that doing is much more productive than reading and researching, but this has already given me a preference for the softer effect of reversed white umbrellas. These are inefficient, but reliable with smooth and gentle highlights.

After my tests recently, I became aware of the two distinct looks to mods. They are either gentle-soft or run hotter-contrastier. Even some of the more open mods can be hot, and some of the smaller ones can produce softer, smoother looks. Stem position, mod to subject distance and type (bounce or straight through) are the things that matter. One brolly of a decent size (42-52”), used at different distances, angles, reversed or as a shoot through, can be all you need and if a diffuser and grid are available, you have pretty much every base covered.

What I am chasing is a soft, clean brilliance, something I have noticed more from shoot-throughs or silver brollies. Maybe the hot spots I have been trying to avoid are there the brilliance lies?

This is the favoured look at the moment.

Maybe this is the better one to chase.

The options are many, too many probably, but in my rockery, no stones are undisturbed.

The 7’ white brolly (1). This is the Annie Leibovitz super soft look. I have used this for a group shot pushing two flash units into it reversed over an area of about 15x8’ and it produced a soft and even look, but it was flat and a little lifeless. It can have the potentially massive spill issue controlled by a light weight black blanket laid over it. Video or stills.

The 7’ silver brolly (1). This one has the interesting effect, being one of my more “open” or shadow reducing mods, but with some brilliance and it’s about a stop or more efficient than its softer partner. Like it’s companion, these are of limited use, being too big for some environments, stand limited and very easily wind effected. Video or stills.

42” white brolly (2). These are my favourites, probably my “desert island” mods (and handy in the sun and rain!), doing the job when others have been too complicated or difficult to work with and are largely responsible for my preference for reversed brollies over shoot through. Light spill is an issue, so they tend to get used in larger spaces. I used these recently in a 1 mod shoot as shoot throughs and they worked well. My hunch is, these will be my studio go-to’s but as shoot throughs. Video or stills.

4’ octa-umbrella soft box (4). I have two Neewer and two Godox in these, both a little different. They are broad, efficient, versatile and multi faceted. The two types are different, both in depth and finish and I have a few ways of deploying them. They can be used as straight, deep silver brollies (potential?), single or double diffused and gridded. For travelling jobs, these will be ideal as they are more resistant to wind and I really want them to work, but the jury is still out on them, but I am confident one of their forms will be ideal, with others to fall back on. Video or stills.

The 4’ used as a deep silver brolly, slightly feathered with a 50cm silver reflector for fill. I need more light on Megs eyes.

33” Neewer brollies (various x10). I have a ton of cheap little 33” brollies in silver, gold and white all bought in those cheap beginner sets early on, often to get the stands and I have to say, you could do worse. The 33” white is more neutral than the Godox 42’s and very similar in performance and the silvers are very good also. I have not used the gold ones yet, but it’s nice to have a warm option. Video or stills.

26” ArtDNA Soft box (1). This is a vexing beast. I had no luck using it with constant light as it was too intense up close and needed to be for softness. For flash on the other hand, it produced very nice light in comparison to the Neewer 4’ soft. It is also bulky to transport, clever, but fragile to set-up and small for the effort. It has a grid borrowed from the Neewer below, so directionality is good. The right hand image below is with the 26”, the left with the Neewer 4’. My preference is for the bigger modifier look, but …………. . This is only a stills option at the moment.

Neewer 24” square soft box (1). This one is similar in a lot of ways to the 26” above, so I use it ready to go in the studio as the non gridded version, although thinking about it, I should probably put the grid back on this one (done) as the hard sides may work better for control. These two mods are nice, but small. They work well in my small studio, but their annoying form factor and small size mean that will likely be that for them. Stills only as it does not fit any video lights.

Neewer 8x40” strip box (1). This wins the award for “least likely to go on the road”, being a right pig to assemble, but in the studio it will get much use. The shape is so easily controlled and promotes creativity, but I doubt it will ever be broken down in its working life. A grid would be good, but it can’t take one, so lesson learned. Not part of the master plan, more a creative problem solver.

Neewer 32” and 43” soft box umbrellas (1 each). These are both good units, but don’t add much to the equation. They are both umbrella types, so they can be transported easily and the 43” in particular adds another dimension to the brolly dynamic. I will likely add one or the other into a travel kit in case a windy outdoor application is needed, which being closed, they will be safer with. Too small for video lights

12x5’ white diffuser cloth (1). A huge sheet of white diffuser cloth, big enough to be triple folded, it is a real option for the “wall of light” effect and book lighting. It can even be pushed into service as a white backdrop with light coming from behind.

Reflectors (various-4-5). Not light mods as much as post lighting problem solvers, reflectors in many sizes are the first fill/light quench option and the second choice for diffusion. I recently shot some video with my Neewer 480 RGB through a 60cm one and it worked well.

40cm LED soft box (1). New today, this may make an LED panel (480, 660, 2x NL140) an option.

Ok, lots.

Right now, knowing what I know, what would be my one choice?

My heart says 42” as reflected. Hard to control but so nice and gentle and control is possible using a black blanket over their back.

My head says 4’ octa’s as work-horse mods. Are they the “ones that can do anything” mods I hope they are?

My gut says 42” as shoot through. The “B”option to the first one, but harder to control.

The reality is, exploring all the options and variants just one mod can offer can be the work of years.

We will see.


Mentors

You may have noticed I mentioned Caravaggio and Rory Lewis in my last post. One of these is an old influence, the other very recent.

Mentors and inspiration are important for any creative endeavour, but you have to be aware of the difference between a true mentor and an infatuation.

I stumbled over Rory Lewis as you do googling something like “one light portraits” or similar, but what ever, his style and inspirations really resonated. Gavin Hoey, Jeff Rojas and others are the usual culprits, but Lewis stirred something new in me.

His lighting is simple, as is the gear used (although cameras are usually top end full rame or medium format with matched lenses-why not, when you only have one job) as staying portable and working fast is a priority and he does not drive. I must admit, pinning down his gear has been a little difficult, with comments like (under “a essential my gear” post), “I prefer a deep silver brolly”, but I have looked at a lot of his behind the scenes posts and never seen him using one, almost always using a shoot through or occasionally a soft box? In another case he says he uses Canon gear, in others medium format.

Lastolite feature heavily, but other than that he really does not harp on gear, or lighting, saying he feels lighting is 20% of the job and direction the rest.

I am amazed at the quality of his work considering he often only used a shoot through brolly, maybe an octa or reflector, but little else.

One of his most interesting statements is that with the exception of specific past photographic masters, he never looks at other contemporary photographers work, developing his own style using only great artists of the past like Guthrie, Caravaggio etc, all exponents of clear portrait messaging and often stronger lighting.

Caravaggio has always intrigued me, being the most contemporary and photographic of the old masters.

It is no coincidence that my first studio session with Meg and Daisy, was against a black background. If the mark of a good portrait is to see the inner person (or dog), then I hope I will be able to do that.

I will try to find my own style, something that means something to me, but more importantly, to the subjects of my sessions.

So, Any Colour As Long As It's White

Well white it is. White top to bottom, side to side, all except the black floor.

So much for plan “A”, but happy enough to go with it. It’s only paint.

After painting my one intended white wall, my wife suggested I keep going with it.

The reality is, the tiny 8x10’ studio room looks bigger, brighter and cleaner this way and being small, I can control the brilliance with only a little effort (I hope).

For the longer right side wall I have a 12’ wide black backdrop.

For the left, I can use any of several 5-in-1’s ranging from 60 to 200cm wide or hand blankets etc as needed.

Pure ceiling white wall to wall. The yellowish tinge to the left wall is overcast day through greenery? The large backdrop is a 5x7 Neewer black/white cloth one that risked not being used (the outer seam is not super high quality so I have avoided folding and unfolding it too much), but in the studio, it will be ideal.

From this.

A single diffuser, flash, reflector and backdrop. No light splash.

Another very cool thing is there is room for a book case just for photo books.


First Try Of The New Studio

A little set of tests, starring my my long suffering wife and intrigued, but not entirely comfortable youngest, Daisy.

Keen to reassure myself that an all white studio would not be a mistake, I went black and Caravaggio-like. The backdrop is a 200x250 Neewer black/white soft cloth collapsible backdrop, one of the many things that may get a go now I have a studio.

All shots were taken with the Pen F and 45mm at f2 to 4, ISO 200.

Nothing in the league of Rory Lewis, but a start.

A single YN560 IV at about 1/8 into a feathered 26” double baffle soft box with grid, with a small silver fill reflector off to the side only just managing a little rim light. Meg is sitting just a foot from the black foldout background.

The 4’ Neewer, with no fill.

Again, the Neewer 4’. Very soft, very muted and a touch warm.

Lessons learned;

The Pen F struggles to ficus without its assist lamp in poor light,

Reviewing inmages on the rear screen in poor light continually tricks me into underexposing, which all of the above were to some extent.

Everything I have at hand now has a use, either as a studio, video or general stills item. I had a lot of bits accumulated over the last two or more years that ran the risk of not seeing use. Now my oversized backdrop, in fact all of my backdrops, my many reflectors and several mods including a strip box, 24” double baffle soft box (those that did not already get added to the video equation), are now going to be utilised fully.

Crossings, Action Resumed

Waiting at corners is a good method to find where people accumulate, but crossings and walkways are where they mix and animate.

Hugs

In just one short day, in a COVID savaged city, I saw so many examples of peoples need for contact.

Where there is ife……..

Corners, Where The Action Is.

Loitering on corners is an occupation for a variety of careers, street photographers included.

It’s because, this is where the action is and where it often stops for a moment or two.

Big Theatre

Along the same lines as a previous post on Mise en Scene, here a few more “cinematic” scenes.

I really love how cities shape light. The residents likely do not see it, just live it, but for a fresh eyed visitor looking for it, it is gold.

Unintentional Street Clown

Coincidence, humour or satire are often used for street imaging. I tend to avoid these as I feel good light and an interesting subject are enough, but even then, stuff happens.

Not my idea of street imaging, just a lucky (unlucky) coincidence.

More Studio Thoughts

Over on the tech page, I ahve outlined my studio aspirations.

I dont want much :).

I would like small space to feel infinately large, to have a brilliant light spac eor dark and moody one and i, knowing me, have to accomodate my many moods when it comes to colour and texture.

All in an 8x10’ space?

Wall colour has become critical (I am writing this while putting off the first strokes of white paint).

My thinking is this;

If my backdrop can be basically any colour based on a white and grey roll of paper/vinyl/cloth and C1 processing, gels or RGB LED’s, then I can create on that wall any mood. Texture is another matter, but I have other plans there involving separate panels.

If I then have a white wall on the right side and a dark (green/grey/blue?) wall on the left side, then all I have to do is modify one or the other to get a solid light or dark environment. For the right wall I have a 12’ Neewer black background cloth and for the left I have a selection of white cloth or panel reflectors.

The respective sides. The window light starts low right, moving up to the left by mid morning, so the white right wall will catch it.

If I am using both as painted, then one becomes the fill wall, the other, the negative fill wall.

Conversely, if I paint the whole room one colour (shade), then I will have problems when i want the opposite effect, needing to fill it all with white or black panels.

Ok, time to paint.

EM1x Rig Completed

The last bits of the EM1x rig are here.

They consist of a quick release adapter for the universal half cage, so I can now remove the EM1x by simply unscrewing the base plate screw and loosening the QR adapter, then just slide the camera out. This is just right.

A wonder of Camvate, Smallrig, Niceyrig and a little Neewer, it is mostly left-overs with a few needed parts.

A massive brute, but heavy like a pro camera and well balanced, especially with the weights attached.

Three leftover weights from my gimbal. They take seconds to add and make all the difference.

The camera is very secure in its housing, but it previously felt like I have to pull the whole thing apart to get it ready for stills. Basically from 5 screws to 2 and I only need a coin for a screw driver, not two sizes of hex key.

The final part, the quick release, joining the rig top plate to the hot shoe. Without this i had to unscrew two small hex nuts after taking the handle off.

Another nice touch is that the 197mm long side stem is now a perfect fit for this rig.

The Smallrig mini top handle, originally purchased as a protective side handle for the G9 has been replaced by a wooden handle (the one I bought the Camvate half cage with), but its true purpose seems to be here doing exactly what it as bought for, protection for a screen and a contact point for the AF by touch screen, hand.

The two Camvate cold shoes are just for options. They are very tight fitting, so I will have to double check anything I might want to add on using them (cannot take a Smalllrig heavy duty ball head or Neewer plastic shock mount, but fine with most else).

Even the upside down printed Camvate plate has a use. This cold shoe takes the Zoom F1-SSH6 mic combo.

The side-on profile is neat with no protrusions or left over stems.

I had mostly turned my back on Olympus for video, but recently a few things have changed my mind;

  • Processing the flat files in DaVinci is very easy and pleasant.

  • The stabiliser and heft of the EM1x are way better than the G9 except in static stabiliser mode, where the G9 draws even.

  • The colours and look add another dimension (but needs 4k).

  • The touch AF is very reliable as is the auto WB. The WB always falls within flat grading range.

  • I can now match the look of the three cameras (EM1, G9, OSMO) better after acquainting myself with DaVinci’s options.

The Real Advantages Of Being A Still Photographer

Still photography and videography are obviously different forms of related media, but after a rocket six months of video adoption, I can honestly say that on the whole, the stills shooter has the easiest road to travel.

Formats;

Shooting in RAW is daunting for some photographers, but seriously, the power so easily at hand is a real gift. I almost never have to worry about miss-cued exposures or white balance in my stills work and with the quality of light meters, even on my lowliest cameras, there are few genuine stuff-ups. To be hinest the dynamic range of an MFT sensor and RAW, I can almost always retrieve something workable.

Video has the dual issues of multiple formats on several levels and for most of us, limited file flexibily. Just to add salt to the wound, different brands all have their own formats, that are actually different in processing response and processing is equally varied and more complicated than stills.

RAW to jpeg with all the quality you would want.

Delivery;

This brings us to delivery, or the end process and what it supplies you or your client (or self). Single images, often single shots taken from sequences or even entire shoot are simply a matter of open minded perseverence, adaptability and practice. Being creative is often just a matter of remembering a different lens, bending down or changing angle and the whole time you are thinking/looking/moving, you are not expected produce work, just the moments you commit.

Video delivery, like formats and processing has multiple options, so choices have to be made. Unlike an still image, not every format plays on every device. On top of that, I cannot upload the huge files, my Dropbox would hate me, so I have to hand deliver them.

Lighting;

Fast glass with fast AF in all but the most extreme circumstances will get any user of any format pu tof trouble. You also have more than enough pixels to shoot wide and stabilisers for single sots are getting better and better. Time it well and even a 1/8th of a second shot of an animate subject can work and of course that may come from a dozen or more images. Flash units are powerful for little outlay, super grunty for a little more. It is possible to overpower the sun with a $100 flash unit and modifiers are all the choices videographers have and many more. The assumption is also that these lights will be daylight balanced unless gelled or modified otherwise.

Video, being constant requires strong, continuous and colour corrected light. Strength is not an issue unless colour is, then the big, cheap flood lights builders use become an issue. Modifying these lights is also harder.

Easily balanced with a naturally lit still image, but hard work for video.

Storage;

I can chew through 5-800 images in a big project, which usually takes up the bulk of a 16gb card and maybe some of another. These cards are often base grade as I do not need more. A series of 20mp RAW images may tax the buffer, but I do not shoot that way.

After editing, I often ditch at least half of these images, storing the better original RAWS for later and putting the submitted ones into the cloud. Even with my relatively slow internet, they go up fast enough. I once lusted after a jpeg work flow, likely to be a Fuji based one as they at time produced jpegs that were close to their RAW images (sometimes better in Adobe), but I could not break the RAW habit.

Video eats up capacity and requires speed. Even 1080 with a reasonable bit rate and colour depth can be taxing. A reviewer of the new GH6 worked out that a full wedding day shoot with two cameras and backups at 900mb 6k would cost him $8500us in cards!

Quality;

20mp does all I need. I have supplied images for a billboard, several 6’ wide signs and a minibus, all from 20mp MFT files and all were cropped to some extent. Quality is not an issue these days. Too much quality can be, but no real risk of falling short in a techncal sense.

Most of us only need 720p for net use or 1080p for better, but the call of 4k and higher is getting stronger. The irony is, video needs less improvement in resolution than stills, but tends to be more obsessed by it. Ironically, we often chase the “cinematic” look, which requires sharpness reducing filters! Good video seems to walk a fine line between realism and objective quality. Too sharp and it is too digiatl video for most people. Too soft and it looks low grade.