A Mindshift

The Mindshift/Thinktank Photocross 13 eluded me and at the time it was a little disappointing because I really felt it would be a problem solver, but on second thoughts, maybe it was, like a lot of things, a win in disguise.

Originally I wanted a bag that could take my sports kit, but realistically that may have been unworkable. The PC13 would have still struggled with gripped bodies (EM1x), even M43 ones, so I would have had to break down combinations, defeating the purpose of the exercise and not really achieving anything over the LP Pro Tactic 350 or other options (Domke F-804).

The Turnstyle if it was compared looks to be the next incremental drop down in size.

Looking at my day kit, trying to change up the heavy bag on the shoulder dynamic, I decided instead to use my TT Turnstyle 10L as the base, hopefully working from the sling “workbench” with ungripped cameras and a few lenses. The F-2 Domke is nearly perfect, but it is still a shoulder bag.

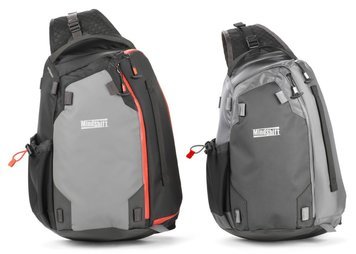
The Photocross 10 kept coming up a few times when I went looking for alternatives and it has a few benefits compared to both the PC 13 and TT 10.

The mouth is wider, so easier to work with gear and maybe even a two camera kit again. The TT10 is surprisingly big inside, but the two ends can get a little cramped even with the zip fully open. The PC10 is more of a three sided-flap opens forward setup rather than a single sided “gaping mouth” zip. The TT is a better travel bag, a little more secure, but the PC may be the better work bag.

It is a little bigger than the TT, squarer and deeper. It may even be big enough to effectively do what I wanted with sports, a job the TT10 is almost big enough for, but a touch more room (especially height) would make a huge difference. When I did the basketball recently, the TT10 easily took my spare lenses and accessories, even taking my second body, but not in ready-to-go form and it was a little cramped when I went to add a flash.

One helpful reviewer compared the PC13 to a Domke F-2, and they were basically the same volume if very different shapes. This means that if the PC10 is 80% of that, which it looks to be, then it should take my cut down kit, maybe even a smaller sports kit*.

The other small benefit, apart from the fact it is actually available, is that it is a fair bit cheaper. About $70-80au on average. If I love it, I can then gauge the chance of the bigger bag working and I can get some idea of the weight when loaded, so the PC13 may come later.

*For football I intend to use the 40-150 f4 instead of the f2.8, which will change things.

The Mythical Superiority Of Full Frame

This one will never go away.

There is no doubt from my persepctive* that this is just another of those phurphies told by an industry bent on selling more/bigger/newer cameras, but I know there are a few of us who disagree and can prove it if needed ;).

Shape

First, lets look at the history of “full frame”.

When the first makers of compact and portable stills cameras went looking for a film stock to make a “miniature” camera format, easily sourced 35mm film stock was the logical, the only real choice. It was first used as the movie shooters used it, but vertically being the later named “half frame” of 18x24 4:3 ratio. The later Simplexpresented a pair of options, one of which resulted in an odd shape the wider 3:2 ratio 24x36. The 3:2 ratio was never popular with print makers, magazine editors or even frame makers, but it was bigger which matterred when quality was premium. Leitz then adopted the horizontal format officially and that cemented the 35mm 3:2 format into history.

Almost all formats that came before were squarer, but this did not stop 35mm “full frame” from shoe-horning itself into the mainsteam market.

Fast forward to the dawn of digital and the term “full frame” became known as the professional format, almost promoted to a status of mystical superiority. This was because the early formats of digital, forced by technical realities of making sensors, were smaller, but also some common sense prevailed and a few deliberately went away from 3:2 full frame.

Canon and Nikon as the main players were never happy relinquishing full frame as their pro offerring**, but the reality was, the economy of sensor manufacture guaranteed full frame sensor cameras sat at the top of the tree, further reinforcing the perception they were the one true format, the format to aspire to.

Some companies looked at the whole thing from scratch, such as the 4:3 consortium, who decided to (1) go back to a better shape for print and at that time screen and (2) chose a sensor that actually made lens design easier. It was easier for them, because Olympus in particular had not much of a working legacy to support and Panasonic and Fuji effetively started their push here, choosing 4:3 and APS-C respectively as their primary formats.

While we are on it, I feel there are really only two true formats of choice, the square and 16:9 wide screen or wider. The square is convenient, equitable, expressive and logical, while the wide screen format is proven to make sense to our two eyed view of the world.

The 3:2 format is not as settled, crops poorly and forces a wide/tall choice that is often not satisfying or even convenient. The sensor is also too wide for good lens design. The designer need to cover a lot of width for a low content of height.

below are four crops (well three and an original). Which is best? Up to you, but the bottom two to me are more decisive, more poweful, the top two are much of a muchness, the 4:3 one though is more versatile.

When chosing a shape for my images I find the square is exciting and freeing, cinema wide feels “right” and a little epic looking. My standard 4:3 is convenient and less wasteful to make square, but 3:2 is a poor compromise of all of these. The reality is, 3:2 is not a shape enabler it is a shape forcer like square or wide screen, but more limiting. Interestingly, no one I have ever submit my images to has every noticed or complained about my squarer submissions.

My editors both at the school and the paper say the same thing, “shoot horizontal, so we can crop vertically if needed”. Almost all the templates we are forced to use still ignore 3:2 as the norm, often forcing us to accomodate wider or squarer.

This image has enough height at the distance shot. On a 3:2 ratio camera a little more width would have been needed. It can also go vertical with ease.

Ok, so full frame, a format that is the current pro choice is by default an odd choice and has a mixed history. Remove nostalgia and legacy and it makes little sense to stay with it in the modern era. Like the mirror, it is a hold over from the past, a convenience, a habit, supporting the legacy of the two big guns in the industry.

Quality

Next, we need to look at quality or more accurately sufficiency.

What do we actually need? The line peddled regularly is we need more, but ironically, highly ironically, the only medium that needs more resolution in real terms is print, a form of image viewing that is dying before our eyes. When we needed quality in a print based world, resolution or raw image quality was elusive, creating a desire that was hard to sate, but now we have tons of quality and the software to fake it if needed, few ever do.

Taken from a half body (+) image.

I was talking to a friend the other day who is running a 60mp Sony, but never uses his images for more than screen viewing! The proper viewing distance rule has always been the limit that addresses print size needs. Print a billboard, then stand back and look at it. Stand close enough to see the dots that make it up and you cannot see the image. How close do you sit to your TV screen? You are dot or pixel peeking and only photo nerds do that to prove a pointless point.

Enough for most people is 2mp (a 1080p screen), maybe 8mp (4k), but even then, a good screen and good base image quality will defy you seeing any real difference at proper viewing distances. We are constantly looking at high res on lower res screens or the opposite, almost never realising the inherent compromise. Some of the sharpest images you see on TV are still recorded on 720 HD. Even 4k is only 8mp.

What resolutuon did the masters of painting have or the vast majority of film photos in the 20th century? They satisfied all our visceral needs at the time and are often revered now, because they were good in all ways relevant and the technical limits did not stop that from happening. The large format film shooter had enough quality to satisfy any needs, even in the 1930’s, but most of us were happy with less.

As we move through our image making history, we are sold the idea that quality is all. This is true to an extend, but what we need to remember is quality is a combination of things all supporting each other, not a single number or value.

Ask yourself this;

If M43 or crop frame are inherently inferior, then why would any company, especially one with 100 years of innovation and excellence behind it stake it’s whole future on these formats? Why indeed would a photographer who was working in a camera shop with all it’s buying advantages buy into that system and then, with the opportunity to re-think their path, choose it all again and go even deeper?

One day a few years ago I decided to test my Fuji and Olympus cameras and lenses against each other with the intention of choosing between them in the short and longer term. All was going fine until I discovered, after a lot of normal sized viewing, that the Fuji images were actually taken as small jpegs (amazing jpegs being a Fuji thing, so that bit was no surprise).I had this set to take some web images for ebay. I had not noticed even at 8x10 print sizes, that the Fuji files were tiny. Super sharp, colourful, but tiny. One of the main reasons this went unnoticed was my determination to look at the images fairly, using the 29” screen of my Mac without peeking closer and a decent print as the gauge. Turns out the Fuji files just filled the screen with little more to offer, but were fine for that.

Contradictions are plenty. The mobile phone industry and even most full frame makers are quick to sell us on the benefits of their 1” sensor super compacts, their APS-C range or even the smaller sensors in their remaining compact cameras, but then they want you to believe that anything short of full frame is a compromise unworthy of a professional.

From 12mp on in crop frame, only printers or pixel peepers were dissatisfied. The rest of us could not tell the difference and the customer/client/employer usually does not care. My sisters favourite image I have taken for her was on a 6mp crop camera and she always comments on the “quality” of the image.

Search the internet for examples of people "fooling” clients or viewers with their lesser gear posing as top flight equipment***. M43 passing as full frame, low res prints indestinguishable from high res. The list goes on and on, all made irrelevant by application and even time itself.

If the next great thing is needed to make future images, then what about everything that came before?

In the film era, format did make some difference, because lacking computers for post we could only enlarge like to like. Physics at work. Start with a bigger negative then you can enlarge to a bigger size, but even then, some of the benefit of the larger formats was lost due to the difficulty of making better, larger format lenses. The Nikkor 55 micro blew away the standard 80mm Hasselblad lens for actual resolution measued in lines-per-mil, a lens that in itself had a near perfect reputation, but it relied very much on the bigger format for its raw quality.

Convenience and Empowerment

I can go on forever about the massive size difference between my M43 lenses and their full frame equivalents, but lets look at this seriously.

The squarer M43 sensor is a lens designers shape of choice. A square sensor matched to a circular lens shape makes the most logical choice, so closer to square makes more sense than not. This means the sensor offers more useable area for the design and even smaller lenses.

Not a choice for me. The newer Olympus is at least a match for this well respected war horse and the rest speaks for itself.

The reality is if they went with a half sized 3:2 ratio, the sensor area would have to be even smaller or the lenses bigger. The lens mounts on M43 cameras are quite relaxed, in comparison to some full frame ones anyway (the Sony mount actually clips the sensor corners). Nikon has gone super wide with their Z series cameras, but that is again partially because of the shape of their sensor. They could actually squeeze a 4:3 medim format one in there also and may intend to.

I can realistically carry a 600 f4 around with me in my day kit and regulalry have a 300 f2.8 at hand. My 300 f4 is a toy compared to most. There are examples with every lens I own of bigger, heavier, more expensive full frame equivalents, that are often optically compromised or are even more ridiculaously oversized to avoid that. Look at the Sigma ART series for example. Packing 2-3 of their FF 1.4 primes into a bag is no laughing matter, but in M43, it is not a big deal (although they are bigger than most M43 lenses as they can fit APS-C also).

My cathartic moment came when I was showing a friend my Canon 35 f1.4L and my Panasonic 20 f1.7. The size difference was drastic, but I knew that my images at that time (5d mk2 vs EM5 mk1) were effectively the same, the Oly often winning on speed and focus accuracy and always for convenience.

Would I, knowing what I know, sacrifice my current flexibility and freedom for the assumed, but mostly un-provable advantage of full frame quality? No way.

This file is a crop from the image below. Taken on a tiny, relaitively cheap zoom acting as a ff 300 f4 equivalent, it is more than enough for any uses, even without aggressive post processing.

I work with two photographers who omly take a small part of their FF kit with them on a job, because the whole lot is back breaking. I cannot help but wonder if they miss opportunities by leaving things behind. I have a comprehensive kit including 18-300 FF equivalent focal lengths in zooms and some fast primes, two cameras, video and flash accessories, all in a bag that would only handle one of their bodies and an attached lens. I still manage to complain about weight!

Real Benefits

The most often sited benefits of full frame compared to smaller formats are better high ISO noise control and shallower depth of field when needed. These two really wrankle and are the foundation of many full frame users feeling of superiority and non full framers sense of injustice.

Depth of field is a creative tool, but who is to say one format is better than the next. If you want super creamy, super shallow depth, the difference between M43 and FF formats is not going to make a huge difference.

For a real change in depth of field try large format with movements! The rules of depth of field are based on lens magnification, aperture, distance to subject relative to their distance to the background. Basically, the same lens on any format will produce the same DOF, but will be effectively different in practical focal length. There is a lot going on here and relatively small differences in sensor size, determining actual lens magnification, is only one small element. Even a compact camera can achieve very shallow depth of field if used well.

Even at effectively 600mm at f9 on a full frame, there is not enough depth of field to get all the birds sharp. I rarely complain about having too much depth of field.

I find professionally, a little more depth of field is always a good thing. I can fake less in post, but not more. I can use my f1.8 lenses wide open more often than not, gaining the benefit of their light gathering power without worrying about stupidly shallow depth of field.

This brings us to the second point, noise at high ISO settlings. I will go on record here and say I believe software will kill this monster way before sensor size make any real diffierence. I can regulalrly use ISO 6400 in my work, which is more than enough, with little fear of dissapointing a client (they never seem to notice). There is a balance between the quality of the latest M43 sensors and good processing.

Add to this the above mentioned depth of field advantage and I can shoot two ISO settings lower than a full frmae shooter in the same situation. Sure the Full framer can buy the same focal length and speed and gain those ISO settings back, but can they?

A full frame pro body and 150-200, f1.8 to f2 lens would come in at $10-1500au+ (if available at all). The closest I have seen is the Canon 135 f2L, a great lens, but matched or actually beaten by the Oly 150 f1.8 (75 f1.8) at half the price and smaller. This on an EM1x comes in at about $3500au. The full framer can also crop if blessed with more pixels, but that often evens out the advantage as 40mp+ drop to 20mp odd, the same as the M43 camera and that resolution advantage you paid for is lost.

ISO 25,600 properly exposed with a quick trip through C1 and ON1 No Noise. More than just a rescue mission.

Relying on a full frame camera’s sensor and running the files through the same old soup is fine, but why limit yourself to using just the sensor size? If you do go the extra yard, then how much better is sensor A vs Sensor B? When you look a little deeper you see that the world has changed. We can all get enough from a lot less. I have seen amazing results from the latest phones.

Full frame has it’s advatages as does any format, but the relentless push for it to be the sole format for small cameras seems one eyed and pointless. To me it just seems to be the middle ground of the range of formats available and like many middle points, it is a compromise of ideas, master of none. Sometimes it forces a larger dynamic, but not add a decent enough jump in quality.

If the ability to shoot good enough quality for a fine art grade 16"x20” print from a well treated ISO 3200 file is enough, then M43 will do fine, maybe more than enough. For screen filling, even less is needed. Before you go and get that monster sensor camera with 30+ MP, and a lens stable to match, consider what you are actually going to use it for. It may be that less is more.

Just my take.

*20+ years working in camera shops, 35+ years using cameras of all formats and media.

**Canon never made a red ring lens for APSC, Nikon never even fully fleshed out their lens offerings for crop sensor and Sony still under sells and supports their excellent APS-C cameras. Ironically, I found many of their older lenses performed much better on crop sensors.

***Luminous Landscape have plenty, as does the Lens Rentals blog, Ming Thein, who shot a Rollex commercial with a 1” compact, etc, etc, etc.

Can It Be Done?

I am in a funk with photography at the moment. I am working through it, but still have a way to go.

One line of thought is address uncertainty with a review of processes and gear.

What do I use, what should I use and how do I use it?

What I use currently is a good and sensible coverage which forced a few new lenses in specifically to reduce weight. This is designed to handle anything, to be the swiss army knife or boy scout kit. Safe.

G9, EM1 mk2, 9, 17, 45, 12-40, 40-150 f4, flash, Led, mic.

What I should use is the gear that inspires me to shoot my way.

So the question is, if I was shooting purely for myself, what would I use?

Wanting to avoid flash, preferring single focal lengths for clarity of vision and having a depth of field advantage, I would use my fast primes for shorter work. This is less logical for longer lenses (although the 75 could do most things), so my f4 zoom usually, then the 75 for known poor light jobs.

Could I function with a single EM1 mk2, 9, 17, 30, 40-150 f4, an led panel all in a Think Tank Turnstyle 10?

The story telling 17mm just gets the job done. Why clutter that thinking with a zoom?

This is basically my travel kit, my “seeing it my way” kit.

Effectively weightless; 9, 17, mic, led.

Very light, but of substance; EM1.2, 30, 40-150 f4.

Bags.

The Turnstyle 10 is small, but can take this kit with room and the outer and inner pockets will hold the other stuff I need. It is even weather proof.

Maybe the Tokyo Porter or waxed Domke f3x?

What could go wrong?

Cameras break down, which is always a possibility, but the other two togs go with a single body and I would have spares at hand in the office (maybe put one in the car in case). I use two cards so the first level of failure is covered.

Not enough coverage? I can go 18mm FF equiv, 16 is my widest, which requires a zoom, but if 18 does not do the job, should I be taking the image anyway? Remember, my images-my way.

Not long enough? This is rarely a thing, because I know the 150 can be cropped in to crazy small frames for print media (6-800mm eq).

A 150mm lens doubled by M43 then cropped into about a 700mm FF equivalent. Fine I feel.

Too dark?

If f1.8 or f1.4 does not do it, then the LED can add some light or maybe again I need to consider the shot. We rarely shoot in total darkness and if I know that is what I am going into, I will swap the 40-150 out for a flash (same-same).

Video?

Unfortunately, there is not much happening here, but if it does, all I need to do is add the mic back in using a small bag attached to the strap of the TT. The G9’s do video better overall, but the EM1 mk2 in 4k is no slouch. The sound is better with a mic (always the case) and the 4k capture is decent, even good. The 1080p is ok, but 4k is better if I can do it.

So, relying on a single camera, 18-300 range and limiting accessories to what I actually use.

Maybe a thing?

I had the TT10 at work when I wrote this and no, it is not possible. The bag holds it all, but only just and is not convenient for fast work. The Mindshift 10 is on the way, which should do the job better.


A Little Test

A little test to see if you the viewer can see any real difference here.

No hints given what you are looking for, except to say, I have written in the recent past about the real differences between some lenses.

M43 blesses us with a large and well established lens landscape with a couple of things that you can take to the bank.

All the lenses, especialy the long ones, are relatively small compared to larger format kit.

The sensor size and shape was selected with lens design in mind.

There are a lot of giant killers in the range, whether they be pro or not.

Answer?

The 1st, 3rd and 5th images were taken with the multi thousand dollar 300 f4 Pro, which is large and expensive for a M43 lens, but a holiday in the sun compared to an equivalent full frame 600mm f4.

The rest were taken with the slightly better than kit level 75-300, usually at about 200-250mm where the extra width helps on a small ground and ironically the extra depth of field helps tell a story. This lens loves f8, especially below 250mm where it is nearly impossible to split from the 40-150 and 300 Pro lenses. At 300mm wide open, I can sometimes pick it….sometimes.

The give-away is the slightly nervous Bokeh on the Pro 300’s files with a hint of “ringlet” Bokeh (look at the roses in image 3 or the brickwork in image 1), but this is balanced with shallower depth of field for better separation .

The zoom was shot across the ground with a messier background, but still looks less bothersome (the out of focus sign on image 2 & 4 and wheel hub in image 6). The other benefit of the “sunshine” lens is it’s ability to tame strong contrast. I usually do less work to the files.

Rarely do things line up conveniently in photography, but this sunny day story teller is the perfect cricket lens (as long as the sun is out). It offers good compositional control, excellent contrast and is plenty sharp. I find on many smaller grounds, it is hard to get the keeper and batsman in the same shot or the bowler side on with a 600mm equiv and the 40-150 with tc is a little short.

For winter sports like AFL, there is no competition. It’s slow aperture and less assured AF mean the cheap zoom will go back into my home kit, but for summer sports, it is a regular option and is small and light enough to always be included.

Why?

I guess I have the best job in the world, so why doesn’t it feel like that at the moment?

After a solid six months of balancing two jobs and never feeling like I was doing either any real justice, I am maybe a little burnt out and realise that what I loved, the school, the kids and staff were what made me happy, not the photography, which is just the vehicle.

My role was special and quite unique, but had no security and no real future.

Working for the paper is a shift further away from where I want to be. It is photography, real photography, sometimes exciting, often useful, but rarely as satisfying. The imaging is fine I guess, although the nature of the work often forces me to go to a dark place, the place where images need to be posed! Add to that the constant chasing around for names for captions, which is all pervading and I often forget why I want to do it at all. My last week before holidays seemed to be one captioning nightmare after another.

I am AWOL in this process at the moment. If I do not turn up to play, then what is the point of the game?

I guess after a long six months of giving two masters all I have, sometimes seven days a week for weeks at a time, I am just done. Making decisions when you feel like this is always a mistake, but when won’t I feel like this?

Not enough attention paid to the important things.

My C.I.A mantra is actually more spot on than I realise and may eventually be my escape route or the harbinger of my doom. I need to work on it, to ponder the reality of my situation. I need to embrace or reject it. I need to trust my instincts. I have to accept the consequences.

We all gotta eat, but at what cost?

Control is key. I need to control the elements in my images much better. I am not accustomed to this at all. Control for me has been, pretty much for my entire life with cameras, all about watching and taking (graciously), not forcing or manipulating. I guess I do need to manipulate, but passively. I need to put the elements in place and take what I get.

Probably not what a politician would expect from a newspaper photographer, but this is what I saw. So shoot me.

Interaction or interest are the main imaging tools you need to make a posed image look natural, so my Control needs to facilitate that.

Elements in place, interaction naturally achieved. Also, there is nothing wrong with a smile.

Action is the interaction bit happening and angle the point of difference. No more static poses or flat wall groups!!! Use the scene, the provided elements and make it mine.

Use the elements in concert, change your angle, look for contradictions or supports, that is, things that are not expected.

Will I make it?

I know I can if I have to, but how much do I want to compromise my own standards to just do the job? Also, how many images per week am I ok with taking contrary to my own tastes in balance with those I can do to suit them?

I may need to drop a day or two so I can pursue my own ends, using the paper as my base-line, but not my everything.

I do not have to travel too far to find my happy place. I was asked to take a quick portrait of a friend and colleague Reverend Grace Reynolds (School Chaplain) the other day.

Managing to miss each other at every turn, we ended up in the same place at the same time for a New York minute and I found some passable natural light in a large room in the school dormitory. The resulting portraits were really just a hint at what is possible, but were satisfying all the same.

An unguarded moment between ideas and a reminder to me how powerful constant light portraits with silent cameras can be.

So I guess in answer to my own question, why not? Lots of worse things I could be doing.

An Argument For Prime Lenses

I like my lens stable across the board. There is honestly not one lens that is irrelevant, nor one that does not offer a point of strength. This may be weight, price, performance, versatility, power or simply that I like it, but no matter the lens, there is a point to owning it.

However!

My prime lenses, more often than not, take my best images. This has nothing or little to do with optical quality of zooms, it is all to do with the strengths of prime lenses and the way they make me work.

The Leica 15mm cuts out subjects better than any zoom I own.

Their first strength, lens speed (meaning aperture setting). All of my prime lenses (except my 300 which is a special case) are faster than f2. This means they have more depth of field options and produce consistently better quality images in low light.

his image had no depth of field issues, as it was shot on my 9mm, but the benefit of f1.7 allowed a low ISO image in an environment that usually eats light.

An example of this was my shoot today for the school. Mostly shot in the school gym or classrooms, the Leica 12-60 (G9) and Oly 40-150 f2.8 (EM1 mk2) did the lions share, but the couple of dozen images I took with the 15mm on a lowly EM10 mk2 stood out. Better sharpness (lower ISO and cleaner separation), better contrast (same, but also the lens), more keepers (same). Even a weaker camera did not stop it doing a better job, in fact this combo keeps surprising.

Their second strength is seen by many as a weakness, so bear with me. Using a prime (i.e. non-zoom) lens forces you to move your feet and think differently, but I have found this comes with a healthy dose of clarity of purpose. I grab a camera with a prime and feel instantly empowered by the single mindedness of the gear. No standing flat footed and just popping shots, it makes me really think about my other options other than simply changing focal length. I usually find myself moving soon after picking this more limited kit.

I also have the added problem of running two brands that zoom in opposite directions, meaning I need to create work processes to avoid operational confusion. To this end I have limited my standard working kit zoom lenses to Olympus where possible, using Pana/Leicas for personal use and the occassional school job. Even then, I miss the odd shot, zooming the “wrong” way. You can set the focussing to match, but not the zooming.

The power of a long and fast lens against a messy background.

Thirdly, but by no means least importantly, the Bokeh or “draw” of a prime lens is a predictable thing. A prime takes care of angle of view, then you get to know it and use the lens character to suit. A zoom has a lot of different personalities, making it much harder to predict and simply stops me from thinking that way. Generally the only predictable Bokeh behaviour zoom lenses have are negative and equally, most primes show strong Bokeh characteristics (not always, but mine do).

My 9, 15, 17, 25, 45, and 75mm’s are known quantities and are used to highlight their strengths. The crop of excellent zooms I have unfortunately do not work like that. They take great images, but they make me take them differently and in some cases actively avoid some backgrounds where possible.

Finally, their form factor generally aids in camera handling and general movements. This is not as clean-cut as above as some of my zooms are quite small, but there is no doubt, when comparing my best/biggest/heaviest zooms with my primes, there is a mile of difference. My largest fast prime, not counting my 300mm is the same size as my smallest pro zooms.

The reality is, I am never far from commiting to a primes only dynamic. The fact I already own some great zooms is the only hurdle. The convenience of zooms cannot be forgotten, especially for fast moving situations, but primes only can get the job done even gaining some of the above benefits, you just need more than one camera.

What would I use as my ultimate primes kit?

  • 9mm Leica the little ripper that only just came into my life. This fixes the wide end.

  • 15mm Leica the slightly technically better of the two semi-wides, but a more logical focal length.

  • 25mm Oly the nifty fifty that is closer to a 45mm, my ideal “one lens” focal length.

  • 45mm Oly my favourite regular portrait lens, but I would likely switch to the 42.5 f1.7 Pana for better close focus.

  • 75mm Oly the ultimate long portrait and indoor sports lens.

  • 200mm Leica with matched teleconverter. This is effectively my 300 f4 with another option.

Lacking the 200mm, I guess I can make do with the 300 ;).

After writing this today, I shot a pair of basketball matches with my 75 and 17mm f1.8’s with great results. the school gym I shot in is quite dark needing f1.8-f2 for 1/1500-2000th at ISO 6400 (slightly over exposed by a half stop for cleaner files).

Sharp, clean and well separated, this file could have been shot with my 40-150 f2.8, but at a 2 stop cost, so either a risk of some movement blur, some noise or a bit of both. No ON1 No Noise was applied, but would have made the image very high quality.

Embarrasment Of Riches (Cameras)

This is the bit where I do feel a little out of control.

Most of my lens choices were either needed in sme (justifiable?) way or were effectively costless due to kit bargains or trades with friends etc. Cameras are the working mechanisms of photography, so it is realistic to say your kits life span is measured in working camera lives, but still… .

(4 but really 1) EM5 Mk1. The cameras that started it all. I only have one reliable one left, three with various issues, but working in some way and if I could I would grab a new one, but alas, there are none. The sensor in the original OM-D is special especially in high ISO shooting. The review button was always oddly placed, they have no tracking focus (but are still fast in first grabs) and 3 of my 4 had a little crack in the rear screen housing that compromised their weather proofing, but otherwise, I love these little guys. They are all tired, they have earned a rest. I only the other day realised that almost all my Japan images were taken with these and processed in Lightroom. End of an era.

The two at the back are only good for home projects and require some well earned patience, the one in the middle, my first and a sentimental favourite is usually ok except the occassional “no-go” day and the front one, a later special edition, ironically sporting some tape over a broken lug hole, is the best mechanically.

(2) EM10 Mk2. These are my “shutter savers”, used for low octane school jobs, but also good travel cameras. The sensor is an evolution of the EM5’s but the images are a little different. I have found they shine with flash images at events and the silver one is my lucky camera for those times. Even though these feel light weight, a cheap ebay Arca-Swiss grip plate has added some serious heft to one and the original grip rounds out the other. The silver one also seems to really like the Leica 15mm, so I use this combo as often as I can. The black one has a slightly dicky card release spring, so I feed out by cable and they are both past worn in, so we will see.

(1) EPM2-mini. The little red Pen that shares the same sensor as the EM5 mk1’s has taken some of my favourite images and tends to go unnoticed as a street camera, likely due to its amateurish good looks. Matched to the 17 or even 14-42 kit, it is the shoot-from-the-hip option. This may be the last original sensor body I will have soon, so special. Really want to take it back to Japan for one last go.

The second generation. The two EM10’s looking very different due to their grip additions are lightly used and take nice images. The silver one has become a favourite, probably replacing the silver EM5 and constantly seems to be the hero camera of tough gigs (first ball, low light etc). The Pen F is my most prized, something special for me camera. “Little red” is my hip weight street specialist, particulalry well matched to the 17mm.

(1) Pen F. My personal camera and a modern classic. With a lean towards contemplative documentary style shooting, studio portraits and landscapes, it has its quirks, but these tend to force purer work flows, so all good. Wish it was weatherproof, but the bulk of the lenses I like to use it with aren’t either (75, 45, 17).

(2) EM1 Mk2’s were my workhorse cameras up to now. They did the lions share of work for the school, daily editiorial for the paper and some travel. The oldest one looks a bit rough, but that is clumsy tape used to hold the handle rubber down which started to lift a little and I got carried away. It is actually quite comfortable. With the lastest firmware the AF is close to as good as any EM1’s and I have found the gripped one is a very good pairing with my 40-150 f2.8. I like this also because the grip allows the strap to run from right top to right underneath. One card door is sticky some times and they have done a decent amount of work. The main issue I have with them is the lack of the little “nubbin” control.

The engine room. My day to day work-horse stills kit and video specialists (one of the G9’s is usually video rigged). The front EM1 looks a little batterred, but that is my clumsy fix for a slightly lifted rubber panel. The neaerest two are my day kit, the other two reserved for specialist jobs.

(2) G9. The Panasonic G9’s are in my opinion the best value M43 cameras on the market. Still in the top two Panasonics for stills and a competitive video option, they are very attractive no matter how you look at them. AF performance for sports is far better with a Panasonic lens on, workable but odd with Olympus, so I use an Oly for long lenses and the Panas with standard-shorter because they are very responsive in close. I trust the face detect AF and static stabiliser performance for video more than even the EM1x’s and they sit between the EM1x and the EM1.2’s for ISO and image performance. The sensor or processor are different to the Oly’s providing brighter and more delicate images, that can seem a little thinner, and the two brands respond differently to each others lenses. I often mix Pana and Oly gear for effect. The 12-40 is especially good for video, taming the sensors lighter look and adding proper MF.

(2) EM1x, this super camera is the top of the pile offering for stills capture, also very good 4k video and is the ultimate for handling, durability, AF and stabilising. My original EM1x is at the moment my primary sports camera usually mounted with the 300 (outdoor) or 75 (indoor), but I may soon shift the new/second hand one into day to day work and may well just use the EM1x’s for work. They are supremely customisable (except for video), even down to the AF configurations and the uncluttered layout which really helps with operation. The EM1x also handles electronic shutter issues (banding etc) better than the other cameras and the poor pre-amps for sound are improved over the EM1 mk2’s. They are big, but not overly heavy and the benefit of the extra real estate is genuine.

An imposing sight. These two are my sports specialist.

Too much? I guess so, but I am the sort of person who likes to be prepared now, not chase replacement gear as needed. My work horse kit is duplicated and interchangeable as well as offerring a dual video or dual stills combination.

The personal cameras are either surplus or kept as task specific units. The Pen F is a delight, but not practical, the EM10’s are ideal for static sork or travel and the Pen mini is likely to be my last of the early generation sensors.

The two EM1x’s are there for a reason. Built in grips and extra durability are not always necessary, but when they are, the best cameras are at hand.

Being A Little Stubborn, But With Good Reason.

I use Macs, Capture 1 and M43 and I choose these aware of the benfits and pitfalls of each.

Work has supplied me a powerful HP Z laptop, Lightroom and a full frame Nikon DSLR kit.

The laptops compared are interesting. The HP costs at least twice as much, is heavier and larger than my base model M1 chip Mac Air, but the Mac looses little by comparison. I bought a second one the other day as a backup for work, but both still come in under the cost of the HP. I looked at more powerful ones, but unless you go up a few cogs, there is little to gain and the M2 chip actually does some things slower! These HP’s are also showing a weakness in their USB-A ports, most suffering from some “twitchiness” after light use.

M43 for me is a fully evolved space. I am afraid of nothing! Sporting way too many options, I realise just how powerful the system is as I can often tackle a tough subject several ways. Even my most basic kit* can produce images that satisfy “fine art” me, not just “get it done” me. Going backwards into old tech full frame DSLR’s, with their monstrous FF lenses to get (at the moment) only about the same quality, does not appeal in any way.

Enough quality to crop aggressively without detriment. This is effectively a 300mm field of view from a lens the size of a full frame kit 70-200 short prime or cheap superzoom.

The original was fine at roughly FF 80mm equiv, but the ability to shoot wider and sort it later is a bonus.

Roughly a 400mm equivalent crop. Want to know the time? I can read most of the watch faces in the image.

Capture 1 vs Lightroom is for me a no brainer. Even with all the nice bells and whistles the latest version of Lightroom has, the Adobe base file processing is a step behind and looks to be quite heavy handed in application (user aside). I work with two photographers who are constantly fighting the noise vs sharpness game even with full frame files, but are tending to use the new subject and background select options regularly. Even files processed in C1, then run through LR with no processing (for our internal upload process) seem to take on some nasty artefacts and grittiness.

I cannot remember when that balance was a real concern for me with C1. I have literally never used the Noise Reduction slider in C1, using ON1 deliberately, but rarely. The programme even removed some of my concerns regarding the slightly softer files from my EM1 mk2’s, which it turns out was more of an Adobe processing issue and gave me a better understanding of colour accuracy, removing some of the Olympus warm/magenta bias from earlier models. I now treat my G9, EM1.2 and EM1x and older camera files equally for quality, but I do pay attention to their differing colour and the way some mesh with different lenses.

If I go into a messy space like a badly under exposed ISO 6400 file or just want the very tightest processing for a stressed file, I may drop over to ON1 No Noise, but otherwise I tend to leave both sharpening and noise reduction to the basic import settings and deal with my usual considerations, like my seeming inability to shoot a straight horizon.

My belief is the petty arguments between format sizes will be largely over taken by processing. The real visual difference between M43 or even 1” sensor images in almost all circumstances compared to full frame or even bigger formats has proven to be, time and again, not as relevant as some would think**. Processing is making sensor size and pixel count even less relevant. On one hand the “my phone is plenty” crowd are at odds with the “you need a full frame to be pro” mob, with M43 sitting somewhere in the upper middle. The reality is, even the 1” sensor is enough for most uses.

If the image is in focus, it rarely gets dumped for other reasons and even if it is a little out, some localised brushing-in of sharpening and clarity can often fix it. Lightroom and No Noise could work, but I would be using ON1 a lot more. In this case, I would likely switch to importing through DXO to Lightroom.

Ironically the thing that has empowered me to be in this place has been the technical quality of my images, not my disguising of compromises.

Need more realistically?

More is there. 600mm FF equiv hand held cropped to 400%.

*EM10 mk2 or EM5 Mk1 with the 12-60 Pana and 40-150 Oly kit lenses, which are the core of my travel kit.

**The now defunct Luminous Landscape site did several excellent de-bunking articles, one comparing a series of shots taken on a tripod mounted Hasselblad MF to a hand held Canon G9 compact (used for record keeping images). The photographer found it hard to split them so printed them out at decent sizes for his friends to look at and found they could not pick the difference. Another test had an 8, 20 and 50 mp comparison of Canon FF cameras. These tests always found that there was a measurable difference, but not a practical-visual one. Even visual tests of A2 prints at different print resolutions (72, 180, 240 and 300 dpi) have shown that 90% of people or more, even people in the industry, cannot see a difference unless they are told to expect one and even then they often guess wrong.

I Have A Problem

So, I have a problem.

It has been zero (“0”) days since I last bought a camera bag. No token or badge for me!

The Mindshift/Think Tank Photocross 13 has been on my radar for a while. I have the Think Tank Turnstyle 10 and it has been great, but it is just too small sometimes. The Lowepro Pro Tactic 350 (first model) is my least liked, but quite often used bag, so looking at it logically (ahem), it only felt right, necessary even to get the lovechild of the TT design and the PT’s size.

The need, yes lets get to the need, because there is one (seriously), for a bag that can be used at sporting events capable of carrying the 40-150 f2.8, 300 f4, flash and a backup gripped camera, that can be worn and worked from, even when I am running.

A shoulder bag is a no-go here, just too impractical and the LP back pack is similalrly annoying as I have to take it off to get at it, contary to the promise of the design. The LP is also regularly frustrating, often being a hair too small for most of the rigs I would like to put in it. It even struggles with a M43 gripped body standing up!

The P-Cross hopefully, and I have done enough research here to be sure, should be able to take the 40-150 f2.8 and/or the 300 f4 standing up in the bag, or even one of these mounted on a camera. I have photographic evidence of it taking the 70-200 and 100-400 Canon slr lenses.

The 70-200 in that config is about the same as the 300 f4 or 40-150 f2.8 with hood on. Looks like there is room to spare.

A small advantage of this bag also in getting into good habits with this type of sling bag. I will use the TT for travel, but fear I may forget to zip it before re-slinging, so a little in the field habit forming is needed. Occasional bags (habits) can get you into trouble, regularly used ones do not.

There is a possibility if this works as envisaged, I will end up using this as my every day work bag.

Ed. this bag has proven to be very hard to track down, so I am going to give it a miss. It is the right choice, but comes at a time when I really need to question any purchase in light of my opaque future plans. In reality I have several bags that can take the afore mentioned gear, I just wanted the most comfortable option.

Embarassment Of Riches (Prime Lenses)

Followng on from my zooms post, things get equally hedonistic in primes land.

I could (should?) probably work with primes only, missing only the Panasonic 200 f2.8 to fill the main hole in my game, but lets not get too carried away. My best working method seems to be zoom tele lenses and prime shorter ones.

9mm Leica. A recent purchase to reduce weight in my bag, this little lens is a gem. It handles everything I throw at it, never looks overly wide in use, is useable wide open, has gorgeous Bokeh and is nearly flare free (great for shooting into ceiling lights at sports games). It often feels like I am using my 15 or 17mm’s until I realise it is covering so much more. My preferred day kit is the 9mm with a standrd zoom or a pair of primes and my 40-150, so the 8-18 has been bought home for landscapes and school work. It is so light, it will also be added to my travel kit. Nothing to complain about here.

Did I mention it is also my best macro lens?!

15mm Leica. This was bought partly because I always wanted one and partly to replace the 17mm for work. I felt the slightly wider lens would be better and wanted the 17mm for my home kit. The 17mm has gone back to work, not because there is anything wrong with this lens optically, but mechanically it is annoying. On a G9 (my wide angle work camera) the aperture ring is too light and easily turned and the hood comes of very easily, but equally frustrating, the MF switch is very tight. On an Olympus camera the aperture ring is ignored and the Pen F, a camera I use in gentler situations, is far less likely to be handled quickly or lenses changed often, so the hood thing is fixed. As for AF/MF, I use the Pen F in Manual Focus usually, so the tight switch is actually handy. Only issues are mechanical and not insurmountable.

That Leica magic at work again.

17mm f1.8. The lens I literally had to buy, being the only practical option in the early days of M43, but it is now a cemented favourite. I use it for work again, loving the generous and forgiving rendering and solid behaviour. The reality is this lens is much misunderstood. I is accused of crummy Bokeh, but in reality it is designed to render long transition blurring, i.e. forgiving transitions and the other complaint is flat colour, but again, it seems to be designed to control hard light, both desirable street shooting features. There is a little flare, but little else to worry about.

Shot wide open and focussed on the mouth, this stable (get it?) little lens gave me long transition Bokeh and generally good behaviour. Few of my lenses would have been able to deliver such a seamless rendering.

25 f1.8 Olympus is my “nifty fifty” that actually isn’t. It really renders about the same as a full frame 45mm, but that is fine, because I actually prefer slightly wider than 50. This thing is the prime equavalent to the 12-40 f2.8, by which I mean it is razor sharp, but it is smooth, not brittle-sharp. There is a lushness and depth to its rendering and unlike the 17mm, my specialist street lens, it is a true portrait lens with smooth and modern Bokeh. Not a lens I warmed to easily, it has become one of my clutch lenses.

This is also my second best macro prime.

30mm f1.4 Sigma Art. A lens that offers something different, the super sharp Sigma is quirky, fun and powerful, but not super dependable. AF performance varies, flare can be problematic as can CA and colour is a mixed bag on some sensors. I get excited about it, especially for black and white, but also a little nervous, so I have stopped using it for work. A mixed bag specialist.

A good solid choice for studio work.

When it behaves, this is a very delicate tool…

….and very sharp.

45mm f1.8 a lens I have two of and once even had three. These were sometimes free in kits in the early days of M43 as was the excellent 14mm Panasonic in theirs, all to promote the benefits of the burgeoning system. Apparently sharing the same optics as the 25mm, I do not equate them as being the same. The 45 has a grittier and more neutral feel to me. It also lacks the same close focus power, but regardless, it is as reliable a performer as the 17 or 25mm lenses. This is always a part of my day, travel and sport kits. Only close focus disappoints and not by much. The Panasonic 42.5 is better there, but no great matter.

Never disappoints and it’s tiny form often goes unnoticed.

A consumate portraitists partner.

75mm f1.8. There is no doubt that this is one of my top two or three lenses. Great Bokeh, wide open sharpness and AF and all in a small, but solidly made package. I could drop a thousand images in now and all would be perfect in their own way, proving that this lens is adept at sports, portraiture, technical limit stretching and flying the flag for the design benefits of M43. To me it’s main distinction is it’s ability to be both razor sharp and lush-smooth, which bucks the trend with Oly lenses that tend to be either high in mico contrast and sharpness at the cost of some nervousness in their Bokeh or smoother but less micro detailed. Not this one. Is it perfect? Nearly, it has some detectable, easily removed CA wide open and even with it’s sublime build quality, it lacks weather sealing, a bit like the Pen F and not very Olympus-like. The effect of that is it has a habit of fogging up in winter, and it can sometimes render physically flattened looking files.

One day, I will have to print this just to see how big it can go. Not bad for a hand held snap near wide open.

Capable of producing this……

….from this.

300 f4. This lens was purchased on a whim. I had the money and my wish list lens was the new Olympus 100-400, but I decided to try the prime at the same time and even just tooling around in the shop and testing a firmware 1.0 copy, I could see daylight between them. I keep trying to explain to the other togs at the paper how nice it is to walk around a field of play and grab genuinely sublime 600mm equivalent images with blindingly fast AF and ridiculous sharpness, all without breaking my back, but they will just have to lug their monster 400’s around and take my word for it. It does have one weakness, occasionally nervous Bokeh with small “ringlet” highlights similar to, but milder than, the ones a mirror lens would produce. They are not image destroying but noticeable, so I try to avoid busy backgrounds with lots of little specular highlights.

That true super tele look. I have a few lenses that push the resolution limits of my viewing screen regulalrly. Other than ringlets, which only happen in certain circumstances, Bokeh is generally ok.

Not many lenses on this earth that can give you this…..

…..and this, from the same place (not kidding). I was seeking shade and got this snap while waiting for the riders to arrive.

Even useful for candid portraits, if you can back off far enough.

From my lenses I generally split my lens kits into the following.

Day kit; 9 and 17, 45 or 12-40, 40-150 f4 or 75.

Indoor Sport; 9, 12-40 or 25 and 45, 40-150 f2.8 or 75.

Outdoor Sport; 8-18, 40-150 (any), 300 or 75-300.

Travel; 9, 15, 45, 12-60 kit, 40-150 kit.

School/Home; 30, 12-60 Leica, 75-300.

Video; 12-40, 25 old, 25 new, 45, 75.

Fine Art mono; 15, 30, 75.

That’s lenses covered, now to cameras.

Embarrasment Of Riches (Zoom Lenses)

I have an embarassment of riches now, with several backups to my most used lenses and occasionally a backup for those.

8-18 Leica. Personally I feel no great need for a lens wider than 12 (24mm), but when working in this business your need has to be very specific to be able to honestly say you do not need either a very wide or very long lens occasionally. This has proven to be a brilliant lens to cover this range and was useful from day one. I am not a super wide convert, but this lens certainly comes through. It’s edges can get a little iffy at extreme settings, but nothing to stress over and it seems more obvious in video than stills (I owned the Canon 17-40L and got by, anything after that is a win).

Utter………madness.

Fine art grade snap shot.

I made no friends shooting real estate hand held with this lens. Apparently I needed to make it look more difficult…..

12-40 f2.8 the standard lens that needs a service. Ideal as a work horse video lens, but recently put back into my day bag and with use the “lumpy” sand gritted zoom seems to be easing. I love the images this lens creates, as it leans a little more towards a smooth-lush look. Only the slightly iffy zoom bothers me and the mk 1 version of this lens seems to occasionally have a few mechanical issues.

The three main advantages of this lens for work over the newer 12-60 Leica are (1) It owes me nothing (2) it zooms the same way as the 40-150’s, which for reactive sports is golden and (3) it has the constant aperture and manual focus clutch for video.

12-60 Leica bought to replace the above assuming it’s assumed pending mechanical failure, adding better AF performance on a G9 and a wider range. Every bit as good as the 12-40, though different, this lens is now my personal or “other” jobs standard. There is a little something extra to the Leica lenses. Hard to put my finger on, but something. I will never regret buying this lens even if the one above and the one below probably make it a luxury.

“Glowacious” as Brett Western would say.

It does shoot more than trees, but these really highlight it’s glow.

12-60 kit was to be the backup for the 12-40. It has been shunted aside by the Leica, but is still handy to have around. Like the 40-150 kit below, this is a stellar performer regardless of the price, that will likely be reserved for travel only. In all honesty, this would have been enough to backup the 12-40 Oly, but was bought after the Leica in a G9 kit for effectively nothing. Like many good modern kit lenses, the only thing to complain about are “on the label”, which are lens speed and build.

A very reliable image maker. Colour is less brilliant than the Leica, but still pro-grade.

40-150 f2.8 is the sports master. This lens is the most capable in lower light and takes the teleconverter without consideration. Without doubt one of my confidence boosting lenses, but also one of the biggest. I sold this to a friend for a year and am soooo glad he sold it back to me reasonably. Only reservation and this goes for many of the super sharp, high micro contrast Oly lenses generally, is slightly nervous Bokeh with busy backgrounds.

The reach and speed to handle basketball at both ends with one lens. Bokeh on this one is lovely unless the out of focus elements are complicated or fine, then they can look a little messy.

40-150 f4 has quicky become my work-horse tele, replacing the much bigger and heavier f2.8 model for most jobs unless low light is a genuine issue and even then, there is not much in it. I have seen no visible or mechanical difference between the two, except maybe Bokeh, where the slightly less powerful f4 lens seems to be smoother.

Just really sharp. The background trees with the f2.8 would likely be slightly softer, but a little more “nervous ringlet” looking. Even the M43 shallow depth of field sacrifice is tempered by the “snappiness” of the rendering.

Every little detail is there.

40-150 kit has got to be the best bang for the buck lens in the range. Seriously sharp and responsive, this lens is a no-brainer when travelling or for personal stuff, but I could also seriously use it for pro work (with a couple more for backup at $100 each :)).

Nuff said….

75-300 has gone from being my most used tele to hardly ever used lately, but Cricket season has given it new life. It provides the handy ff 500mm focal length and is very sharp at this length also, especially if stopped down to f8. I often cannot pick it from my other teles except that I appreciate it’s gentle handling of strong light and pleasant Bokeh. Cricket has less stressful AF and lighting needs, so this light-heavy weight is ideal. It is a little underwhelming to look at so I take the bigger lenses also, then pack them away confident I will get the shot. The rendering is most like the 12-40 lens, smooth and sharp. Slooow maximum aperture (something like an f13 at 600mm full frame equiv) but that strangely never holds me back and slightly plasticky build, but still seriously better than the 40-150 kit. This and the 12-60 kit provide a nearly unbroken 24-600mm range.

Sometimes 600mm is too tight and 400mm unnecessarily looses quality, so 500 is the best. Nobody ever noticed these files mixed in with the 300 f4’s! It is also better at handling high contrast than my Pro lenses which tend to run a little “hot” here and the Bokeh (such as it is) is very smooth.

Another ideal situation for this lens. How could anyone complain about such a nice image?

The lens I wish I could add here is the excellent 12-100, but I will put selling that down to a bad idea on a bad day and try to move on.

Next primes.

Backdrop Arrived With Mixed But Realistic Feelings

I ordered a second Lastolite backdrop, one that had been calling to me for a while, the Pewter and Walnut.

I chose this because the Pewter adds a slightly textured grey with a darker base, which appeals (it’s where I tend to take my processing) and the Walnut looked to be the most realistic looking of the antique textures. The Tobacco and Olive seems to be the favourite around the traps, but I do not like either for my style. I dislike either of the overly mottled and “brush stroke” looks. What I was after was the look of an old wall or worn piece of cloth rather than the deliberately textured look of the others.

First up, these are beautifully made. Unlike the cheaper collapsibles I have, there is no sign of ware points or even the potential for them (one of the bigger Neewer Black/Whites I bought for peanuts by comparison, came dirty on the white side and already had a small tare point forming, so galaxies apart). The metal is strong, but seems smooth edged and the seams are very well done. More industrial than hobby grade.

I have been tempted by the Kate version of these, but I and others have been stung a few times by their colour and texture accuracy as well as build and considering they are still 2/3rds the price, it does not seem a good gamble. The Kate’s are also rounder, which is limiting.

Compared to my Black/Grey the textured ones are all a little smaller and lighter, which is a plus. The B/G is a monster coming in at 1.8m on the short side and the difference is clear below. The two are laying on their sides and you can see a clear width difference.

For comparison, I painted my studio walls ceiling white.

The warm grey of the B/G is versatile and useful, but I really prefer a lightly textured near black.

Standing up you can see the subtle vignette on the Pewter starting to show. Note the wrinkles.

My standard processing from the grey is vignetted and dark, so the Pewter should give me more processing latitude without effecting the subject and the “perfect” smoothness will go.

The Walnut is a bit less appealing on first opening. I expected this to have been in storage for a while, because the business selling it has had this one on special by $50 and in stock since before I bought my first. I like this combo, but it seems to be less liked generally, so slower selling I guess. Flash will likely remove these wrinkles to some extent as it does with my Grey, but I would like them to at least drop away by half.

Wrinkles aside (ugh!), the texture is quite soft up close. This is normal and expected, but this thing is not cheap. I am hoping the images I take look similar to examples I have seen and the wrinkles drop out with a few days standing open. If not I will probaly have to steam them out with the iron and hanging it will help also.

Now, to be fair I have poor light in that room at this time of day, it was ery directional and I only just opened it out. After taking a shot, it looks closer to the samples I have seen than to the naked eye. Even while writing this and looking at the quick snap above, I am settling with it better.

The texture is nice and the vignette handy. The Rory Lewis video on this one is unfortunately not my favourite subject or look, so I have to make this my own.

I am happy overall with this purchase.

It adds options and back-up, especially to my portable set-up and when the wrinkles go, I will be able to manipulate the three levels of texture to the colours and hues I need.

Being smaller also makes a difference. the weight difference is noticeable (helps me grab the right otherwise identical bag) and I should be able to hang it on a smaller stand sideways like the Neewer 220cm, so I will not need the much bigger 260’s or my C-Stand). The 1.8x2.1 is so big, that even hung sideways it is too tall for my shorter stands.

Options as they stand;

Large Black/White, Black/Grey, Textured Pewter/Walnut (collapsible).

Medium sized 1x1.5m Black/White (collapsible).

Small circualr 1m Black/White (collapsible).

Huge 12x20’ Black and 12x20’ Chroma Green cloth (need a cross bar).

Medium 6x9’ Grey and 5x7’ textured Grey cloth (need a cross bar).

4 colours of mildly textured soft vinyl in rolls .8 x 2-3m long (need a cross bar).


Too Long?.........

Portrait lenses come in all shapes and sizes, but what happens if the only lens you have at hand is a 600mm?

Lots of detail, plenty of Bokeh and some working room, but maybe too much?

I had the chance to back off a bit, which helped. The reporter is about 6’4”, so over the shoulder is more star gazing with his interviews.

Even good for other portraits.


Beautiful Day

I covered a Triathlon today at the lovely seaside town called Bridport.

Bridport is known to local photographers for it’s collapsed jetty, which has drawn snappers for years.

Aside from this though, it is becoming one of the half a dozen premium beachside towns in Tasmania and this Triathlon shows proof of why.

A misty start.

A perfect early summer day is coming.

The gentle start of the Standard or Olympic class. These athletes will complete 65km of swim/ride/run in relatively little time.

Some of the old jetty remnants can be seen in the background.

Sprint class start. More revs. Jack Woodberry who will win this is #160 out the front.

Woodberry coming in.

Jack Latham, second in the Sprint. My 300mm is sharp, but I am becoming more aware of its slightly busy Bokeh.

Jack Woodberry, winner of the Sprint class.

Quality Enough By Far

Micro Four Thirds format is a curiosity to many, a guarantee of inadequacy to some, but a well kept secret to others.

I have not had any issues getting the images I need under pretty much any conditions with the following things taken into consideration;

Lenses are the secret. They are the power of the system, but are also the main requirement for best quality. this is the same with most formats, but the difference is the main thing to pay attention to and comes with a vastly reduced stress element. You need great glass and without breaking your bank balance, back or sanity and you can have them.

A 150mm f1.8 is a dream lens for a full frame user, but for M43, it is only a very well corrected, regulalry priced and sized 75mm f1.8. Yes you can crop the full frame camera, but all that would be achieved is an equal pixel count or maybe even less and do you need to?

Processing helps. Just running M43 through Adobe processing is ok, but to get the best out of the system, look elsewhere. Again, like lenses, this goes for all systems, but for Fuji and M43 especially, because Adobe does neither any favours, use a hungry competitor.

When I used Lightroom, the constant battle of sharpness vs noise was tiresome and limiting. In Capture 1 this became a near irrelevance, with ON1 No Noise as a sidecar addition, it effectively disappeared. I almost never see that “grittiness” so common with Lightroom from ISO 1600 or above and can confodently use ISO 6400 expecting good results, 12,800 even with care.

Be confident, realistic and aware. The call of full frame is strong, but do the math, look at things realistically and use the gear without reservation. Can you afford a 600 f4? If not, can you accept that a very good 300 f4, doubled by the smaller sensor, can actually give you 20-26 very sharp mega pixels of quality, that are in real terms indestiguishable to a full frame 20-24mp. Full frame systems emerging are starting to tackle the same thing backwards, providing us with slow 6-800mm lenses at a budget price, but sacrificing 2-3 stops of light. What is the difference, apart from the maturity of the Olympus and Panasonic systems and the real benefit of actual light gathering for the reach?

Embrace the benefits. The added depth of field, smaller size lens to reach/speed dynamic and the easier lens design advantage are strengths not weaknesses. F1.8 that acts like 2.8? What is the problem. In most practical situations, more is more. M43 was designed for a few reasons, not the least of which was lens design.

To make better lenses, one must either use a smaller sensor (smaller image areas are easier to make good glass for) or use a larger mouth to image surface area, like the the new Nikon Z mount. The M43 format is smaller, but squarer also, which helps.

Ever wondered why Sony needs to make huge front elements for their fast lenses, when Olympus or Nikon can make relatively tiny ones? The main reason is the ratio of lens mouth to sensor size. The Sony “mouth” is smaller than their actual sensor diagonal, the M43 and Nikon Z ones are larger, meaning full coverage of the sensor is easier to achieve.

In some cases, they can do the seemingly impossible. The f2 zooms from the original 4/3 system, the 9mm f1.7, the 10-25 and 25-50 f1.7 zooms. The average size to lens speed are all M43 benefits.

The advantage of gathering f2.8 light, but shooting at effectively f5.6 depth means misses are less brutal and less common.

Super shallow depth of field is fine for effect, but from a professional perspective, more is more. Try telling a pissed editor that you were looking to show of the beautiful Bokeh of your lens when half the subjects face is out of focus. Realistically, f2.8 is as wide as you need to go, but retaining f2.8 from f1.8 light gathering? What an advantage.

Smallow depth is still easy to achieve, but it is not a liability.

Recognise “enough” when you see it. We are all after great quality images and sometimes forget when viewing at 2-400% on a screen, that we usually have more than enough and that skill and application are the true measures of quality, not obsessive pixel peaking. To me, a pin sharp, fine art grade 12x16 print is the standard I aim for.

Portrait Photography Basics 3

Now the gear and background have been looked at, it is time to talk process.

Here is my basic process for artificial light portraits.

Step 1; Background.

Once the place is set, decide on the background. If it is to be supplied by me, it is usually the magnetic bracket on a tall stand, or my 8kg C-Stand if I can for extra stability.

This allows me a few options. I can use a Lastolite Black/Grey (no texture) or Walnut (antique texture)/Pewter (mild texture), a Neewer White/Black or even a cloth backdrop on a pole will hold. If a bigger backdrop or a vinyl is needed, then I will switch to a pair of stands with a cross-bar. This allows me to use clips for tension and takes more weight. I can even use a third stand for my widest backdrop.

For me colour is not too imortant, but texture is. I can change colour several ways, but texture is harder to mimic.

From here, the basic distances can be set. Usually about 4-6 feet from the backdrop is plenty, then what ever is needed for the subject to lens magnification and your cropping. Supply a stool if sitting is needed.

I always use manual flash. The main reason is consistency of setup and consistency while shooting. I know from experience that at ISO 200, f2.8 and about the same distances (2m to subject, 2m subject to background), I can start at 1/64th power for my “A” lights and adjust from there. At this power setting, I can shoot over 1000 images with a single set of Eneloop Pro batts.

Step 2; Key light.

I have waaayy too many options here, but at the end of the day, bigger and closer equals softer, smaller and further away is harder. My softest modifier is a 72” reversed white brolly with my double diffused 5’ soft box second, but anything from 33” up will work. Smaller than that is less soft, more directional.

Even softer is bouncing light onto a large surface then through a large surface, called “book” lighting, which is when my extra flash units will come in handy, because that type of light is power killing.

Shooting into the room supplies a mix of a black and location abckground. I use a single 42” reversed brolly for these shots 45/45 right side, which is forgiving and gentle and generally devoid of hotspots, but less brilliant or efficient than a shoot through (about 2 stops). For fill, I used on this occassion a single 480 LED panel set to warm and about 50% power, which helped me focus as well. My lucky camera for these balls is an EM10 mk2 and 12-40 zoom.

The key light is effectively you deciding on the look you are after. There are a lot of terms used here like Rembrandt, split, butterfly, open, closed, loop etc, but for now, just go with what you see. The basic and I mean “average” key light is about 30-45 degrees to the side of the photographer, and about 30-45 degrees above. Aim the centre of the light at the subjects eyes, then adjust.

Butterfly lighting, which is shooting down from above is a differnet look from standard. Key light choice is image defining.

The light, modifier size and “shape” will determine softness of the light and intensity. I have found a shoot through umbrella is bright and has some subtle hot spots, a reversed one is more forgiving and gentler, but looses power.

A single Westcott pearl-white, black backed 45” reflective brolly at the 45/45 angle. There is plenty of room in the file to add post processing “fill” by raising the shadows, but that was not what I was looking for.

Using a massive 48” soft box located just off to the left and above, this image did not need any fill, but in hind sight a rim light would have helped brighten it up a bit. Poor Meg does get the toughest gigs as I experiment with new gear.

Step 3; Fill light.

Once the key light is placed you need to decide on your fill light. This may be nothing if you are going for dramatic-powerful, but if you use a strong key light and a more open and softer image is wanted, then fill is usually a must.

Fill can be from a reflector, even bounced off a wall on the opposite side to the key. For more reliable and stronger fill (usually about 1/2 or 1 stop to 1/4 or 2 stops less than the key), a second light is ideal. This is often placed close to the photographer and often lower than the key, basically aimed at the shadows created by the key.

A 42” shoot through brolly key light 45 degrees to the left/30 degrees above, with a reflected 42” at eye level and the same distance. By reversing the brolly, I have reduced it’s power by 2 stops at the same distance. Easy to remember. Both lights can be set to the same power and channel on my remote, saving confusion, or the fill can be moved closer or further back for fine adjustments.

Step 4; Rim light.

At this point I will decide on a rim light or not.

If I do use one, only a little soft box (65 cm) on a third light or even an LED panel will do. This is often a warmer light, but not always. The rim light helps a lot with dark haired people against dark backgrounds, but it is really a matter of taste (and time). I have found I generally dislike the third light, but clients respond well to it.

The rim and fill lights in this portrait allowed me to push contrast a lot in post, without risking impenetrable blackness, which I did not want. Notice the mild hotspot on the forhead, which is the price paid for the ectra brilliance of the shoot through brolly.

Step 5; Back light.

If a different background is wanted, a light can be applied to the background. A single flash with a 7” diffuser grid and a coloured gel, which is a cool way of saying a bit of coloured cellophane, can change a background colour or create a hot spot-halo effect.

Camera is irrelevant, but I usually use an EM10 Mk2 for warmth, Pen F for maximum crispness or Panasonic G9 for the skin tones. Lenses range from 12-40, up to 75mm f1.8.

Re-capping, so far we have a basic camera, lens to suit and three YN560 flash units and controller with a pair of 42” brollies and 65cm ARTDNA soft box on Neewer stands and my Lastolite Grey collapsible on a fourth stand and bracket (but that could be anything, even a wall).


Portrait Photgraphy Basics 4

Processing.

We should always try to get the best result straight into the camera, but there is no denying that post processing is and really always has been a major part of the whole.

My preferred shape for protraits is the square. There is something logical, gentle even about a square image and it allows for subject placement in the “box” to be more creative, less strict.

This subject screamed mono to me.

Then I tried the faded, antique look. The image is also slightly shifted.

This is the core file with a little vignette added. Again shifted to the “normal” place, which is the rule of thirds coinciding lines applied to the left (his left) eye.

Colour is important.

All the shots below were shot against a plain grey background, I then brush the background in C1 and can shift the white balance from brilliant blue to deep purple or muddy brown.

The trick is to compliment or contrast, depending on what you are trying to achieve. My own personal habit is to go with my instincts, then try the polar opposite, working back through the process.

The basics of portrait photography are simple enough. You need to control light and apply basic technique, but otherwise pretty simple.

Practice is the key and the ability to connect with your subject.

Pushing It

Bit bored at work. This happens, like most places I guess. All or nothing.

Thought I would give ISO 25600 a go.

EM1 Mk2 (I have better cameras), 40-150 f4 at 150 wide open.

C1 only. Grainy, unsurprisingly, but still sharp and the colour is workable.

With some ON1 NoNoise love.

Compared, they look similar at these sizes, but at 100% there is a clear difference.

I got up close to the actual sticker and the roughness on the edges is from the ticket printing. Fully useable in print and even on screens.

A bit more processing. Generally, the best process for me is to do most in C1 before dropping the file over the ON1 as a tiff, then exporting out of ON1 pretty much on standard settings.

Something Special

I am happily exploring recently neglected cameras and lenses. Having a work kit that stays there most of the time, has allowed (forced) me to use the “left overs” for school and personal projects.

The crowning glory is the Pen F, a camera I have always admired, but sometimes struggled to commit to. Recently it has been identified as my premium black and white image maker, mating nicely with a couple of similarly sidelined lenses.

I must admit though, I had forgotten the very special colour images it can produce also. The sensor is the last evolution of the original EM5 mk1 series. It has more pixels, slightly wider dynamic range and looks more delicate in rendering, but the files share that same earthy, natural depth and robust reliability. A little bit old school, film-like even.

One thing I really do appreciate about it is the files, either colour or mono, rarely need much work.

All these images were taken using the Olympus 25mm f1.8, usually wide open, but the same magic is obvious using any of the better Oly or Panasonic lenses, especially the 17mm, 15mm and 45mm’s or the Sigma 30.

Unlike the other images here, this was taken at f2.8. The deeper depth is still harmonious, but the snappiness is curbed.

The maturity of the files is a reminder to me to back off when processing some of my other cmaera’s files. The Pen is a partner in the process, not just a step.

Gorgeous muted tones, something I recently put down to the antique 25mm f2.8 Pen half frame lens, is it seems, partly down to the camera. The Sigma 30mm tends to go into slightly magenta hues, but otherwise, all my lenses seem to be more neutral on this camera than most of my others.

The teal and amber look so very common on modern TV series. These files hold on really well.

If I had to descibe the files by “feel” when processing and the results coming from them, I would say they have the same neutrality and deicateness as the G9‘s, similar sharpness to the EM1x and the robustness and consistancy of the EM5 mk1’s.

On the other hand, they are also noisy like the EM5’s sharing the same film grain-like sharpness and the AF is frustrating sometimes. However, to really enjoy the camera, I feel you should use it with the screen flipped inward and in manual focus.

I have often put the quality of this image down to the 25mm lens, but I feel the Pen F, taken only once on a trip to Japan, must share the credit.

Favourite lenses are the 17mm Oly, often mated with the Pen in kits, which has the dual street photography advantages of forgiving, long-draw Bokeh and real manual focus, the Leica 15mm which has a rendering that is just very special (and it’s annoyingly light aperture ring is disabled) and the 25mm Oly, which is such a good pairing. The Oly 25mm is also slightly wider in reality than it’s name suggest, converting closer to a full frame 45mm.

That 75mm magic at work on a very harmonious and sound platform.

Other lenses that work well with it are the 75mm and 45mm teles and the old 25mm half frame lens. I have even had some luck with the 40-150 kit, although the balance is odd.

Speaking of balance, the Pen F is heavy. With the little grip added, it is a solid and reassuring lump of a thing, feeling far more substantial per square inch than even an EM1X.

A Little Accident, A Little Stress, A Little Fix

Packing away my Zoom F1 mic the other day, I dropped it, well it fell a few inches onto a wooded bench and the battery door broke.

I was a little surprised by this until I googled it and well, it seems to be nearly inevitable.
The odd and annoying little battery door is under some considerable contact spring strain and a very thin little bit of plastic is all that stands in the way of battery, full projectile exit.

Further Googling found little of use. A replacement door or clip fix, even a service agent seemed to be hard to track down. I have only used the F1 a few times, so breaking a $200+ item (including mount) is annoying, but I perservered.

Turns out a helpful blogger came up with a simple fix.

A cable-tie, synched tight and the tail clipped off holds the door closed, slides out of the way easily (more easily than the stupid little door) and even does double duty covering the on/off switch and record button when being worn as a LAV recorder.

A clean look, replaceable and even a selection of colours. The last image shows that you do not need the tie to be flush, which it can’t be, but the connection is still clean. I used it last week mounted on camera and it did not miss a trick.

Ironically, battery changes are now quicker and more secure.

A few for later :)

The original poster said he tried a few and settled on 4.5mm ties, but I went to Kmart and bought this bag for $6.00 and they are fine. First one fit, was clipped clean and there we go.