The Cinematic Look

Ok, a bit of a ramble and a can of worms to open, worms with sharp teeth maybe, but here goes.

How do you make an image look cinematic?

Do you even need to, and if you feel you do, what is the benefit?

I can 100% guarantee you cannot buy what’s needed in just a lens and camera package. That will only get you some of the way there. You have to bring the rest and with it a lot of experience, means of control and effort.

Huge crews and massive budgets empower us, but they alone do not make it happen either, which leaves a little room for us to find our own way.

Start by creating separation, layers and depth, or in a nutshell, make an interesting, majestic and enthralling still image and then make it move.

How?

Use light, focal depth, colour, contrast, framing and sound.

Big budget movies spend a lot of their budget on not just cameras and walk away, they use their large crew and their experience on control of light and colour, sound and scene.

Light.

Light and contrast.

Contrast with control..

Lots of light is needed to look like not much light, but not much light when controlled gives us contrast and contrast is cinematic.

Very few movies rely on ambient light, even outdoors on a sunny day there is help for the sun, something to control shadows or control of the light overall. It looks realistic, but it is often not real. Natural light is rarely strong enough or perfectly balance especially when used dramatically, so the trend is to remove the light, then replace it with something better.

Research this. The reality is surprising and is not limited to a few fringe cases.

Very rarely, natural light can be un-naturally powerful and cinematic, but the problem is, it is fleeting and unpredictable.

For example, in a scene from “Once Upon a Time In Hollywood”, Brad Pitt is driving down a dimly lit highway, the shot is of him driving, shot from the side passenger seat or another vehicle in seemingly natural light. The light is enough, just, gloomy maybe, but in keeping with the expectations of the viewer, enticing us with subtle glimpses, very controlled ones.

The reality though was massive light banks stretching along a decent length of road, then bought back down to look like they are not even there. The unlit image would have been deep shadows of little interest and very occasional glimpses of interest, the manufactured reality is far more attractive.

This gives the cinematographer two things.

Control of light shape, contrast and colour and plenty of light for a clean image.

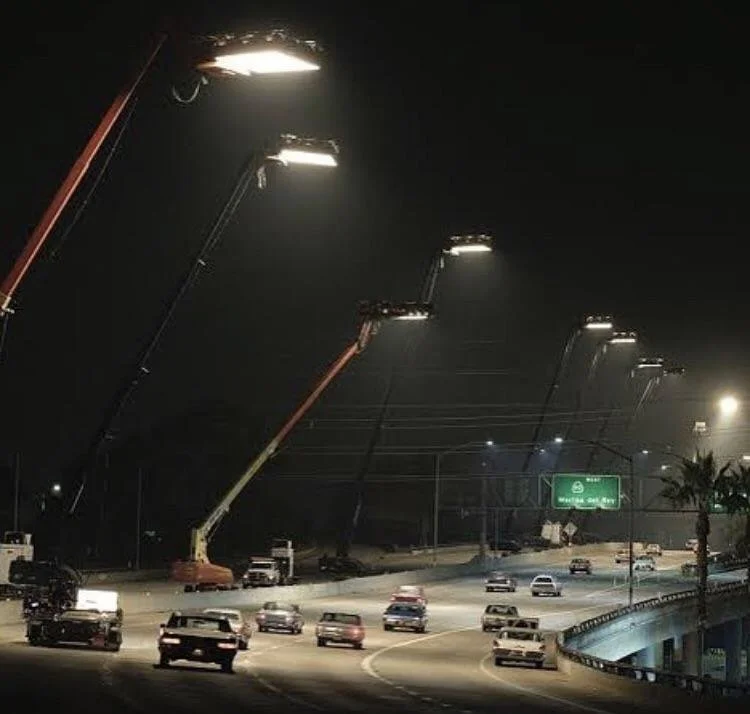
Yep, just for that bit of that scene with the end result looking effectively unlit.

A lot of lift for this amount of reduction. but that’s Hollywood. Similar images can be found for so many other films such as the enormous light boxes hanging over the “Sleepy Hollow” set, all to produce dark, but even and controlled light.


Light direction, colour and balance are key. Flat light looks amateurish, contrast and angles make the same scene better and less of more is generally more. Very few Hollywood cinematographers do not use back lighting or fill.

Cinematic images tend to be precise and minimalistic. Warm or cool, hard or soft, strong or mild, the look is highly controlled.

Be aware, that when you are looking at a naturally window lit indoor scene, you are probably not. Motivated light, which is light that looks like it is coming from a logical source is usually much stronger and controlled than the real thing, but like well applied makeup you are either unaware of it, or on some level very aware but appreciate the masterful use of it.

Make it work on all levels.

If it helps, create a solid still image first. A still image that looks like a still taken from a movie (not a set, but the end product). By doing this, the image can stand on it’s own, not rely on the distraction of movement.

This image was the result of natural sunlight, a cheap reflector and a glass shower enclosure. Technique was important in harmony with light and contrast control.

Processing may help here with an extreme example but relatively easy being shooting in daylight and processing to look like night.

Focus Depth.

Shallow depth of field is not cinematic by definition, but it is a way of creating separation. A lot of movies are shot at smaller than wide open aperture on a fast prime (smaller meaning a bigger number = a small hole = more depth of field). Often f4 on a full frame, f2.8 on Super-35 crop, (f2 on MFT) or deeper are used most often affording the DP some focussing room, adequate depth of field to cover the subject naturally with mild, natural (ideally invisible) focus drop off, like our eyes actually see, not the uber shallow depth f1.4 craziness commonly used my videographers looking for that “special” look.

I feel they are responding more to the pro-stills look of overtly soft backgrounds, more than than cinematic beauty.

This image is cinematically beautiful. It does not need super shallow depth or compression tricks, just composition, great lighting colour and control. Many of the great directors avoid super shallow depth, Speilberg and Deakins in particular often using more depth to tell a deeper, layered story.

Separation is actualised by placement of the characters relative to the lens and each other (blocking) and other elements like light and contrast.

Colour and mood.

Use the colours you are dealt, but to the best of your ability and if you can, and if they are not working replace them, shift them or if you have no other option, lose them completely.

Modern cameras can handle low light well, so drop the light out which allows you to work with less artificial light if less is all you have. Quite often on the making of “The Creator”, lots of small LED’s were used and the shadows crushed. Instead of a lot of light then bought down, they used little lights and bought them up.

Plenty of documentary film makers can achieve a cinematic look, but they must follow the light, not control it.

Audio.

Good sound trumps video for effect or more to the point, poor sound makes it all fall over. Deep, clean, intimate and appropriate sound, just like lighting really effect your footage.

Shot strength.

Movies are made up of around 1500 separate shots. Videos tend to need fewer. Each one matters to the whole.

Crew size.

The reality is lighting, sound and electrics are all specialist skills. We all fool ourselves we can do bits, but the reality is, no we cannot. For just a few seconds of one angle of several, as part of a relatively short scene may take dozens of man hours, thousands of dollars worth of gear and years of experience. Reality.

Effortlessness.

What do I mean by that?

Gear can help here, but it is basically that feeling that you and your gear are not stretched and that comes across to the viewer as invisible competency, or majestic constraint maybe? Regardless, the effort must be seen to be within an envelope of constrained control and therefore not seen.

The right movement, the right look, the best technique, all executed effortlessly and more importantly harmoniously by professionals with the needed (not necessarily the “best”) gear.

Expansiveness.

Try to use the whole frame and with it the whole space for a look of expansiveness. Some of my favourite scenes in movies are the scene setting room shots of the subject off centre and the room doing some work. This plays into the point above. Make the viewer feel like they are in a space, not just in someone’s face.

This may also be used with shallow depth, but often equal sharpness front to back works best.

Subject.

Good acting and direction, or even poor acting with great direction.

Finally, a word on softening.

It is true that cinematic work usually looks softenned in some way. This is sometimes becasue f the medium, film looking more organic and natural than digital, but the myth that black mist filters are always used is a myth. Softness comes from contrast control, filtering is often only used to make digitally hard frames look less so.

The “Netflix bloom”, is a trend borne of need to control harsh highlights (something digital often fails at), consistency of look and flattery for the actors, which then became a habit or expectation, but like most things, technology will address this and the look will gradually go.

Personally, I have found myself avoiding filters lately, even my 1/8th strength seeming over the top, using a little softening in post if needed.

Cine lenses can help sometimes, because they are either limited in sharpness and contrast by quality (cheaper lenses that would nt cut it as stills lenses), or by design (flawed character people, by design). I have found budget cine glass is as sharp as a lot of stills lenses, even as well controlled in other areas, but often have deliberately (?) softened contrast to help capture more detail in a compressed range, which in video is good.

It is more than just tasking inferior lenses to less stressful jobs, or at least it seems to be, but when this perfect-imperfect philosophy is also put into multi thousand dollar glass, it seems more of a real thing. Really sharp, well corrected lenses are great, but why is it the very best lenses are rife with flaws and still preferred by the best cinematographers?

I guess it is time to rewind and “nut-shell” this.

Cinematic images are a combination of controls and effects, the camera and lens combination only being a small part of the whole. If you want that cinematic look, try this;

Look at the movie scenes that blow your mind and reverse engineer them. Don’t go to “shot on what” and buy the multi thousand dollar kit they used. It is mostly irrelevant. Do what your eyes see and control the lighting, the blocking and the story telling, don’t seat the technical stuff.

Finally, if you like something, do not question it, go with it. Your opinion is really the only valid one here.

The Domke F-810, Some Idle Pre-Arrival Speculation (Let's See How I Went).

No Bag is perfect, but some brands tend to make bags that are acceptably good regardless of specific, usually minor, flaws or annoyances.

The Domke F-2 is nearly perfect for me these days, just a little short for some larger lenses.

The F-7 is taller, but lacks a single large pocket, that even the F-2 can provide, thanks to a waist belt accomodation that I will never use. This means that this relatively big bag struggles with a folded down small 5-in-1 reflector or large note pad, let alone a tablet.

The F-802 is the perfect tall bag, hard to fault, but the shape is quite specialised. Tall and thin has it’s advantages, but also some disadvantages, especially for MFT kit with sometimes tiny lenses and cameras. I have found that taller bags seem lighter on the shoulder, which is not nothing.

The F-804 is an over sized F-802 and not a favourite bag. The extra depth is sometimes handy, but that is rarely needed. Until recently, I had struggled to make it work (see below). This bag manages to be both tall and deep, but without some of the benefits of either.

A F3x is always on hand (I have had several, but only my limited edition green rugged-ware is left), basically a mini F-2 with a smaller main compartment, but the same external pockets. In reality it is the “one big camera and a trio of f2.8 zooms” design, so less relevant in the mirrorless era. If I start using a EM1x more, maybe it will be handy?

The F-6 is also like a small F-2, but with a full sized main compartment and no end pockets. I have had one, let it go and see little point in chasing that one down.

The F5C is the biggest of the F5 series (I have had the other two briefly), a slim little “Tardis” bag capable of handling a surprising amount of gear. I again have had a few, but found the large flap annoying, although the zip top was to my liking.

and so on.

A couple of things I have found them useful in the past are;

  • Zip top opening, but with no over-flap to fold away (F-5 series).

  • A slightly dressier design so I can use it at functions (my F-802 is looking a little army surplus these days).

  • A new internal shape, just to see and avoid repetition. A less “boxy” shape would be handy, as I have two bigger slim satchels, which are maybe too big sometimes.

The now discontinued, but it turns out still available new from my favourite supplier (Photo Video Accessories in Australia) F-810 accommodates the top zip thing, is slightly more professional looking, slimmer form factor and the flap covers the front pockets only, not the main compartment (compromising weather proofing I guess, but I have options).

It is not perfect (perfect would have been sand colour, a colour I have never had or the J-810 in sleeker ballistic nylon), but it is different and has a range of currently unavailable features.

So bought sight unseen, but having researched and owned enough Domke bags to start my own museum, I am confident enough.

What will it be like? Let’s have a crack at guessing.

It should hold a similar load internally to the F-2 (at least the F-6/F3x), just differently and a little taller. Unlike many other bag brands, what you see is genuinely what you get with Domke, so I feel confident this is real.

One of my small gripes with the F2 is I cannot perfectly house two cameras with lenses on, but it will take one. The other is nose down into a lens compartment with three more lenses. In a few older adds for the F-2, two bodies are shown without lenses on and four lenses in the divider, but I work faster than that.

Height is also a limiting factor, the 40-150 f2.8 is too tall even off camera. This led me to get the F-7 as an impulse buy in Japan and previously the F-804. I do not regret those, but they have their own issues and the f2.8 zoom with a camera on is still pushing it.

I am not expecting it to have the same relaxed width, because it is not as wide, but it is a little taller. I am also not expecting the same issues other tall bags have, where small items (like small MFT lenses) disappear inside.

The front pockets will not be as big as the F-802’s, but they look bigger than the F-2’s and have covers. Sometimes with the F-2 I feel uneasy with the open top front pockets, so I don’t use them for small and loose items. The huge ones on the F-802/4 on the other hand are secure, but so large they tend to lose things (they can fit two full sized flash units each!).

The little zip pockets on the flap like the F-802/4 may be more useful as the flap will not be in the “ready” position I often use, where it is folder back against my hip. This gets the flap out of the way, but makes the top lid pockets both uncomfortable full of batteries etc and impossible to reach on the go.

They are also quite large, so I have been known to check them multiple times before I finally find a missing card or battery and finally, if you fold the flap over with the zips open, every thing spills out.

It could maybe be upsized with a 901/902 pouch on one or both ends, but the sleek shape is ideal when needed, no need to make it into something it is not and after all, I have multiple other options, including mounting these pockets onto my F-802 as the 810 may play the role of the smaller bag.

I remember the zips sometimes being a little rough on gear and naturally lacking weather proofing provided by a flap, but the zip thing does allow easier access to gear than a flap covered bag and less chance of things jumping out.than with the flap pulled back. It is also slim enough to go under a coat flap.

*

Ok, so fast forward to today when it arrived.

I thought my knowledge of Domke would be reasonably sound, but I am happy to admit, I got several elements of this bag wrong.

It seems smaller than I thought, but hey, I kind of expected that.

The F-802 lurking behind, a bag I consider to be large-medium. The difference though is in depth. the 810 actually takes the F-2’s base board, meaning it is effectively a tall F2 with satchel pockets (so I may order base).

It turns out that is deceptive, it just looks small.

The camera is the EM1x, not a small camera and the lens is the 40-150 f2.8 complete with fixed metal hood, which it turns out does fit even with a camera on it (just).

The internals are about the same as the F-2, but taller, so some of the space can be lost to an MFT user.

The four section divider is much the same as the F-2’s, just taller and felt a little squashed by the bag’s shape (or lack of without a base board). I have put that divider into the F-804, which needed something to define it and the insert has better “spread” in that bag. Surprisingly, it fits that larger bag quite well.

I then put a two section lens insert in, which gives me two larger spaces for cams. These are genuinely large, like the bigger ones in the F-7 and it turns out I can put in them two decent sized cameras with lenses mounted (G9 with 8-18 and EM1 with 12-40 or 40-150 f4) and have two tall compartments for other gear.

The same camera and lens swallowed by this Tardis of a bag. The lens inserts easily hold a 75-300, a flash or a stacked pair of small primes. The EM1x could have a small zoom on also.

The other pockets are interesting.

The two front pockets are basically the same as the F-2’s (large smart phone sized), but with covers, so unlike the F2’s, they are secure. Again, like I expected, but the smallest covered pockets I have bought so far.

They look large……….

…until you compare them to the F-802’s, but are still bigger than most of my other bags.

Behind these are a “small” organiser space, with multiple small pockets and card holders etc. All of this is covered by the flap, but the flap does not cover the main compartment, so no need to fold it back. Wins all around.

I say small, but an ipad would fit in here, my phone, wallet, a large note book and other bits fit easily. This is the “reporter” element of the bag. The lining is nice.

The top flap pockets are also relatively small, maybe too small for my decently sized hands, but secure and ideal for a wallet, cards, batteries or my car key. I find these on the F-802 and 804 are maybe too big and have a habit of spilling stuff when I draw the flap fully over, but these smaller ones are ideal and the flap is front only.

About perfect.

The back pocket is full sized also, but maybe too small for a laptop. This has a bottom zip so it can be used as a handle sleeve on a suit case (a combination I would have loved on the F-7).

Ok, so my 13” M1 Air in a case does not fit perfectly (but it does fit), but a tablet or large note book would fit.

Handily, it unzips so you can run a suit case handle through it for travel. Also of note, this is the only Domke I have with feet. One of my very minor issues with the bag (has to be something I guess), is this zip and cover “lump” rub obviously against my leg worn when on my right shoulder.

Thoughts?

A great bag, as described and decently roomy if maybe too small for a full day kit which may include small clothing items, water bottles etc, but way more useful than some recent non-Domke purchases.

The little Vanguard I bought recently with the same things in mind. Nearly useless by comparison. Below I have images that show the over thought and under useful tablet pocket, cramped top access (easier to zip it and lift the whole flap from the rear) with added and required Billingham dividers and the odd bottom flap for a tripod I never intend to buy. It’s not useless, but another example of the perils of over complicated bag design and slightly misleading advertising.

By comparison, the Domke, with a mix of a flap-covered small pockets, the zip top, which it turns out is not at all abrasive (I had even forgotten there may have been an issue there), decent height and depth, all in a small and smart looking package is nearly perfect, as long as I use other options when appropriate that is.

Issues?

So far and we are only talking about a few jobs, the lump I mentioned above that of the zip on the back and protective cover rubs a little and there was not much padding or shape in the base, fixed by swapping out my old 1980’s F-2 base board, which fits perfectly.

Otherwise it seems a very good fit and even full, is not great bother.

My embarrassingly large collection of Domke bags may finally be sorted now, but we will see.

  • F-2 is a day bag option (the older one is reserved for specialist kit).

  • F-7 is a bigger version of the same.

  • F-802 is the “tall” day bag when long lenses are needed, added pouches give it huge capacity.

  • F-804 is mostly used with the roller bag for big video jobs.

  • 217 roller is my full frame video bag (S5, S5II and Lumix-S lenses).

  • F-810 is a day bag option, reserved for better turned out jobs or when hight is more important making the F-2 less useful.

  • The F3x oiled cloth is my wet weather bag.

Ed.

Since going back to work, I have used it exclusively, because so far I have not needed to look elsewhere. With minimal thought, more time tested bag user instinct really, the top flap pockets have become by fresh and used battery/card pockets, the front organiser fits my phone and wallet ideally as well as a note book, the front pockets take handy extras and my basic day kit of 2 bodies, two primes, two zooms fit in any configuration.

The little Vanguard has become my 2 small cams and 4 primes bag for personal days.


The Zoom F1, Long Term Thoughts.

The Zoom F1 mini field recorder is a curious beast, sometimes reassuringly my best option, sometimes frustratingly difficult to use.

The recorder is in the “Field” range, not the “Handy” range. This means it is designed with clarity first, which may explain some of it’s handling short-falls.

What I have come to love.

Sound quality is at least as good as the much dearer and bulkier H8 when using the many mountable capsules (maybe equal to the H8’s XLR inputs, which are better in performance than the capsule interface).

The SSH-6 Mid/side shotgun, not the one that can come packaged with the unit, the decent SGH-6*, is strong, sensitive and clear thanks in part to the mid-side mic option (it is basically three mics), which means it can include more or less sound from the periphery. This is something most shotgun mics lack and is handy in two ways.

Most obviously as the name suggests it is not just a highly directional shotgun mic. It can be used for focussed, less focussed or broad coverage (which can also be balanced in post from RAW audio) meaning in real terms, you can expect to use it for interviews etc, then switch to environment coverage for events, blend the two for more open environmentally inclusive or group interviews. My most often use-case is small groups or pairs set to about 30% for guaranteed wider coverage.

Secondly, it can avoid some of the usual issues of shotgun mics in echo-prone spaces. Shotgun mics have long, thin rejection tubes used to reduce side sound from muddying the primary source.

In a real world situation, by using this mic combo, I tend to avoid having to deal with very poor echoey, or “cave-like” sound, only realising the fact when I use a different mic in the same situation. No matter the situation, I can usually get something decent out of it.

On sound generally, it is warm, deep and quite natural. There is limited sibilance and usable reach is good, at least equal to the MKE-600.

These tubes do tend to increase echo as the sound enters the front in layers of second hand bounced sound. The mid-side mics seem to overpower that to some extent, by simply recording the sound properly.

A mic I would love to compare it to is the MKE-440 dual shotgun from Sennheisser, a great area mic with 3D sound, but one I suspect, would offer little more than the SSH-6.

I can mount it on the left or right of this rig and it sits slightly higher than the MKE-600, which is better for matt box use.

The F1 is the smallest and most versatile way of employing this or most of the other Zoom capsules. I had the H5 Handy recorder, but the sheer bulk of that unit meant using the SSH-6 as an on camera mic is not feasible, even after large rigs emerged. The F1 is much smaller and has an excellent shock mount option.

Optionally, you can attach another mic capsule like the X/Y’s or the twin XLR adapter etc. The smaller X/Y from the H5 is a very compact fit and ideal for event or area recording.

Not a common use case as I find the SSH-6 more versatile, but it is compact, sensitive and way better than any camera mic.

The accessories are excellent, which is why many people persevere with Zoom devices.

Compared to my other mic options, the MKE-400 and 600’s, it has several benefits, but only after a few issues were sorted.

First, it records a backup internally.

The MKE-400 is very neat on my various rigs, undoubtedly a cleaner set-up than any other option and on lighter run-n-gun rigs or for stuffing into a small pocket just in case, it is often the only option. It is short, self contained, has three sound levels, turns itself on and off with the camera and the sound is excellent.

Compared to the F1/SSH-6, it is limited in sound level choices and is less easy to set, it relies on long life AAA batteries, but as I found out the other day, they can go at the worst times and if using the wind sock, the warning light is hard to see.

The supplied wind rejection sock and shock mount, both using a clever combination of internal and external applications are good, but neither are perfect.

The MKE-600 is longer, needs to be turned on and off (something I regularly fail to do and it is the only mic I have with no automatic off option), it has no sound level control on the mic, meaning you need to access it on camera or via an interface, neither are straight forward or always convenient, but sound is excellent and very focussed.

On camera it is sleek and low profile, but the shock mount and provided pop foamy are the least effective of the three. I fixed the wind issue with a Rode fluffy, but the shock mount thing is real.

Height or length is one way of choosing, but there is more to it than that. Notice the huge difference in controls. The F1 is a full microphone interface with tactile volume control, multiple effects, low pass filters and limiters, the 600 only has a low pass on-off option. The F1 can also be used as a body worn LAV or remote placement mic. The Zoom also has an effective shock mount.

The F1/SSH-6 is not ideal for boom or XLR wireless use, something I do use the MKE-600 for, so each to their own.

Things I do not love?

The F1 has a fragile battery door. It broke surprisingly easily one day after a very short drop to a bench top. I researched it and yes, it is a known thing, so common in fact, it makes you wonder about a unit on the market for years.

First I used a cable tie to hold the door shut, which was fine, except Zoom devices need fresh batteries often for peace of mind (the battery meter can be simplistic and misleading), which was beyond frustrating. I remember one of my regular subjects asking “oh, do you need to do that battery thing again and if so, will it take long?”. Not cool.

I can slide the tie forward, replace the batts and slide it back, usually.

The second fix was a small power bank, magnetically attached to the side of the unit via the USB port and is very long lasting, but it can be knocked off easily.

This works well, as long as you are careful.

The last and by far the best option, is attaching it to my V-mount battery on the RigidPro rig or the NP battery adapter on my other rig. The extra cable is a small price to pay for a mic that runs any time the camera does.

Secondly.

It does seem fragile when the capsule is on the interface. It probably is not, but I feel it has a point of weakness. To be clear here, none of my Zoom devices have broken here, in fact apart from the door above, nothing on any of them has ever broken, but I tend to avoid excessive mounting-dismounting of capsules, which means carrying it is sometimes problematic (I tend to put the H5 and F1 in a hard case with capsules n).

Last, but not least.

That F%$#ing washer. What were they thinking? The F1’s shock mount has (had) a small plastic washer between the foot and locking screw. It makes quick mounting the unit nearly impossible. You have to hold it up when mounting the shock mount, often a two hand job, annoying and sometimes it gets stuck.

I fixed it……….

Grrrrrr.

To put all this in context.

It is my best and most easily used on-camera mic option with the best controls, power option (now), backups and features. It now inspires confidence in contrast to my frustrations with it over the years and is quite simply my most versatile and reliable problem solver.

It does not do everything better than other choices, so I have others at hand.

The MKE-400 is smaller and lighter if needed, often in my day bag as a seriously good handy option.

The MKE-600 is potentially better than either, but due to other issues is reserved for boom or static use.

The other Zoom interfaces (H1n, H5, H8, AMS-24) are employed when they make more sense, which usually involves XLR’s and multiple microphones or as backups.


*The F1 comes in a LAV or shotgun kit. I would suggest buying the LAV version, which is cheaper, then looking at other capsule options.


Big Rig Sorted.

The “Big Rig”, my video work horse is not how I thought it would be, but it is maybe even better.

The RigidPro rig was bought because I had the G9II and S5II cameras in (coincidentally) the right cages to fit. It seemed like a sign, but ironically, I have not used either with it.

The S5II with fan, V-mount, big cards or SSD via the Video Assist seemed the ideal “endurance” rig, but it just would not settle with me. I have enjoyed the occasional jaunt wth the S5II as a stills cam and even bought the Tilta half cage to allow hybrid use. Fixing it into the more cumbersome rig seemed a shame.

The rig was bought so I had a grab and go, no need to check or change anything, commercial grade camera that looks the part and does the job. I feel five steps should be all you need from bag to go.

The RigidPro rigs are designed to attach top and bottom. Four large gauge screws anchor the cage solidly (Smallrig Black Mamba or Tilta Half cage specifically), then it is just a matter of adding the bits you need to the ample real estate provided.

Did it fit?

Yes and no, but mostly yes.

After trying the S5 mk1 first, I was enthusiastic to say the least. I love finding undiscovered solutions, the ability to be flexible and find the “magic sauce”. The RigidPro it seems, can fit basically any of my Lumix cams (6 in total).

The GH5s cage, in an older Smallrig “semi-generic” GH5/G9 cage that I have always struggled with, anchors really solidly at the base with three screws, but leaves the same half centimetre gap at the top the S5 had. It has as much solidity as many connections I have used, so depending on overall weight and distribution, it should be fine.

The key is the central lifting point. I will not want to put all the strain on the top-front of the rig.

Why the GH5s over the S5 mkI or II or G9II?

The GH5s, is a dedicated video hybrid, older than any other camera I am currently using for video (even older than the MkI G9’s I think), but is still a current “H” cam with much the same engine room as the BGH1 box cam, which is a Netflix approved. Unlike the BGH1, it is self sufficient and multi role if needed.

The “full noise” rig, complete with matt box, MKE-600 mic (or Zoom F1/SSH-6), follow focus and handle. The rails can be pushed back in line with the body, the follow focus, Mic, handle, matt box and BMVA come off and it becomes quite small.

It compares favourably with the the Pocket 4k and has several desirable improvements, such as better internal battery life, the ability to take stills, Lumix cross-compatibility and system familiarity, reliable AF, a smaller form factor. (and a more self sufficient one.

The sensor is video specific, using only 10mp on an MFT base (slightly bigger actually), with no stabiliser and shaped to properly accomodate various formats it is the best of both formats with full frame-like noise performance and dual ISO’s but the advantages of MFT in all other areas (it is actually quite close to true Super 35).

Unlike my other MFT cams, C4k is not a compromise crop as the sensor is larger, the crop factor is actually 1.8x, not 2x and the camera maxes out at C4k, not 6k in RAW, which is ideal for me as the files are plenty, but smaller.

For me there were added advantages of already having a cage, spare batts at hand etc from my G9’s, but the final nail was the price. It was cheaper than the Pocket 4k from a local B&M retailer (which is rarely the case) so it jumped into my thinking. About a week after I bought it, it jumped back up $1000au with the same supplier, proving it was a bargain.

The GH5s’s layout seems well suited to rig use. The usual wheel is handy, buttons smaller and fewer than the new cams but logical and the thumb nubbin and Q buttons are missing, but these are hard to locate in the rig anyway. I feel my thumb is less confused by the feel and being the only different hybrid in my video kit, it is not an issue to adjust in this situation.

I am using two of the four D-taps, one for the screen, the other to run the dummy battery. The GH5s has a a front of body dummy battery cable port, something I missed at first and was a little unsure about. I do have plans to use a third for a Zoom interface, but seeing as all four I have are different fittings (?!), I need to think on which.

It ended up being the F1, which I feature in a later post, using the V-Mount batteries USB ports.

The dummy battery cable runs out the front, under the handle and the bulk of the cable disappears into the alcove provided by the rig. The key for me arrived in the form of a Smallrig cable clamp locking the under-loop cable securely.

Very clean cabling from the dummy batt and up to the monitor. The huge gap in between the rig core and the camera can take a lot of excess cabling meaning you have flexibility without having to find shorter options..

A screen or BMVA are powered by the V-Mount, so a cable runs from the rig to these, also held in place when not connected by a Tilta cable clamp.

The gap on the top of the camera fixes an issue I did not have any good ideas for. What to do with the Sandisk SSD I will use with the BMVA? These are large and flat, eating up real estate easily. It turns out, after fiddling with the S5.1 idea before this, that it fits into the gap left between the top panel and camera.

On the other side, the large HDMI connection provides for a screen or Video Assist. This short right angle to right angle Blue Kondor cable cannot lock it in the BMVA cage, but is secure enough. A Tilta cable clamp on the top of the rig sorted out all three cables used currently.

The Tilta clamps on the rig top hold the HDMI and power cables when not used.

The two rails underneath line up with the lens mount and V-mount battery, so the packed away profile of the rig is not compromised.

I had a really nice little C-to-C type cable for the SSD to BMVA, but it was not fast enough (the give away was the BMVA freezing up), so I had to use a better, longer one.

The monitor or BMVA is attached using a Neewer magic arm with Arri attachments at both ends, which is fast and ideal. It collapses small, but can extend or angle well.

The Neewer magic arm allows the BMVA to be collapsed, extended or laid length-ways down the rig for travel.

Under the rig is a Neewer tripod plate, which matches all my other heads (three tripods, a monopod, a mechanical gimbal, a slider and pair of rail units). Standardising on these makes the whole kit work better together.

This has the optional chest/leg brace. If I want this and the follow focus, I just need to add a longer rail.

So, steps?

Camera out of bag, attach lens and matt box if not already on (I have a bag that can take the whole thing assembled), add tp handle if needed, attach BMVA if not attached, cable it (2), add mic if needed, headphones go into BMVA if shooting RAW or camera if not, setup follow focus (or just attach if rigged up),

Mostly broken down, it can run from lens mount to battery back. You can see the SSD clearly here just above the camera.

I have a second rig with similar performance, consisting of the S5, a rail set with NP battery, the monitor or BMVA and top handle, but it lacks the heft and sheer endurance of this rig, finding it’s most valued form with the chest brace as a light run-n-gun rig or second cam.


The Ratio Of Creative (Video) Control

I have been looking at video codecs and it has been revealing, but also a little confusing.

To my mind, I have been thinking of capture codecs and post processing a little like running a shop, something I have experience with.

“Front of house” is a term used to describe what you do at the customer facing direct contact end, so basically the capture point of video. “Back of house” is the running of the business in an administrative and stock handling vein, so it is the post shoot handling of the captured materiel and the pre-shoot prep.

Sometimes you can do most of the work front of house with lighting, composition etc and if done well enough, that is often all you need. If the footage is to be used live, or with little or no processing added, then front of house is all you have.

Back of house is relying on post processing, which requires time and settings that will allow that.

Why?

Because processing of these compressed files is always destructive resulting in files breaking up and loosing visual integrity. You simply cannot shoot to fix it later, but you can give yourself a little wriggle room.

Two things effect this, one more than the other and for a while, I had them a little mixed up.

Codec or the capture type, ranging from IPB/Long-GOP, All-i, to RAW will determine the bit depth and compression. Unless RAW is used the colour profile will determine contrast and saturation applied, which in part effects compression etc, but less so.

Compression makes files smaller and easier to share, but reduce processing depth and require “unpacking” by the computer, which can be a strain. The less compressed the file is, the easier it is on your system to process but the original files are bigger.

I will now throw out a rough guide based on my understanding with a ratio of ten values for front of house:back of house, meaning combinations that require mostly front of house controls applied like lighting, white balance, exposure etc, or back of house like post exposure ISO and white balance, colour grading etc.

You should always employ best practices, but sometimes the choice is made for you.

There are other factors at play of course, like bit depth, specific camera performance etc, but these have less effect overall, so I will assume they will be addressed as suits the user and camera.

As an example, this is how I see my RAW stills; 6:4 meaning nearly equal work at the capture and processing ends, leaning always towards capture as the more important. If I shot JPEG’s it would be more like 8:2, although heavy photoshop users may think it is closer to 5:5.

A RAW stills file usually needs a little coercing, but it does not resist this input and more.

9:1

IBP or All-i codecs"*, with basic camera selected Rec709 colour profiles like Standard or Natural or even more video specific ones like Cine-V. These give you literally what you see on the screen, but with little room to move. Reducing saturation, contrast and shifting white balance are very limited and tend to break up the files quickly, although adding is less restricted, which is why many reduce contrast and saturation. You can give yourself a little more room to move by reducing saturation and contrast, but maybe only a 8.5:1.5 shift is achieved.

For set interviews and less busy subjects with controlled light and time to set the camera correctly, these are fine and are often equal to much higher grade codecs in end results. The reality is, this is where you are headed, so it is possible to get there at the start, as long as you control all of the variables.

I have had great results from my G9 mk1’s in Standard profile, Long-GOP/422/10 bit, as long as I get white balance right in camera and avoid extreme exposure ranges.

8:2

Semi-LOG colour profiles like Flat or Lite-LOG allow more processing of colour and contrast, but do not effect compression. You have some post control, but errors in white balance etc are still not easily fixed.

For a while, this was my maximum quality level, being easier to use than full LOG which requires extra exposure awareness, but more flexible than a standard colour profile.

7:3

Moving up to LOG or LOG-like colour profiles adds a relatively increased amount of processing options. Full LOG profiles are heavily softened, allowing processing to add colour, contrast and exposure information from a very forgiving base, but also require exposure and white balance awareness and often need viewing Lut’s applied.

I avoided LOG for a while when it was available, but the reality is, if you are limited in codec choices, it is the best option for serious video creation, as much for it’s support structure as anything else. Learn as much as you can about properly exposing LOG.

6:4

Next we change codec to something like Apple ProRes which delivers less quality loss with less compression. Colours etc are still baked in, so up front choices are important, but overall quality is potentially higher and processing relatively easier.

The colour profile you choose is still important here as what goes out to the capture device is ProRes with a colour profile like LOG applied, so in camera settings are important. Personally I am interested in knowing if a standard profile like Natural and ProRes 4:2:2 HQ would make a difference.

The files below were shot with the wrong WB setting and exposed for the open side of the face. It pushed and pulled well enough, but the test was against B-Raw and in this circumstance, with my limited skills, there was no comparison.

ProRes 422 may be an option as a better quality choice than those above, but 422HQ has not impressed me with it’s strong contrast and less malleable properties in post than B-Raw and the size is considerable, even in 1080.

5:5 RAW formats in video are a complicated thing, but let’s assume they mean much the same as they do for stills, which are effectively un-compressed, unprocessed files.

Two things happen here. The lack of compression (althought here are sub-choices within the format) means files can be large, stressing capture devices and storage, but as there is no compression at the outward end, computers can handle these more easily (there no compression to “unpack”), as long as the file size does not bother them.

The reason I have applied an even higher ratio to this than stills is the reality that moving footage often requires more work, even if it is harder and less efficient. With stills, it is totally realistic to assume a well exposed RAW capture may only need a little saturation or contrast to get sorted and the reality is, most processing platforms apply a small amount of pre-set information, while ironically, video footage, which can often have a Lut applied (a pre-set look up table of settings), often needs that and more, which being connected and sequential is often harder.

The file below was a pleasure to grade. I bought it up to bright and cheery like the last file, made it more or less contrasty and adjusted white balance easily. Shadow detail was bought back up (deep blue using false colour, so I would have assumed completely lost), highlights showed no sign of blowing out and my wife’s hair, which broke up a bit as she spoke in the ProRes files, was clean and sharp.

The best bit is, the C4k constant quality Q5 RAW output, was only slightly bigger than the 1080 ProResHQ footage.

B-Raw in Q5 constant quality seems to be a sweet spot and is recommended by Black magic for “TV serial content”. It processes like RAW stills, without the oddness of LOG profiles or the still present limits of ProRes.


The reality of these things is clear to me. Any capture format can work, but the more flexibility you want, need or are forced to use, the more information you need to capture and retain.

My two baselines are ProRes/Flat for simple and controlled jobs, ProRes/Log (or just LOG) when I need more latitude and either cannot use or do not have a BMVA to spare, but may need to match it, and B-Raw/Q5 when I can, but limited to a single unit at the moment.

I would like to like ProRes more, but B-Raw is clearly stronger, more flexible and intuitive and lighter on my system (more hard drives are cheaper than new hardware).

*IPB such as Long-GOP are a combination of bespoke files supported by extrapolated files, the most common codec available in consumer cameras or All-i using clean files per frame,

Video Quality Some Interesting Discoveries

So, it looks like I am a B-Raw convert, probably at Q5 (constant quality) compression.

In C4k on the GH5s, drawing as needed can range in compression from 21 to 58 MB/s, compared to 4k ProRes 422 HQ at a flat 117 MB/s (I used 1080 for my test at 27 MB/s).

That is a manageable file size with the added benefit on the GH5s of full sensor width C4k, so cropping etc are also possible.

Some reviewers, rare unfortunately because constant quality is harder to quantify, consistently state that the file sizes are smaller overall, large only as needed and plenty good enough for most uses. Constant quality is better than constant bit rate 8:1 (15:1 to 6:1 (as required), but vastly smaller than 5:1 compression at a flat 20 mb/s.

The flexibility of the files in processing is really very good, especially in the highlights and white balance. I do not get the full B-Raw benefits in processing, but the file flexibility is there and what is missing from the RAW options is available from normal processing.

My wife in home improvement mode, standing up in the name of research. This footage was compared to some ProRes and the difference in quality of fine details and post processing was huge. The file size was about 40% larger (the files were the same size, but the ProRes was longer by about 40%). GH5s, BMVA, Hope 25mm, Smallrig 60w into a reflector, exposed for the lit side of her face (green with false colour), white balance I must admit was neglected (3800 by mistake) and fixed with little trouble (the light was set to 5600, so I simply changed it to the same). The skin tones were better than the ProRes, that did not handle the WB error well.

Pans are smooth with little or no “judder” (a long term Bugbear of mine), colours natural and the exports are much closer to what I see on the screen (another issue with video editing).

There is still room for anything from Standard, Flat and Natural Rec709 modes, some V-Log and ProRes, but to my eye and for my needs, B-Raw Q5 is it. I may need to get another 12G for matching cams and I will also probably upgrade the S5II to B-Raw support for that one seems to be well supported.

Another change and one that may be even more exciting is adopting false colours.

Seriously folks, it took a New York second to learn and works intuitively. To nut-shell it, green-greys are middle grey (green = middle grey or skin tones) or there abouts, pink-blues are under, yellow-reds are over. In RAW you are well in the ball-park. Unlike true colours, they are simplified and consistent. You can expose to taste and by eye, something I struggle with using histograms or even wave forms.

So, B-Raw flogs V-Log for safety and versatility as well as being easier to “eye-ball” with exposure and white balance, the cost being occasionally larger files, but sometimes not (according to Black magic, Q5 maxes out at about the same as PR 422 Lt, but matched HQ for quality. Also colours are easier to use than other forms of exposure control.

These two changes fix most of my issues.

At the moment my G9II is off for warranty repair, a front function button not working, but oddly, I am not missing it. No stabe on the rigged GH5s is interestingly not an issue, the S5/S5II’s getting more love and I would even use a G9 mk1 in ProRes at a pinch*.

My learning curve with DaVinci has been challenging to say the least, but I am getting there and using B-Raw actually makes the whole thing easier.

*Given my time over, I may even have just bought two 3G’s for my old G9’s, but I am glad I have grown here.

Pondering That Special Something.

What is that special something we all chase?

I will have a look at that in a post soon, but part of the answer is in lens rendering.

This is not a lens quality that often aligns with high price, state of the art glass. It is something far more elusive and often runs against the usual current of super lens design.

The five lenses tested below share four things;

  1. The same aperture at f2.8 on MFT format.

  2. A roughly 50mm full frame equivalent focal length.

  3. No post processing from a G9 RAW file.

  4. Unfortunately poor focus control.

Lens 1 is sharp, has nice Bokeh and decent, maybe high contrast.

Lens 2 is very similar, maybe a little pinker and warmer. This lens is also a little wider than marked.

Lens 3 has a softness of contrast, but more than that, a more three dimensional, more a sharp/smooth look. It is a little cooler as well. I did miss focus on this one (the front leaf), so the more coherent background may be down to that.

Lens 4 is mre like the two at the top, is slightly wider looking than the top, reference image. It does however look a little different to those lenses, less “flat”.

Lens 5 is a mix of less aggressive contrast, but strong smooth/soft rendering.

Lens 1 (left) and 5 (right). To my eye, and it is hard to be totally objective because I know which they are, the left lens has that very modern, brightness and contrasty, but flat rendering (look at the shape of the table). The right lens is deeper looking if that is a thing, maybe more three dimensional? It is not depth of field, so there is something.

The variable was focus, which I tried to be accurate with (all manual as three lenses were manual only). Lens three copped a miss I feel, but the rest were pretty good.

Lens 1 is the 12-40 Olympus at 25.

Lens 2 is the Olympus 25 f1.8. I know this lens is wider than marked, about the same as the 24 Sirui as it goes, or maybe even wider.

Lens 3 is the half frame 25mm f2.8 (which is less contrasty wide open)

Lens 4 is the Sirui 24mm

Lens 5 is the Hope 25mm

The same combo below. Highlight detail is retained well by the Hope, detail looks the same and is it me again, or is the Hope ever so slightly more three dimensional and tonally smoother?

The reality is, the “cinematic look” comes down to a lot of elements working together. Cameras and lenses are two, but just two.

To create depth, which is the key, you need all of these elements to work together, but each also needs to be addressed. I am keen to explore lenses first, as I have plenty of them and I can control this in my space.

The Benefits Of Living Where We Do

It is no exaggeration to say, where I sit right now in my living room, is only an hour or so’s drive from two coastlines, some very real mountains, and temperate rain forrest.

We chose mountains thanks to some friends suggesting it.

This pristine and very wild plateau is only one hour from home.

One hour from our near sea level front door and we are in a wilderness that without roads and good weather will kill you.

Because it takes sometimes more than a century for these to grow, board walks have been placed carefully through this wilderness.

Walking In To Form Part 4

Crossing the river again, back towards the Uni.

None of this was here ten years ago.

Same as earlier, just a different bridge.

Big rowing community here.

Last remnants of its old life as a rail yard once employing thousands of multi generational workers.

Just over the old rail bridge towards the car. This area can regularly flood, but still hosts several businesses.

Long Wattle bird caught shopping.

Not technically part of the walk, but later the same day, we got some weird cloud action.

Sometimes it needs forcing, but just getting out can work you into form.

Walking In To Form Part 3

Turning around at the half way mark, we move away from the river and straight into town.

The side door of the little corner store where I had my first job.

A splash of colour on the old Technical College building.

And more around the corner.

A quaint scene hidden just off the street. Launcestn is older than Melbourne, so it is not hard to find those little forgotten corners of post colonial architecture.

Through town and to the main park. In the terrarium, old also, but constantly changing.

Some scenes just make themselves.

Through the park to the new University precinct on the other side of the river. “The Shed” is a science building built on vacant land basically in the city area.

A view through to the old gas works.

Lots of shiny steel.

Next we return to the start looping over the river across the new foot bridge to the car.

Mixing It Up

The RigidPro rig is designed for the G9II nd the S5II with Tilta half cage or Black Mamba cage.

I have both, so go me (not planned, just happened).

Tht S5II made the most sense as it has a fan and the G9II seems so well designed for movement and run-n-gun as is, so of the two, it really did make sense. Perfect endurance cam for interviews, stage productions etc.

I made a little support rig for the GH5s, the G9II was left light and agile, the S5 relegated to stills only, maybe some support work.

It was fine, it made sense but it would not settle for me.

In some ways, other options were left languishing, the S5II, my most capable full frame maybe under utilised.

So, I did this.

Notice anything?

This is the S5, not the S5II and it fits, well kind of, but sometimes wins and losses even out.

It attaches on the base perfectly well, two screws, solid and tight. The centre of balance is fine as shown above, the the weight supported by the handle with very secure anchor points top and bottom, aligned with the solid main block of the rig, so the lack of a joint above the camera is basically irrelevant.

A gap that I felt might have an easy fix, like a plate or space filling washer, something I have plenty of, but no, not to be.

To be clear here also, the camera in this configuration is not going to be used as a hand held rig, it is going to be static, usually manual everything, reliable and capable. If I try hand held, I will be looking for “big heavy camera” micro jitter control, as opposed to in camera stabe.

Given that the whole thing is not super heavy, the balance point is well supported and the cam will not be handled heavily, I do not see a problem other than the strength of the Nato rail handle, rated by Smallrig at 10kg!

The gap?

The gap actually solves an issue.

Running out of real estate even on this large rig, I have been pushed for room for an SSD mount (if using the BMVA), as well as a mic and handle.

This fits neatly, snugly enough to be secure and out of the way.

It gets better though.

The GH5s, my only non-stabilised camera would, it turns out, be an even better fit (so to speak) for the rig. The GH5s is my most specialised video camera option, bought as such, eyes open. It was bought as basically a Pocket 4k alternative to support my growing range of manual focus cinema lenses and is my most video-centric camera (It’s in the “H” you know).

The GH5s fits well, maybe better than the S5, it has a different dummy battery cable-out hole, in the front of the cam instead of the battery door (which needs adjusting to), is maybe better at static interview AF (if used) than the S5 and the lack of any stabe is balanced with the bulk of the kit and it’s intention.

The cage I have for the GH5s is my least inspiring or useful, being a compromise option for the G9 mk1 and GH5 series, something the rig will care little about, but is actually lines up with the RigidPro better than the S5’s and the unlikeable bulk is just a more relaxed surround, so I can run cables through it and the “bumper-bar” is more pronounced, more protective.

The S5 also has it’s small HDMI issues (and fixes that cause their own issues), the GH5s does not, while the GH5s has an older screen and view finder, so less of a hit there. Even the rear button and dial layout seem to be more logical for rig use (more sparse).

Oh, and of course, it is the only cam that does not handle basically the same as any other (S5, 5II and G9II are the same body shape).

The S5 on the other hand was intended to be my “eye” camera, the camera I would follow action with using a deeper eye cup, something I would miss.

Coincidentally, the gap is the same.

As the year progressed, I surprised myself as I drifted back towards MFT format for video.

Low light aside, the G9II, even the older G9’s called me and after buying the Hope glass and the GH5s, things shifted clearly for me. Full frame became more of a stills/video option.

Overheating issues look to be pretty minimal, the GH5s running cleanly and gently, made to purpose, the S5II is in the wings if needed.

The new look kit is now;

G9II for movement and action. basic cage, minimal stuff, touch screen AF, very reliable in that role. This is unchanged.

GH5s is now the “big rig” camera, the interview and video-centric work horse. The G9II and GH5s can share similar glass, so they form the core of the “commercial” kit..

The S5 Mk1 is the “B-cam” for static video and personal projects using cine glass. I get good results from this setup. It can be used with the NP batt option.

The S5II is now the hybrid, filling the role of the G9II as needed, but as a stills cam also. It can also be used with the NP battery bank as the backup to above.

Why?

Because it cannot shoot B-Raw without a paid upgrade (not going to happen), nor All-i, is wasted in a static role, has a half cage that suits hybrid use and the best AF for stills and stabe for video.

It just did not feel right caging it up in the RigidPro rig, where the GH5s feels like it is at home.

Walking In To Form Part 2

From the Uni campus, barely ten minutes into our walk, we continued along the river to the Sea Port region.

The Esk has a long and dramatic history of flooding. The flood walls erected over the last twenty years are part defence system, part memorial.

I cannot remember the name of this old pub, but built on swamp land, it does not share two straight lines in a row.

This earth wall was raised a few feet and only a few years later the “once in a hundred year” flood reached the top, but the suburb behind was spared. As weather patterns change, this is predicted to be more of a “once a decade thing”.

Through the hole is the Boags Brewery and other older industrial buildings but there is a river between.

Tagging comes and goes, a little on the heavy side at the moment.

The river, Boags and Windmill Hill in the background. Hard to belive the rest of the city centre is only s few blocks away.

After crossing the bridge, we came to the Sea Port, a reclaimed industrial warf, childhood memories of the “Cotswold Prince” leaning unhealthily against it always come back to me (later sunk down the river as a divers wreck). This area is tidal, made problematic by the dam up river, so at low tide these boats often sit on mud.

In the background over the river are the old silo’s now a luxury hotel and eating hub.

This shot came after a conversation I had with my wife about the difference between colour and mono images. In mono, the textures and size of the hotel would dominate, but in colour, the two yellow (or red if there were any) elements grab you first. To the right is the massive playground build a decade ago, apparently one of the biggest in the Southern hemisphere.

Moving past Home Point, we come to Royal park and the old flood wall.

Deliberate graffiti foreground, native Aboriginal inspired, less desired in the background, but to be fair, the whole wall at the back is covered with sanctioned graffiti to support the skate park, so a little “bleed” is expected.

To the right is the largest bridge and behind it the oldest (King’s Bridge, just visible on the right), that jon the West Tamar region to the city. The canyon behind is the gorge, a spectacular walk in it’s own right with parklands, athe oldest electric power station in the Southern hemisphere and swimming baths if you do not want to brave the Basin itself.

There are working boat yards on both sides of the river, this classic getting much needed love.

A park ends the official top of the river, with this textural wonder. Heading around to the mill in the image a couple up. The park, like much of the rest of the river’s edge, has been massively upgraded, but is mid re-work at the moment so angles are limited.

One of those images that beg the mono question.

Half way, so I will stop here.

Feeling good.

Walking In To Form Part 1

My wife and I had a nice walk yesterday. I did not take a camera and to my surprise, I really wished I had.

Today we repeated the walk, with cam* and apart from slightly less perfect conditions, it was fine.

Not yet out of the front garden, this exercise in Bokeh and dynamic range grabbed me.

Journey starts, a slightly melancholy view from the old rail lines, that lead to the rail yards, now a museum and university campus.

The rear of the yards is much as I remember it from my childhood, but the bit at the back is new as is much of the complex.

The walk skirts the edge of the city so wildlife is not uncommon.

Much of the original infrastructure has been left as is, partly museum, part waiting to see.

The Tamar is actually the longest tidal estuary in the world, three quarters salt water, so seagulls are common.

Part f the new build fr the university, with alight tower from the city stadium. Our sports stadium can hold one quarter f the city seated, most of the rest standing.

A switch to mono that I feel does so well with modern metals and glass.

The stadium up close.

Stadium on right,

University to the right.

Colour, shape, story.

Not as ‘glowy” as yesterday, but still an interesting interplay of shade, light and colour.

The entrance to the museum section, the first stage of the rail works reclamation.

The campus is also accomodation and a coomunal garden. I was here often for the paper. As a child this was a no-go zone or in kid parlance a “try and stop us” zone, but it is great to see an area once abandoned reclaimed by a city on five minutes walk away.

A decent showing of several crops.

At all stages of development.

Leaving the precinct still sporting an operating tram line and station (trams were once a major part of Launceston life).

From here we followed the river to where the Esk meets the Tamar.

*Camera is my oldest, most beaten up EM1 Mk2 and 12-60 Pana kit lens.

Video Quality, Some Thoughts.

Now that options are available, thoughts are turning to quality and needs.

In stills you have RAW. All cameras shoot in it, better cameras allow you to access it and life is good.

From RAW you get jpeg or TIFF files.

Easy.

In video, thanks mainly to RED cameras, you do not get true RAW, because they own enough of it to make using the term and tech prohibitively costly as several companies trying to sue them have found out. Video also has to balance quality to storage realities.

The question I guess is, what makes a visual difference, is worth the extra cost/storage/effort and what is basically wasted in the long run.

Video therefore has “layers” of quality, best explained by Gerald Undone,

https://www.youtube.com/watch?v=wX9KGRHaMEY&t=42s .

Apart from the now dated camera specs being talked about, all this above still holds true, the main difference being direct to SSD recording from camera.

Internal limited users, tend to use LOG as their maximum quality level and those who break the shackles go into ProRes, RAW or similar. My own journey was one of liking standard profiles, feeling a natural draw to LOG, but compromising at Flat profile. My hope is, Flat with maybe a codec lift will give me what I want.

Ok, that is the meat of it handled, now the garnish.

First lets look at file sizes, storage and realities.

This is the key I feel.

Having the best quality available to me (B-Raw) and several levels down previously unavailable (ProRes and All-i) and even 6k, realistic storage is the first issue. Do I really want or need to come back from every little job with 50-100gb or even more eaten up?

Long-GOP or IPB format is the most common capture type, great for relatively stable subjects and a light load on the camera. Long-GOP captures a master frame (the I frame), then “fills in” the next few with mostly recycled information (B and P frames), only adding new master information with the next clean full capture frame. This is a little like traditional animation, the “moving bits” overlayed over the static background plate, although that is an over simplification.

All-intra on the other hand is better for movement and changing subjects, or camera movements etc as it captures a completely new frame every frame. This is a bigger load, so a waste if applied to interviews etc, where most of the frame remains unchanged.

I shot 5Tb of stills last year, but dumped 80% of that as unnecessary (I keep masters of submitted files, but let the rest go unless the event is very important). My video has been limited to 1080/10 bit/422/Long-GOP, but even then a 2Tb drive was swamped in no time and I would not consider myself overly active in this space yet.

Realistically 1GB/minute is plenty, maybe more, but not very often and some flexibility would be great (why record more than needed?). 1GB a minute is Long-GOP/10 bit/422/1080, so not much room to move, but it turns out B-Raw at Q5 is potentially less, but some of the intermediate steps do eat up more space (6k All-i can be a monster 1.6gb according to my G9II!).

So, resolution and basic codecs.

Do I really need 4k or is less plenty?

Keep in mind, my main concerns are smooth footage, no artefacts and good processing flexibility, with low card speed and storage stress for mostly internet use.

It seems 4k is the assumed standard these days for capture producing roughly an 8mp image per frame, 1080 is a lowly 2mp file, so “out of date”. The common logic though seems to be, you cannot see the difference on most screens or even if you can, it is only evident with direct and close comparison, so future proofing aside, which is often not a real world thing, 1080 is usually what people need even if it is not what they think they need.

Also, 6k is generally only a cropping convenience for reels in vertical format.

The key seems to be visual quality in and out, not quantity of quality. Very well recorded 1080 footage can go up, where oversized recordings will likely end up going down in size for storage etc and poorly realised 4k is not better than well shot 1080.

1080 looks to be the smart move for my work, opening up more options at the camera end and heavily reducing file sizes and media stress (4k B-RAW at 5:1 compression is 81mb/s needing a 560mb/s write card or SSD, 1080 is 20mb/s, so a 160mb/s (20x8) card is fine). The cost in cards alone is enticing. It would be great to have all my video from a year stored on 2-3 2TB drives.

Can quality from other elements make up for the resolution difference?

Codecs.

As well as resolution, codecs determine both the capture, processing and output quality and often the options available to you. MP4 is easy to use, small, very versatile, but severely limited (just watch some cat videos for examples).

Apple’s .Mov is better and the most common more serious codec for in camera use, but is not fully supported on all platforms once exported. There is more though.

Codecs are often overlooked, but as we move up the chain, their importance becomes obvious.

After .Mov are a range of less compressed codecs, which offer better quality, but produce larger files. These top out as 422/10bit ProRes HQ, an industry standard and plenty for most projects.

It falls short of RAW codecs in pure post processing flexibility, but if you have cut your teeth on lesser codecs, it will feel like a luxury ride and a reward for good technique. ProRes has competitors, but this level is already a quagmire of options, so I will use PR as a base line and for me it is most relevant.

From ProRes we shift to full ProRes RAW, or in my case B-Raw. Like RAW in stills, these offer maximum post processing power and negate most other quality settings.

I have used .Mov without hesitation, but may also export an MP4 version of my work if I am not sure where it will be used.

Colour profiles.

Colour profiles do effect quality when post processing is considered.

Unless you are using RAW, “baked in” picture profiles are more or less are applied starting with generic Natural, Standard, Portrait, Vibrant etc. These are camera processed profiles, designed to be shot and used as is with minimal post processing.

I have used Panasonic’s “Standard” profile a lot and even pushed it around some. If I get it right it is great.

In modern video empowered hybrid cameras, there are often video specific profiles like Cine-V or Like Rec 709. These react the same, just look more “cinematically” aligned. A common trick is to reduce contrast within these to simulate a “flatter” profile (see below).

They allow you to apply settings and features only the camera can apply like dynamic range boost and sharpness, noise reduction or saturation etc, but are quite inflexible in post and depending on the camera, usually have less dynamic range than un-processed profiles.

Bottom of the food chain, 10bit/422/.Mov granted, but Standard profile, Long-GOP, 1080 from a G9 Mk1. Fine if you get it right (which I did not, losing the shadows completely, but it was not a test of exposure). To get the file above right, I would need to do “front of house” fixes like a reflector or light.

How do they effect quality?

If you have a controlled situation, need to output your footage directly or super fast and trust your processes, these profiles are fine, because at the end of the day, they are often where you end up anyway.

The reality is, they do not effect potential maximum quality overly (the codec does), but fall apart quickly if heavily processed.

Elements such as white balance and exposure are critical to get right here because they are too hard to adjust in post processing, most adjustments being destructive. Control at the point of capture is important.

Next step, editing friendly profiles.

After these come “flatter” profiles which include Cine-D, HLG, Flat etc with reduced contrast, saturation and sometimes sharpness to allow for more aggressive colour grading in post and wider dynamic range.

If your subject may require some post processing, but is still in a reasonably controlled space especially dynamic range, then quite often this is enough.

Flat profile on a Lumix is my “work horse” profile and plenty for most basic shooting. I will use this with Long-GOP for most interviews etc, switching to All-i if I have it for moving subjects. For added longevity, the BMVA can be used with the non-upgraded S5II in ProRes codec (LT probably), but this is overkill quality wise, just an enabler. The advantage of Flat for me is it has a little wriggle room, but still behaves like a standard profile type allowing me to apply idynamic range boost.

The king of internal profiles.

Becoming more common and often seen as the high water mark for most videographer’s needs are internal LOG profiles, in fact often the move to LOG is seen as the step from amateur to pro video production.

Flatter even than the flat profiles above, giving us a RAW-like look, these can reward the user with quite powerful results for a little more effort, but are generally too flat to be used out of camera.

For some, LOG is not worth the effort or trade-off (it shows RAW realities like more noise etc), but the support network for LOG is substantial, so sometimes it can actually be easier to use.

Each brand has their own LOG or light-LOG profiles and they tend to remain quite consistent, so processing software can usually apply pre-set LUT’s (look-up tables of pre-set settings) to them by brand as a start in their processing chain.

LUT’s are often seen as the beginning and the end of LOG file processing, but should be seen as a step only, especially LOG to 709 conversions. The reality is, with LOG as the high water mark for many video creators, there is a massive support network for most LOG formats. Standard and less flat profiles get little if any..

At some point, most serious videographers will end up using LOG profiles occasionally or maybe even always as they allow for both the maximum post processing flexibility and the most support of out of camera footage.

Personally, I find this is confused often by poor grading and over reliance on Luts (and the sale of same), leading many to think the smokey-milk look is a thing.

When cameras are touted as having “x” dynamic range, it is with their LOG profile used, capturing more highlight range.

If your footage is important, difficult to capture due to mixed or strong lighting, needs to be delivered in a post-processable form, or you want to push it hard in processing, then LOG is probably the way to go.

External (sometimes internal) capture.

Once LOG has been mastered usually in .Mov codec, there may be a desire to go “full noise” and seek out the codecs most professionals use. With these come added processing difficulty, often larger files (but not always) and usually with mirrorless cameras they require some sort of off-board recording device.

This is changing and in the next generation coming in camera ProRes in particular will become considered standard.

The Ninja-V or Black Magic Video Assist units will allow compatible mirrorless cameras to record in ProRes or various “RAW” formats as well as some other formats I am not familiar with.

A still taken from some 1080/V-Log-L/ProRes/422 footage from my S5. Standard 422 is the second from best PR codec and considerably more powerful than .Mov. This footage was under exposed, but recovered nicely. Non RAW ProRes is probably the most a videographer would need as a day to day codec and a clear step up from internal codecs. It gives more quality, but still uses the camera’s internal picture profiles and has the benefits of processing noise and sharpening internally,

Apple ProRes comes in several types, from very light Proxy to 422/HQ and are All-i formats, but still responding to colour profiles*. ProRes 422 HQ is the maximum quality most cameras can provide short of RAW and is an industry standard.

According to Black Magic, B-Raw 3:1 or Q0 compression and ProRes HQ are similar sizes (B-RAW at 33mbs, PR at 27.5), so the choice really comes down to a more flexible file or a more ready to use out of camera codec.

Even though they are not true RAW file type in the still photography sense, these still offer vastly superior control of white balance, dynamic range, exposure and even ISO in post processing.

At the bottom end you still have theoretically superior capture to most internal codecs, at the top end you max out what 422/10bit colour depth can record.

File sizes are huge and hardware needs to be capable of handling that. ProRes is an Apple product, so for best hardware value, Mac’s are often a smarter move.

Some more S5 1080/LOG/PR/422 footage. This grades very nicely and has good baseline quality.

RAW, which is usually pseudo-RAW, like B-Raw or ProRes RAW is for most of us and the movie making industry the holy grail for capture and processing using 12 to 16 bit colour depth.

B-Raw has various compression rates, but even 12:1 seems to be better than the equivalent ProRes and a lighter load on a computer. Big files to record, RAW files are actually easier for a computer to process because the computer does not have to “unpack” the compressed file, it just has to deal with the sheer bulk.

ProRes Raw is even more “pure” using an alpha channel, so it is 4444, not 422 colour depth and 16 bit over 12. This is the real deal, but massive and a huge strain on hardware.

For me?

My S5II is set up for endurance and static recording being fan cooled and V-mount powered. In 1080/Long-GOP/10 bit/422 in Flat or LOG it is enough and can be handled by pretty pedestrian V30 cards. I can record out to my Video Assist to ProRes and an SSD, but that would be an extreme case for that camera.

Some S5II and Lumix 35mm f1.8 talking head footage from a shoot recently. Long-GOP/1080/Flat/422/10bit is fine for this sort of thing, more is probably overkill. I shot some footage at the top of this pathway into stronger light and Flat was not wide enough DR to handle it, so I should have used a light or reflector then. Maybe B-Raw could have handled that.

The G9II is my movement camera so it needs to be flexible and fast, but also to be able to handle busy, complicated scenes. Great slo-mo options, the best stabe and AF of my kit, and importantly the ability to record All-i internally or ProRes to an SSD without any added weight or bulk make it the camera for this role.

A cage, a pair of side handles, a top handle, a weighted or shoulder rig and I am set (no screen as I want to use it’s touch screen focussing, but maybe a phone as screen if I can get that sorted). I could use the big rig from the S5II, but it is not that camera. In a nutshell, the easiest path to better quality, with minimal rigging.

If I could have only one camera, this with the RigidPro rig and BMVA is my power house, but too much for most things.

The new (older) GH5s is a bit of fun and a bit of a sleeper. Behaving like the love child of the G9II and S5 mk1 producing a pseudo Black Magic Pocket 4k, it has reliable AF, excellent low light performance, All-i internal recording, full compatibility with the BMVA for B-Raw or ProRes (in C4K, not 6K, which is better for me). I will use this as a static cam or a traditional weight assisted hand held rig with cine lenses (which it was bought for) as it has no stabe.

I bought this over the BMPCC4k (or BGH-1) for its more practical operability and compatibility with my existing gear, but otherwise much the same camera with a BMVA mounted with better battery life.

As a minor but real consideration, it could simply be used as a stills cam at a pinch, my “let’s drop this video crap” release switch**.

The S5 mk1 is a very capable video cam, in some ways better than the S5II, so at this point I will press it into service as the second static camera.

The S5II will be used as a stills/hybrid, like the G9.I’s. I think this will often be the really light job video cam option with Lumix lenses.

If I go down the B-Raw path, this will switch with the S5II (I cannot use it in RAW without a paid upgrade) as my stills hybrid.

Another of the shots lifted from ProRes footage taken with the S5.1. Nice control of flare.

So;

422/10bit is not negotiable. Less here does much harm for little gain. All my cams can handle this, so I will accept this gift as offered.

1080/Flat is a solid base and grades easily. I have four cams that can handle this, several others with similar profiles (Cine-D, Natural with contrast reduced). Flat also allows idynamic range to be applied as it is a processed format gaining abut a stop. LOG is slightly better and better supported, but Flat is a faster “eye” grade.

Long-GOP with the S5II empowered by a fan and V-Mount battery, with the GH5s or G9II (NP batts) as support, will handle interviews and static endurance work. It is efficient, though a tough ask for my computers. If I keep it linear and do not mess with it too much, there should not be an issue.

All-i is for movement, slo-mo and available on the GH5s or G9II. This will not be long connected reels so the extra depth or shorter endurance will not be harmful. Potentially ProRes (1080 HQ or 422) may replace this as it is actually better and I can use it with the same number of cams or potentially more if I add a much cheaper BMVA 3g (the non B-Raw or 4k capable Video Assist).

4k will only be employed when (1) requested specifically or (2) for zooming in post, mostly for sit down interviews for zooming in etc. The fact that I can use 1080 Q1 B-Raw or ProRes HQ for similar strain on my system as 4k 12:1 B-Raw or ProRes Proxy is compelling.

ProRes+LOG or Flat will be used for special projects and important stuff, which is currently limited to two cams, three if I get a 3G BMVA. The extra quality of LOG/ProRes would be noticeable on close inspection, but that will rarely be needed.

or

B-Raw at Q5 or Q3 if heavy post processing flexibility is required, but this is limited to one cam unless I get another BMVA 12G and is most powerful with white balance fixes. I am torn here, but need to do more of each to see.

ProRes is so much more accessible, B-RAW potentially more powerful and system friendly, 1080/Q5 needing surprisingly little space or processing power, as low as 4 mb/s (or 32 Mb read speed).

Ed. It is important to note, video RAW is not the fix-all stills RAW can be. Stills RAW and jpegs compared are two very different fish, on a 12-14 bit full information capture file, the other a highly compressed 8 bit file with most of the highlight and shadow detail compressed. Video RAW, usually a slight compromise anyway, is up against comparison with much more flexible and robust “jpeg-like” processed files, designed to give you some processing power more or less. My own observations after 15+ years shooting RAW stills are processed video files are surprisingly malleable and RAW files are mildly disappointing by comparison.

The reality for a single person crew is to use more than one camera generally means a static subject like an interview or performance, so ProRes would be fine, B-Raw reserved for passion projects or very difficult subjects.

Questions still to be answered, but will be as I explore are;

Is ProRes/Log better than All-i/Log?

Is ProRes/Log good enough to match B-Raw?

Is B-Raw/Q5 good enough for basically everything and worth getting another 12G for?

Is ProRes 1080 good enough so I can get a 3G recorder (or two) for the same price?

Is simple Long-Gop good enough for multi cam interviews etc?

Etc as I go along.

*A question I need answering is there a difference between a Standard profile in ProRes as compared to LOG or a flat profile in .Mov?

**I only have a few things that would be considered truly useless if I moved out of video, something I like to keep in mind.

The Big Shoot.

Recruited again to shoot wine for friends at their East Coast vineyard, I was keen to do something different.

On pondering the options, we retired to the old cellar tasting room, set up some mono blocks set to warm colour and tried some ideas.

One bottle was ok, the ancient walls adding much, but there was something missing.

More bottles maybe?

A splash more light on the wall behind.

A change of angle?

Then another few with single bottle and the green cloth with a vat behind.

And a few more singles with different light.

The crew were happy, I was also, especially the change of style from previous outdoor shoots.

Ok, time to ‘fes up.

Looking for a better idea than previously, armed with a Pen-F, a couple of primes and a small 60cm 5-in-1 reflector/diffuser, I noticed walking up the hall from our bedroom, that the shower cubicle was pebble walled with a reasonably flat concrete base.

Grabbing my “crew”, consisting of a clever 10 year old and my meagre kit, we played around with several angles with the gold, then silver reflector, settling on the gold, using window light.

The whole job took 20 minutes in a 6x6ft space, with minimal gear, a team of two and no, there is no ancient “cellar”. The bottle, more often than not, is covering the outlet drainage hole.

Every Day You Waste Is Gone......... But You Also Need To Relax

Casual visitors may have noticed I am not blogging a lot at the moment.

I find it relaxing and need the reflective power it offers, but sometimes I just fail to follow through.

Subjects can vary widely or I tend to get fixated on the current “thing”, but either way, sometimes it comes easily, I stop doing it when it does not (the benefit of not being sponsored).

As I get older, my ability to waste time is softening, my awareness of that time wasted hardening. It may be a “time is running out” thing, or simply a change in work habits, but one thing is for sure, I am finding it hard to switch off.

Self regulation.

The first of my “holiday” images, made with zero planning and little thought, just taken as I see them. A good sign.

I must start to regulate my work time as a self employed person. This is the key, but it tends to come down to working at break neck pace for weeks, then nothing. The nothing in winter is hard. The short days and general darkness that comes with winter often leads to depression. Not the clinical depression many espouse to, but regular, daily, controllable depression.

In summer, which by it’s nature, being connected to schools is going to be quiet, I really, really need to just relax.

I worked for a wage for most of my life, full or part time, I had a regular income, I was “reliable”. Now I count my wins against my losses and to be honest, with a regular human brain wired for stress and fear over relaxation and confidence, half a dozen wins never make up for a slow period.

Another nothing shot that had to be taken.

Some good signs so far these holidays. I have remade and perfected my hobby painting space, moving it to a spot closer to a window and making more shelves, which almost instantly got me painting some figs.

My video work space is waiting for key elements, but is ready to go and my old desk top computer, back from the dead is giving me depth and room to move.

Relax, enjoy it and let the strength gained empower later work.


Reverse Engineering

Most of my video purchases, really all of them until recently have been reversible*, which is to say, they could all be additions to my stills range if video becomes too frustrating or pointless.

Lenses are interesting here. What would a cine lens add to my stills kit, now that I have 8 of them and it is a thing?

The 7Artisans Hope 25mm wide open on a G9 (ISO 1250). Focus was easy to acquire, the heft of the lens both reassuring and helpful for s sharp image at 1/40th.

Something I have noticed with all of them is a feeling of old fashioned comfort when handling them and sometimes even a little nostalgic rendering.

For me, one of the advantages of manual focus is framing off centre, so it follows a lens needs to be roughly as sharp on the outer frame as the centre, which this lens is.

The Spectrum glass has been directly compared to my Lumix-S lenses and apart from their opposites being true opposites in colour (1 warm 35, one cool etc), the cine lenses are gentler in contrast, but not massively less sharp or less capable in rendering.

The Hope, Sirui and Vision lenses are all capable of holding their own in my MFT stills kit, as crowded as that range is, but nothing wasted.

Specifically, I would use them as studio portrait lenses making the most of their smoother, less punchy contrast in the world of hard and soft light.

Overall rendering is usually good with cine glass. The inability to easily change things is post means their simpler designs can be focussed on classic results, Bokeh and draw being some of these.

Rear Bokeh is pleasant enough.

As is foreground.

Close focus is very good. I have a lot of MFT lenses with decent close focus, but even so, it never hurts.

I doubt I will be getting out of video as my path seems to be more determined than ever, but it is nice to know that only a few bits would be useless apart from the odd video job regardless.

*My sound kit, the Video Assist and the recently purchased gimbal.

So, Have I Betrayed Everything I Believe In?

Bit dramatic, but after several post on the subject, I now have a feeling this year of getting it right, of dotting my I’s and crossing my T’s, so I have relented and accepted a gimbal into my kit, just like the reality that LAV mics are needed..

The Zhiyun Weebill 3S combo pack is on sale for half price at $399au* (less than the DJI RS3 mini and without all of that gimbals short comings** or the cut down 3E), right when I decided to look tentatively at the idea of adding a capable, is restrained gimbal into my otherwise complete kit.

The handle, arm rest and backpack all make a difference (now irrelevant if I get the M3s).


I do have opinions and techniques that support never going this way, but to be honest, I am sick of dodging client requests and trying to sell them on other ideas. If I have one, then I can say ”hey, how about this instead” with no ulterior motive assumed.

What price peace of mind?

The whole kit costs less than the 7Artisans 16mm I bought recently with little thought, half as much as the Video Assist 12g that I felt would add much to my video offer and only twice as much as a set of M2 Lark mics I bought simply to hide them on a suit jacket!

Several reviewers rated it as best in price class, a little dated in interface, but not capabilities and it should last, being over powered for my intended kit (MFT body, probably the GH5s, with a cine prime on or the G9II with an AF 8-18).

I have several tripods, a slider, a heavy hand held rig, top notch internal stabilisers, top, side and under handles, shoulder and chest rigs and other tricks, but now I also have a gimbal.

Unlike some I do not expect it to be the first thing used, but I also have an open mind as to the things it may bring like “Vortex” mode (360 degree roll) and some pan arounds etc. I promise not to over use it, because then I would be a hypocrite ;)..

Ed. I cancelled it. The second order also went on to extended back order, so I took the hint. Betrayal avoided.

*Later changed to the M3S combo pack for $349 as stock is limited in the extreme. This actually feels better as it is enough, but not a “crutch” to use all the time.

*The DJI RS3 mini would have been plenty, but has a flawed base plate arrangement that requires accessories to fix, comes with no accessories in the box and will only just handle the weight of my gear needs. Some reviewers criticise its fiddly-ness when setting up due to strain on locks and motors and for little gain in size and weight.

Mics Evolve

I have the little Hollyland Lark M1’s in white. White I thought would be good for hiding on clothing, but it turns out I was wrong. Most men wear dark suits, but at the moment, few wear white shirts or it seems, have top pockets.

They have been good the few times I use them, which unfortunately is anytime we use a teleprompter at the school, so quite often. I much prefer a good shotgun mic like the MKE-600 mounted on cam, with a workable range up to 6ft, but needs must as the shotgun on camera is lost in the prompter’s light hood and running it out is less handy (but possible).

I just picked up the M2 combo pack for a reasonable price in black.

These magnetic button type mics will be the perfect “other” mic for me.

I now have a choice between magnetic or pocket friendly, white or black, both reliable and handy, the pair tiny and easily carried and as any pro should have, they are each other’s backup.

I did not need the combo set, but it seems hard to get the basic RX+TX set for less, so a handy option I guess especially for running a backup to a phone or similar. They even come with a set of stickers to cover up the logo.

Reviews have been positive and have to be accepted with the reality, the mic’s sound is only the beginning not the end. Their only negative is the wind cover that obscures the direction the mic is pointing, but I will work something out or use the M1’s or my shotgun is needs be.

Ironically, the M1’s tiny little “fluffies” are black not white so problem solved, or shared maybe, I dunno.

I will find out when I have them if I can use both together, so mic up three speakers or more.

The GH5s, An Odd Choice With My Many Other Options?

With the Black Friday deals around at the moment, it may seem odd to go for the ageing GH5s, a camera with dated specs maybe, but let me explain (hope I can anyway, ‘cos it’s done).

The cage was already floating around, a rare and poor fit for the G9.1, a better one for the GH series. Obviously too busy to find the right body cap :).

I bought the GH5s for a little less than the BMPCC4k (it is usually dearer). I could have bought a G9II for a little more, but as I said at the beginning of this journey, I was after something that grew my space and the GH5s adds a low light MFT, All-i capable camera, with a different crop factor (1:1.8) and BMVA compatibility.

It is in effect a third low light option, a P4k with AF and another decently priced, but quite powerful MFT option. It does offer something that I did not have.

To be honest, if the G9 Mk1 could record longer and had Log, shutter angle and wave forms built in it would have done, but as it does not, the GH5/GH6 or GH5s were the best cheap options.

The P4k was frustrating.

Native B-Raw, was the lure and the chance to buy the camera and a Video Assist to give me two B-Raw cams at a premium price was a strong incentive, but the P4k was annoying me with it’s needs and the shape of my kit was fighting it’s relevance.

The GH5s gives me 3x better battery life out of the box, a lot of “lesser” codec choices than BRaw or ProRes (All-i, VLog-L), the equal best MFT low light performance available, the ability to shoot stills and comes with decent AF and a view finder, in other words it is a hybrid, but a video-centric one. I also liked the smaller profile, the swivel screen and compatibility with existing accessories (several G9 batts and a cage at hand).

Another small benefit, the GH5s is a 1.8 crop, so the Hope 16, 25 and 50mm lenses become 28, 45 and 90mm’s which to a lens are a better fit for my needs than the 2x crop of MFT.

Matched to the new Hope lenses (I have added the 16), it sits well. The slightly older interface, curves and layout are refreshing, reassuring even.

When comparing the two, I often responded better to the P4k B-Raw footage, looking for that tell tale sign I guess, the secret special sauce, but sometimes I did not, I liked the sharp and clean look of the Panasonic and that was regular All-i V-Log-L footage vs B-Raw. With the GH5s and BMVA, I can have both options with colours and curves that match my other cams.

My intent is to go with 10bit/422/.Mov/V-Log or V-Log-L as my realistic bread and butter, 1080 or 4k as needed, the G9II and GH5s in All-i (B-Raw or ProRes as an option) and the S5’s in Long-GOP.

This will give me a good baseline and that cinematic footage option and if I want it later, another BMVA will give me matching B-Raw cams or three with ProRes.

It is a little more expensive this way, but the above options, as well as the option to not do this at all and just go with the Lumix cams as is, or even go down the Ninja-V/ProRes only road, are a justifications.

*

In other news, the struggle to make the G9II a gimbal camera without a gimbal went a step further today.

It seems that if I use a handle on either side of it, I can walk and pan very smoothly. This came from often getting better results with the top handle and also steadying with a side handle. I mounted two in a moment of inspiration and found the elusive “Ninja” walk was much easier to do with two hands on the camera. Not perfect, but a little weight may help.

On that walk, shoes make the difference. I was practicing bare foot and found the jolt almost uncontrollable, then put on my Merrill MOAB’s and true smoothness was realised.

*

Looks like “mr no rigs” here has had a major turn around.

With no fewer than 4 serious video options (bought as such), my thoughts have turned to making this semi random cluster into less of a cluster ………, well you know.

The Commercial kit, meaning the kit that I can trust no matter what.

The S5II is the endurance machine.

Complete with the brand spanking new RigidPro full rig, this thing is out to impress. The rig allows power for everything needed with 4x D-Tap outlets from the master V-mount unit, as well as several outlets from the battery itself.

I have grabbed a Smallrig 99 watt/hour battery and a few Blue Kondor cables, so the camera (dummy batt), mic (C-type) mic (via camera) and monitor (7.5V) are all powered for literally hours on one battery.

Being fan cooled, it is now the “all day” camera, limited only by card life (256gb at the moment, which is about 4 hours of good quality 1080p).

This will be the general purpose work horse my “ground zero” for commercial jobs and I will use the solid and easy to use Lumix-S lenses.

The G9II is the movement specialist.

With the best stabe and AF, lens selection and the best baseline internal video specs (ProRes, All-i, full Log) and high frame rates plus plenty of slo-mo options, the G9II is the logical camera for all movements.

The rig is a simple cage and three handles as well as the option of a weighted base.

This is the second work horse, mated with fast primes and the Leica zoom.

The Cinema kit, the support kit to above, but more for artistic and personal jobs.

This kit has the potential to outshine the more reliable set above, being able to record in B-Raw or ProRes with the Video Assist, but it lacks the easy pathways of above.

The S5 mk1 is the “eye” camera with an extended eye cup, a basic rig designed to be either hand held (held to the eye) or used on a tripod, it’s weaknesses are mitigated and it’s strengths supported. It will be the cine-lens specialist as the S5II is better with AF glass, but either can support the other as needed.

The GH5s is a little like the S5.1, a tripod and manual focus lens specialist, although there is nothing stopping it from using AF glass or being hand held. Like the above kit, this is the All-i capable movement specialist, not so much moving itself, but handling a busy scene.

A thoroughbred video option, it can mate with the BMVA for B-Raw or ProRes or simply be used as another MFT machine. It stabilises fine with a stabilised or heavy lens. It is effectively a Black Magic Pocket Cinema Camera 4k.

Mixing formats is odd I know, but it is how it is, so best make the most of it.