M43 and Full Frame Process Compared

I saw a shot today. A perfect Magnolia stamen wrapped in evenly browned off leaves.

The light was “dappled”, so not ideal. I went inside and grabbed a diffuser panel and the S5 with the kit zoom.

The shot at about 50mm f8 ISO 1000 1/50th. Several were not sharp due to the slow shutter speed and hand holding. There was a little bit of global sharpening, some very slight white balance shifting to warmer, but otherwise as it came.

Yup, all good here. DOF was shallow enough to smoothly blend out of focus areas with the sharp plane. Starting to like this lens.

The mono is nice and easily realised. Compared to the M43 image this one seems more complicated, something that is not always needed for mono.

Slightly worried I would not get a good sharp image with enough DOF, I grabbed a very basic M43 kit (EM10 mk2 and 12-60 kit Pana) and got a second set.

Similar mild processing with a little more attention to the White Balance setting, because I mixed an Oly camera with a Pana lens. ISO 400, 1/50th, f5.6 at 38 (75mm)mm. So lower ISO, a desire to get in closer in a smaller package.

Less fine detail, but still plenty (damned by immediate comparison?). I did get a couple of duds, but more keepers and at ISO 400. I feel the extra detail is there to get, but my processes were loose to say the least.

A simpler file than the S5’s thanks maybe to fewer pixels (16 to 24), but it looses nothing and if anything, the mono processed a little easier, although the colour full frame image was stronger out of camera. Not much in it and happy to use either. I feel I also have a better eye for M43 DOF, but that can change.

The DOF is shallower in the M43 file, but I was closer. I let the framing do itself by feel, so getting closer may have come from a variety of impulses including more comfort with the camera, percieved safer working range, taking a second image “working it” which often creeps closer naturally, the format shape (I feel like going wider in 3:2, tighter with 4:3), or maybe just that I thought it was a better shot.

Nice to have options.

When An Oliphant Is A Hippopotomoose!

I have been struggling with backgrounds for my portrait photography.

Looking to the modern masters such as Rory Lewis, Leibovitz, Mark Mann, Platon etc, has left me with mixed feelings. Many of their images are taken with solid or near solid colours and when they are not, I like their images less.

If I like a texture, I tend to prefer one that is subtle, almost a non-texture, more of a “worn” look on a solid colour.

This is the Oliphant look, which is based on less is more. It has the benefit of being fairly neutral, while also contributing to an image. Like well worn makeup, it only adds to the subjects image, or stays out of the way.

Black and dark grey will likely be my standards, but sometimes textures do add something.

To this end, the only Lastolite backgrounds I have tended to like are the solid colour ones or the Pewter/Walnut, because the Pewter is the closest they do to a texture-non-texture and the Walnut looks very natural as almost the other extreme, like an old wall, not the more styalised and obvious look most have.

I have the Lastolite 1.8x2.1 black/grey on the way. This will be the “fix anything” backdrop, useful for most situations and providing room for gentle colour or tonal shifts to compliment subjects, but not carry the image on their own. For textures though, a $350+ dual sided is a tougher call.

Lots of research, lots of ideas, nothing solid, until………..

My wife dragged me to “Spotlight”, an Australian retail fabric supplier. I discovered their “Jonah” faux leather furniture fabrics and it was sale time!

I came across the brown/grey 140cm wide roll and picked up 4 metres for $60au. This gave me a floor and wall option with gentle texture and a neutral and flexble colour base.

Subtlety is the key.

Keen to make the most of the sale, I went back and to my surprise, I found not only the two other colours they have on their website (light grey and beige), but also a true grey and warm caramel-leather.

I went with 2.5m of the caramel and the light grey for $80au total. That’s three standard width backdrops, each longer than most for under $150au. Today I returned for 3m of the darker grey.

The light grey looks like very mildly textured concrete or stone. It is really just a lighter version of the brown I have, so a dual backdrop shot with a tonal difference is possible and even a near match if I want, with a darkening of the lighter fabric in post or with lighting.

The caramel or “true” leather is a more opinionated fabric, giving me a real tanned brown with again a subtle texture, but more warmth and deeper colour for treaking.

The True grey is tonally identical to the brown-grey, but obviously different in colour. They match well enough to be used together and are nearly identical in mono.

Not award winning images, but good for tests. The three are like mached colours on a paint chart.

In mono, they will look like different densities of the same thing, in colour they are quite different, but still very harmonious.

From a purely practical perspective, the furniture cover fabric is light, very wrinkle resistant, can be sewn on a standard machine, cleans easily, is relatively low sheen*, hangs well and feels great. It is lined with a fleece-like material (possibly another background option), and is durable enough to be walked on.

Compared to a Kate microfibre, that are not as wrinkle resistant as I had hoped and tend to be “vignette” printed, they are a god-send.

Compared to a near thousand dollar, heavy canvas Oliphant, Savage or Unique backdrop, it is a very cheap and practical look-alike that would fool most. For a shooter who is not that in to heavy textures, it is the perfect solution. An affordable compromise that is not really a compromise.

I think my “signature look”, may be to work outside the norm. I will continue to investigate regular fabrics and my environment as my backdrops of choice.

I may still get the Pewter/Walnut Lastolite, but to be honest, between the options of using the environment, the solid colour Lastolite, these four, my Kate and post processing, I doubt I will need it.

*The finish is somewhere between the microfibre of a Kate and a Savage paper roll.

Which Background Is The One

If you could have only one?

Grey.

Why grey?

Because it can do almost anything. It is the fascilitator, the giver and the balancer.

Too much?

Point taken, texture ignored.

Grey, plain and boring, is the best because it can be all you want within limits, but you have to work for it. As is, it is pretty drab, only suitable for a few subjects, but with some effort you can;

Darken it to darker grey or even black by starving it of light,

lighten it to as light as white, by blitzing it with more light than the subject,

shift its colour using post processing, quite easily with brush tools or even just white balance,

use it as a colour bleed-proof replacement layer, like an optional green screen,

vignette it,

simply use its neutrality to hold the subject in stark relief,

change its overall colour completely or shape it using gels on strobes,

use it as a neutral starting point for white balance and exposure.

*

Black is limited because it can do most of this, but needs more light pushed into it and sometimes the flatness is sacrificed for saturation.

White is similarly limited as it is harder to get a balanced grey out of in the first place, effectively making some actions a two step process.

Textures are also limited, because you tend to need more than one or everyone will notice your images all look the same.

The Lastolite I have coming is hopefully an ideal example of the above, with black as an option.

Fighting Daylight

Ask any videographer and they will likely say, fighting daylight is a problem for them.

Outside is often fine, as the sun, the main culprit can provide the answer, a decent reflector, but inside with a bright window behind the subject, putting enough light onto them in an efficient and gentle way can be a test, especially for those buying “budget” lights.

To put this in context, in a dark space, these lights are tons. In a series of interviews we shot recently, I used a 480 LED panel through a diffuser at 35% for the same exposures, so the three COB’s would each likely come in about 10x that!

Below are your choices without lights (aside from aggressive post processing, which is harder in video). You either expose for the subject, blowing out the background, or you expose for the background, leaving the subject in silhouette.

The third image was taken for reference with just a Neewer at 50%, in darker conditions. See how easy it is when the sun is not in the frame.

The solution is to expose for the background as much as you can, remembering there may be a stop or two in post, but not much more unless you are using a full LOG profile, then light up the main subject to the same level, or near enough.

Test 1.

COB lights through a 42” white brolly at 100%, 45mm lens at f2.8 1/45th ISO 200 (the ideal). I also left the black mist on which will reduce contrast, but also blow out highlights. Oops, but in my defence, I would likely use it anyway.

Both lights do a good job, but the Neewer’s fan at 100% is audible.

The Selens in the middle is good enough on its own and near silent. Even in Natural style mode on the G9, I could bring up the shadows and remember also Joe is jet matt black, so he sucks in light.

The Neewer is pushing it. I tried to bring Joe up to the same levels in each, but I think he is still a little under and the background is still too light. The light is softer however. Still noisy when running.

*

Test 2.

Same settings, with a 33” silver reflective umbrella, with the light moved closer, but still slightly further away than the front of the shoot through.

The reflective seems to be a touch more efficient, which I suspected from recent tests.

The pair are good. slightly more contrasty, but maybe more open also, but that may be angle.

The Selens is nearly as good as the pair above. I would use this just for simplicity and no noise.

The Neewer looks much the same as above, struggling on its own, but better than nothing.

*

Test 3.

The Neewer RGB 480 at 100% with collapsible diffuser and the plastic one it comes wih and with only the white panel diffuser, but this is only 1 mtr away from the subject (twice as close) and running on a battery, which is a little weaker in power. These have the benefit of running silently and cool, but are weak.

With the two diffusers, it is not much better than nothing. I forgot to try it with only the collapsible.

Without the second diffuser, it is quite good, almost the same as the Neewer COB (right hand image). This, or one of the NL140’s or the 660 (or a combination) could be my backup to the Selens if noise is an issue.

I was really trying to resist the lure of a second quiet and powerful Selens, but looking at this, I think I need it, because without it, I risk having no silent option powerful enough if it goes down and reliability at this price point comes from depth. The other reality is, more light means softer light.

I do have several panel options, but would be loathe to rely on them only. The Neewer 10.6” flapjack looks powerful also (rated at 30W, but seems better in actual output), but adds more issues with transport etc. and is not necessarily better than the cheaper Selens (I have a large case capable of taking 4 lights, with only three in it and it cannot take a panel).

This test again confirms my suspicion that the Selens may be an older Godox in disguise.

The other option is of course to avoid shooting in this specific scenario. I would naturally when shooting stills without flash, but that may be out of my hands.

Small Studio, Big Plans

So, after a sudden realiseation, I have swapped my much neglected games room to a photo work room and mini studio.

How mini?

Maximum depth unless I stand outside the room (possible) is 3200mm* or 10’6” and my maximum width is 2600mm or 8”, although this is actually 2400mm of actual floor space and 240mm of book shelf up to 900mm/3’. If I shoot towards the book case, I get the extra 10” as background breathing.

This may seem to be a lot of effort for little gain, but looking at a lot of single person portrait setups, often the bulk of the surrounding space is not used, but if space is needed, I will do an environmental shoot, using the techniques I have picked up here. Mods are softer closer and using the average portrait lens (50-90mm on a full frame) means that 2-3m is plenty, especially if mod distance means getting in tighter. Groups and full body shots are different, but I have no other option.

Ignore the pile of books, they are soon to go.

As of now, painted in a pleasant but entirely useless colour for a studio and shot with a “real estate” lens :). The right hand image shows the very maximum distance, about 4m if I stand in the hall! I can see the light being replaced after I break it (!) by a pair of down lights or maybe something even more useful.

Looking at a lot of videos and blogs on portraiture over the last year or two, close working distances are not at all uncommon. Felix Kunze in one example was only 3’ from his subject and she was only 2’ from the V-flat used as a background. With a 17mm (35mm FF eq) I can get a whole standing person with room around, a 25mm is ideal for a seated person or thigh to head and my 45mm gives me a tight upper body. I can even use my 75mm for a dramatic head shot.

I want to be able to do a brilliant white, with equally brilliant gelled colours, a moody to neutral grey with equally moody gel colours and pure black, so a white and grey background are a given, the black comes from light placement.

My options for backdrops are;

  • Paper or vinyl rolls including a white window blind, I can take a 2.7m Spectrum roll,

  • Cloth on curtain rails mounted on the wall or on light stands,

  • Hard panels of thin wood or hard foam with texture paint on them (which allows me to stuff up plenty until I get it right), These could also be “V-flats” for flagging and bounce, probably made out of my many fails. I really like textured “Oliphant” style backdrops, but realise they are hard to nail. I also like the multi panel look some photogs use for forming layers or corners as well as the wrinkle free finish of hard panels. I do have tons of storage space, just a small studio.

  • Canvas for the same as above but portable, probably only after I get my technique down.

  • Painted walls, which is risky for textures but fine for solids.

  • The window can be diffused with a white sheer fabric.

So what colour to paint it?

My immediate reflex was to go white, probably ceiling white as that guarantees a neutral, forgiving, real matt white, which is otherwise hard to guarantee. Note; Un-tinted paint is as neutral as you will get, but true matt is hard to find, so ceiling white works.

This brings up the reality though, that my room is small, giving my about 1m of modifier space, 1-2m from subject to back-drop and 1-2m to me from the subject (3m overall). If I need to control light in a small white “box”, I will be hanging flagging cloth or V-flats all over the place. Claustrophobic much?

If I on the other hand go dark (neutral grey, green or blue, but not black, that’s too much), then I arrest the bulk of the spill, but shrink and force a mood on the room. It would make the room look longer, but also create a gloomy space and bounce would again rely on mods, stealing more space.

The longest shooting distance is towards a window, so I will backdrop that, maybe a simple vinyl blind as the white, then a grey roll (and a Green screen?).

If I go dark, the actual colour will not matter much, but If I go lighter, colour neutrality will be important.

On reflection (see what I did there?), I have decided to do the right hand wall ceiling white (or matt blue for people as I have a white backdrop planned for the long end?), as this is the wall that will get morning sun and soft afternoon light and the rest a deep matt green.

The white wall also gives a more open feeling on entry. The actual green will be a tough one. Darker and moodier, with a warm twist like a deep lime appeals. The left side wall will only be able to do some upper body shots and may need a plinth even, but I want these to be distinctive and my book/camera shelves are dark cedar, which will look nice.

This will give me a pretty controlled environment, with a white wall for near full length or a darker wall for tight upper body shots on the short sides, and these can be a reflective wall for book lighting, a darker wall for negative fill and I can still flag the white or place a reflector in front of the green if desired, I just don’t have to do both at once.

The ceiling will remain white, again for bounce, but I also feel that is the most easily controlled as most mods point downwards.

My floor is black carpet. I am looking into a soft fake wood floor mat a decent rug or some clip together flooring. I do have several 2” square vinyl slate tiles that may be useful as well and I have a couple of long fabric backdrops that can come down to floor level. Shooting low will increase the feeling of room size and intimacy as well as giving me more room for mods.

For props, I have a decent start with an antique wooden chest, a small antique table, two tall modern white metal stools and a hand made Curule chair, gifted to me by my talented father in law. I feel that sitting is better than standing for casual portraits. People seem more relaxed, individual and have more options for their hands when sitting, where everyone tends to stand the same way.

A small lung I have is to remove the custom computer desk* giving me 2’/500mm more room length and another wall to use (textured or blue?), which is on the cards as I do not use the desk top much and it is getting on a bit. I would also like to move the long narrow bookshelf unit running down one wall, but I need it for my cameras etc. Again, something to keep on the back burner.


*

*My intention was to have my printer and comp on the narrow desk, but the huge printer (Canon Pixma 10s) looked really cramped, so being wifi, I moved it to another room. If I shift entirely to laptop operation, the desk can go or become a fold-up.


Field Realities

The Neewer 60w is a great little light, really good value. I was wandering just how good when a recent job forced me to find out.

Today I needed a light on an interviw subject shot against a large side and overhead window on a rainy, overcast day (all I had to work with). The Neewer 60w at 100% with a litttle Neewer 216 also at full noise bounced into a white brolly, was just enough to make a difference, so in a nutshell, one 60w is only just capable of daylight fill working with one of my less efficient modifiers, a reversed brolly.

In a darker or more contrasty situation more can be done, but I will need the second light or a more efficient mod to really hit anything like this again with meaningful effect. Basically, a constant light, dollar for dollar is not even close to a flash unit as my 560’s and Godox can handle bright light fill at reduced power.

This also brings up the 4’ soft boxes. These could add that bit extra the make up the difference, maybe a full stop or more, but still, distance and coverage will be limited.

This is still different territory to the 660 panel, maybe matched by the 10.6” flapjack lights, but maybe not.

On a side note I actually like the light bare and realised on one of the reviews i watched, the guy was using it that way. It is however, way too bright to point at people without something in betwen, so my 7” diffusers with their soft white cover may do the trick.

No mod on the Neewer SL-60 produces hard shadows (the wall is closer than below and the angle different), but the light is acceptably open. My baseline image, the only thing that gives it away other than the wall is the shadow under the chin, oh and maybe a squinting subject.

An efficient and open bounce mod, still with hotter highlights than above!

More tests to come, especially with the new Godox mods and 7” diffusers.

I also have the 150w Selens light pending. This is rated on paper at 3x the Neewer lights, but we will see and if I have the cash, a 10.6” Flapjack could come in handly for overheads and support.

One Modifier To Rule Them All

My ideal with both flash and video imging, is to have one small kit capable of a wide variety of professional lighting effects.

The core of this, will be my four, 4’, deep silver umbrella soft boxes and here are the reasons why;

Versatility. They can be used as large soft boxes, open deep silver brollies, be double diffused or gridded. This gives me the most control to quality I have from one mod type. I was at first concerned my favourite look, the reversed 42” brolly with its smooth highlights would be lost as they do run hotter natively, but the reality is, nearly any look is possible between the modifiers options and some post. The second to last image below is potentiually softer than the 7’ white brolly.

Efficiency. These things guarantee me at lest one more stop of light than any reversed brolly, sometimes even more. This means more grunt for range, for endurance and for control. Even with constant lights, they are reasonably powerful.

Handling. The stem through the side design is great for centre of balance and reduced footprint. These things provide 4’ of double diffusion (bounced then diffused), without the big nose of a Bowens mount soft box (my little 26” on a light is actually deeper when mounted) and more control than a brolly, without the annoying stem sticking out or the “wind catcher” effect.

My 7’ brollies need to be used carefully and many of my lighter, smaller mods don’t feel as well put together by comparison. The end result is the stand needed is not ridiculaous and my C-stand can take 4 of them for a super wall of light!

The only issues are remembering to put the stem in the hole before mounting the light and the hole in the side is only about 8” long, sometimes making tilting an issue, but putting the whole thing on a tilt-able boom or even two on one and rotating the stem itself fixes that, but I also sometimes just push the stem in from the front.

Cost. $100au gets you two Godox ones, with grids, Neewer are often cheaper. That’s 8’ of diffused light with control. That means you can have depth, accumulate consistent parts (double diffusion) and even have a couple set up differently to the primaries, ready to go. I am personally looking forward to the 4 mod, 8’x 8’ monster light. They must be popular because they are regularly the pick for best value mods on ebay and Amazon and the accessories are rarely dearer than smaller mod ones.

I still have the 42” brollies, the 26” double diffused soft box, my 7’ monsters etc, so no issues there, but as my ground zero, my “dependables”, first in the bag, these will do.

A generous and soft light, even from a video lift pretty much straight out of the camera.

Normalised Flash Modifier Tests

The last test had no porcessing applied, to test both look and light efficiency. This group of files are the same ones, but roughly “normalised” by eye. the intention was to get the right brow of Joe Black roughly the same or at least how I would want it if processing.

First up, my favourites, reversed white (and translucent) brollies. The things to take note of are the shadows on the fabric behind “Joe”, which is 20”/50cm away, the shadow hardness from the nose onto the right hand cheek and the transition around the right side of the face (i.e. can you see any ear detail).

Of less interest is light colour, but it is something to take note of.

Reversed brollies always seem to produce the most gentle/flat highlights regardless of other elements in the image.

The no stem 7’ white is clearly softer and more open, but all are pretty soft and the difference between the 42” and 33” is slight other than their colour difference (the cheap Neewer 33’s are stark white, the Godox 42’s warm white).

Pulling the stems in to half way seems to soften their effect, making more difference than the brolly size does. The stem move seems to match the sive above at half stem.

All of these seem to treat the background evenly.

Main take away; Stem position has the same or more effect than changing size of mod.

*

Now for reversed brollies with diffusers. These are effectively “double” diffused.

I find it interesting that even with an effective extra layer of diffusion (bounce), the silver base of these mods still makes them contrastier and more efficient than the brollies above.

The 43” looks closest to either 4’, with the 32” harder overall, the price of being 2/3rds the size, while still being in the same ball park, and it seems quite even over the background and is quite efficient.

Main takeaway; These run hotter than reversed brollies even if double diffused and bigger.

*

Bare silver now, the most brilliant of surfaces.

The 7’ silver manages to effectively remove the rear shadow, but still shows strong and clean contrast on the subject. It is also clearly more even over the whole background.

The 4’ is more open across the face, even though the rear shadow is quite defined and the side shadows are possibly deeper.

The 33” brollies have defined rear shadows, but slightly more open faces (the angle changed slightly due to the size of the 7’ brollies), except the oddity that is the full stem 33”. This is acting like a larger, whiter mod on the face. I suspected I mixed this up with the 33” white sample except that the rear shadow is much harder. I was tempted to lighten this a little more, but looking at the chalk board, it is already lighter than the 1/2 stem image.

The difference in warmth is strange also as they all look cold silver to the eye. This may come down to invisible things like the quality of the backing. Something the top end mods seem to have is a deeper, truer backing.

The 33” 1/2 stem I think wins hardest light overall with the hottest background side.

All of these mods were at least a full stop brighter than any other mods tested, some as much as 2 1/2 stops.

Main take away; Use these for hard/brilliant images only.

*

Shoot through now

I find shoot through brollies are harder looking than reversed ones. The look reminds me of the difference between white and silver mods compared with shoot through/silver showing hotter highlights. The rear shadows are harder, but quite small and the highlights a little more brilliant.

The 1/2 stem versions look softer than the full stem, reversing the effect to the reflected application, which makes sense I guess.

Unlike the reversed images, the shoot through seem less even across the background, the 33” especially.

The 26” is added here as it is technically a shoot through, just double diffused. This one continues to impress, consistently coming in as a perfect middle ground, neutral option. It is in the ball park of the huge 7’, which wins overall when reversed. Unlike most of the mods here, it can also be gridded.

Main take away; I don’t like shoot through as much as refelcted for these mods. If I want this look I will likely use a 4’ silver.

*

Softest?

The king of soft, the Neewer 7’ white has two personailites.

Shoot through, it’s pearl finish warms things up and opens the face the most, but reversed it is more neutral and controls highlights better. The reversed version is better to my eye, but it’s nice to know I have options.

*

Can the extremes be bought into line, that is to say, does it matter with some post applied?

Opposite ends of the spectrum. Considering the vast differences in mod type these represent, they are not completely different in reality. A bit of post (right hand two) can easily change the tonality of the files close to the opposite extremes, but it can not as easily change the light spread or “shape” of the image, nor the background spread.

What this does show though, is that post processing can bridge at least half of the gap in real terms. The softened 33” silver is close to the softest and most open I have shown here, almost to the point of being bland!

Note the slight difference in angles was forced on the testing process by the sheer size of the 7’ brollies. They managed to touch the ceiling and at the same time encroach on the shooting area.

Favourites?

I intend to use the 4’ octa as my work horse mod. Small and well enough designed to be easily applied, big enough to be soft with good coverage, numerous enough to be powerful when needed and versatile enough to be the “one mod” for any job. These are even strong enough to be diffused further, so very versatile.

They do seem to have a hotter side compared to most other mods, even some smaller ones, so placement and fill will be key. The Godox ones (not tested), look to have less briliant silver lining, thicker diffusion, slightly less deep shape and grids, so I will compare them all when I get the studio space up and running.

The 42” is softer, but over a stop less efficient, spills light and is unusable outside. The difference falls within post processing tolerances.

The 7’ white is also softer overall, but the 4’ has more clean brilliance and is safer-easier to use, especially outside.

Used as a deep silver brolly, this is the most efficient mod I have, making me excited for the potential of 4 of them used together!

The 7’ silver is also very strong with more open shadows, but is harder to use and I have and can use one only due to C-stand and space requirements.

The 4’ consistently produces a more focussed shape on the face and stronger background shadows, sometimes more even than smaller mods, likely down to the deep parabolic shape. Focus is good though as shadows can be recovered, but stray light is hard to fix.

I can also grid two of these making them even more focussed than almost any other mod I have.

Other options available to me are to change the flash head diffusion to white domes rather than the drop down transparent panel, change the head spread from 50mm to wider or tighter, change camera and most importantly processing settings or even try some internal baffling.

If I stay determined to master these, or any other mods, I think they will be able to do anything I need, even with tons of other options available.

Still my two sentimental favourites. The awesome value that is the 33“ white translucent ($10ea) for soft flash indoors-several ways and the gridded, double diffused 26”soft box for video with the Neewer 60w or flash outdoors, these two will be close at hand always.

A Quick Light Spread Test

A very quick test after a fortuitous discovery. My 26” octagonal double diffused soft box, can take the grid from my square 24” one, the one that gets no love because it is a pain to transport and use. I think that one may be cut up into 4 triangle reflector panels.

The basic set up;

1.2m to the black backdrop from light head,

then 1m to camera with a 35mm eq. lens to fill the frame,

light as noted on the back of the light (60%) and camera to what ever will expose ok.

The egg crate grid really does make a difference. The small soft box is already reasonably well controlled, the trade off for a less powerful working distance to softness ratio, but the grid does help focus the light down even further. There was also a drop off of about one stop of light, which may come in handy as the SL-60 only goes down to 10%, which is still quite bright.

I did not test my 7” diffusers, but I am guessing that the next step down would be one of those with a diffusion cloth over it, then a bare diffuser, then grids (60 to 10 degree).

*

While I had the set-up made, I tried out the 4’ models, important as I just bought 2 more with grids.

As undiffused deep silver brollies, they are well enough controlled. I have no explanaition for the hotter bottom section. I checked everything was straight and repeated, but still no clue.

With the diffuser, the light is wider, softer and transitions more gently. Notice the even bleed onto its own top edge. These are obviously more even as they spread compared to the much smaller 26”. Good stuff to know.

I am guessing, based on above, that the grids will give me the softness of the diffuser with about the same spread as the bare mod and a drop off of about a stop or so in power. The Godox mods may also be different to the Neewers (or more likely be identical!), so I will have access to a massive 8x8’ wall of light, soft or brilliant, or 2x double diffused 4’ mods, with or without grids and could theoretically grid a bare mod for even more focus and brilliance. I will do a better test of these when the grids come.

I have not been using these enough. They have a good centre of balance, are wind resistant, can take any light I have, are deep for better directionality, bright-really bright and now, with grids and extra units coming, can add depth, multi angle coverage, massive power and/or control. I watched a Joel Grimes video once where he used a large wall of light mods to cover a moving model, which I guess, I can now do also.

*

Just for fun, I thought I might try a 33” silver. These are pretty cheap stuff, so the “black” lining did little to actually stop stray light. I quickly brushed this in to remove the distraction, the edge “bleed” is actually just my rough brush work.

I also tried a white, but the amount of light coming through the top exceeded the amount reflected, making the test pointless. Handy to know anyway. Apparently you do not lose any light using translucent brollies for bounce compared to backed ones, which seems odd considering how much went through.


Well enough controlled for my super light* light kit’s version of above maybe. Again more light lower down, so it is either the light, the floor bounce or I am not as careful as I would like to think.

The little 26” Double diffused soft box is a nice option for the SL-60. With the grid, I feel I now have several levels of control in a nice neutral light. Add a brolly and I can tackle most subjects.

*In a small bag in my car, just in case, is a trio of cheap stands, 2 white, 1 gold and 1 silver 33” brollies, a pair of the bad brolly clamps (not the good C-type, the fiddly ones) and a reflector clamp. Just add a 216 or 176 LED or a pair of flash units and a 5-in-1 for a go anywhere lighting kit.

(Lazy) Video Light Test

So, I got caught short the other day, doing a video job for work.

I was prepared in a sense (I had a ton of options with me), but I had assumed that the room I was filming in, one I had literally just glanced into once a few days before, was going to be available for a few hours before the shoot, but it turned out, I had 10 minutes to set up and the room was full of surprises.

The three large panel panitings on the shooting wall, were glass covered, something I was not expecting and blocking the light fully proved nearly impossible as the blind only went half way down the window and gaped badly at either end. Lots of tape, some creative moving of furniture and a rushed 2 light set-up.

Anyway, this has raised a need to look at my light options, so that part at least can be fixed.

The setup was obviously for stills, but a sympathetic shutter speed was selected (1/45th), my interview aperture of f1.8 and ISO 400 set*.

The distance to subject was greater than the flash test, partly because of fan noise and partly to allow for Bowens mount mods to be fitted, but the subject to wall distance was shorter, basically nothing.

I did forget the 7” diffuser dishes, but I was after portrait softness, not focussed hard light and the strip light was skipped also as it is a specialist, second light mod.

The Neewer SL-60 was tried at 10%, but it proved to be about 2 stops under, so 40% was selected.

The 40% image is the base line, coming in at about -1/2 a stop of perfect, adjusted for the subject being all black.

Bare, the light provides reasonable light as is. The highlights are well controlled compared to quite a few of my modified strobe test images, especially anything bounced off of silver. The shadows are hard edged but that was expected. This is a good base light and powerful.

Lets start with the shoot through 42” brolly as a cheap soft box. I like the full stem version best. It loses the most power, but produces beautiful light. The half stem one is probably the perfect balance.

The 26” double diffused soft box looks to be about the same as the 42” 1/2 stem shoot through, but maybe (is it me?), a little more 3D? Giving better controllability and wind resistance with a larger form factor and slower set-up, this is my favourite mod for a point light, although my wife as a subject said she found it objectionably bright up close. The 4’ Octa’s were better for her.

Reversing the 42” reduces out-put by over 2 stops (notice the light has been pushed to 70% and it is still the darkest so far) and this has been an issue when trying to fill daylight, but I like the smoother light it produces and there is some light to spare in the right situations. Half stem seems more contrasty, but there is not much in it. The power loss may limit their use to flash photography only.

I consistently prefer brollies reversed, which is a lot of the reason I had a Godox 165cm white on my list, for maximum softness and better spill control. Reversed seems to flatten highlights, allowing plenty of room in post to add overall punch without skin glare, without spending too much processing power trying to bring highlights back, and maybe making makeup less necessary?.

*

The 4’ softbox now. These are reflected umbrella types, which theoretically make the diffusion a two step process (bounce then diffused), but I have found the reflectivity of the silver so strong, that when un-diffused they manage to pump out as nearly as much power as a direct light.

A second pair of gridded ones are on the way with a deal that was only twice the price of grids on their own and they are Godox, not Neewer, which may make a difference (Godox position themselves further up the food chain, but in mods I am not sure it will make a difference).

The 4’ soft box without a diffuser is basically a deep silver brolly and has a ton of punch. It pretty much matches the bare light (looking brighter above, but at +30% power), with slightly hotter highlights. This would be my go-to for “impact” portraits. The only issue I have with these modifiers is the limited forward tilt allowed by the umbrella type mounting (the zip hole is only 8” long), but I can get around this by mounting one (or two) on to a strong extension arm.

Adding the diffuser produces a slightly contrastier light than the 42” S/T, but like the 26”, it still has some more direction and spill control. When I get the gridded ones I will hopefully have big, soft and directed light.

*

Now for the 660 bi-colour, theoritically my next strongest continuous light. I moved it in to 1m as this light runs silently and is clearly weaker than the SL-60.

The 660 panel with just the diffuser panel on front (recommended), is slightly stronger than the point source at 40% (I am thinking all things being equal, the 660 comes in at about 30% of the point light overall and they are rated at about 30w maximum from memory).

Adding a brolly hard against its barn doors, much the same as the dedicated diffuser, drops the out-put by about 1 stop, but retains the warmth.

Turning off the warm bulbs, theoretically drops out-put to half (roughly 10% of the point light?), which looks to be the case and produces a predictably softer result, about half way between the S/T and reversed full stem 42”. These are really too weak for main lights unless used directly and close.

The only issue here is the distance from brolly head to subject, about 80cm and lack of power at that close distance. I think these will be relegated to background or hair lights.

*

So, what was learned?

The point light falls somewhere between the 660 panel and my flash heads in power and produces a decent light when used bare, less contrasty than a silver reflector, but casting a more defined shadow. If used outside in low light, away from a wall etc, they would supply decent fill.

Again, brollies keep coming up as the most versatile and handy of mods, but maybe reversed with constant light is too much to ask of them. I have a small bag now with a gold, silver and white 33” for quick video or stills jobs and to honest, they will do most things as long as subject size or distance is not critical.

Reversing brollies with constant lights guts them, but the point light is still useable as long as fan noise is not an issue.

Soft boxes, especially the Bowens mount ones are an option if more control is needed.

Like the stills test, there are things yet to be worked out such as coverage, edge hardness, best useage distances etc, but the two rules of (1) any mod used well can do the job, but (2) all mods have a specific best use scenario they were designed for, still holds true as long as an overall reduction in power compared to strobes is taken into account.

I have since grabbed a pair of Godox 4’ egg-crate gridded soft boxes, for better control.

*

On the shoot I used the 480 RGB at 30% through a 60cm diffuser disc with a large flag for control. This was a nice combination when trying out the Neewer SL-60 the other day. It was ok, not the best option probably. As the day went on, I shifted to the opposite side, fixing some issues with the space, but the light was not focussed or strong enough.

Right now, knowing what I know, I would have used the point light with the 26” and grid for control and placed it at about 1m, maybe with the diffuser if needed for added width and some feathering or the 42” full stem S/T. Because of the glass wall, I would likely have needed the flagging still, but maybe a little less.

*One of my lazy misses was letting some ambient light in, bouncing off the floor, adding about 1 stop of light and the other was I used f2, not f1.8.

Testing My Collection Of Flash Modifiers

I have had a hankering lately to get another flash mod. A medium big (130-165cm), white with black back is the likely candidate, being the only type and size I lack, but before I do, I decided to do a better set of tests of the many I have. Part of the test result is to find out is backed brollies retain/reflect more light than translucent ones. Other reviewers have said they don’t and logically, why would they, but my mods in my situations may vary.

The test was not overly scientific, more practical field test, but it was consistent. the details are noted on an ever wetter chalk board, but the core settings stayed the same;

The flash had fresh batts and tons of time between shots. The zoom was set to 50mm (ff) and the drop down diffuser plate used (not the dome). I have tested this before and found they have a similar effect.

The camera was set to manual and RAW, with no processing applied after the base C1 import.

Exposure was not adjusted, as part of the test is to determine modifier efficiency compared to the best known unit base line (42” reflected Godox).

Light was controlled for the most part, with the exception of a little side light from a small window, but (1) they all got the same treatment and (2) the exposure before flash was near black.

Distance from flash head to “Joe Black” when testing reflector style mods was 1.2m and 1.5m for shoot through mods to allow for their configuration, which is of course not ideal for some mods, but was again, consistent. Joe is matt finish, so he has similar reflectance as skin.

The angle is not quite 45/45, ore 35/35, but again consistent.

*

First up, I did the reflector style mods.

My base settings were based on the 42” Godox transluscent white brolly reversed, which I have had so much success with. I went with what looked right to my eye with the EM10 I usually use for this kind of work.

My first surprise is how much difference moving the light up and down the stem makes, well pushing down the stem anyway. It seems to make more difference than brolley size. Moving it down to full stem length really reduces contrast, which may also be affected by the flash head settings. Moving it forward is more subtle, so rarely worth worrying about.

I have not used the little 32” reflective Octa soft box yet, but I must admit, I like it as a slightly brighter option. I may get a grid for this later, just to add some relevance to it.

*

Next up, the cheap 33” silver brollies. I have already had some luck with these, using them for some drama student portraits. I also have some gold ones, but won’t bother the umpire with those.

Again, the stem length is very important, more so than any other mod. At half stem, it runs about a stop hotter than the white and is far more contrasty, but pushing back to full stem, it loses about a half stop and takes on similar softness to the 33” white. So these seem to be affected in contrast similarly to the whites, but even more in exposure. These varied so much I checked and repeated.

*

Another mod I have had some success with is the 43” umbrella soft box.

Another surprise. The 43” soft box, with black backing and diffuser still seems to run hotter than the shoot through 33” brolly. Considering it avoids spill and aids feathering, this is a bit of a winner.

*

The next mod is the 48“ octagon reflector soft box (x2). These have a few configurations, open (silver), single baffle and double baffle (putting both baffles from the two onto one). I have 2 more of these coming, with grids.

Open, it is similar to the 33” silver, but it’s even hotter. These would be good for covering large areas, except shadows would have to be factored in. The second baffle does make a difference, but to be honest, I would just go with the 42” reversed for less trouble unless there is a power or coverage benefit.

Compared to the baseline 42” reflected, the double diffused 4’ is warmer (the warmest so far) and a little hotter in the highlights, but also a little more open thanks to their added size and diffusion. I found these mods looked poor with the Neewer 60w point light pointed into them, but need to test that. They had obvious hot spots and too much translucence, hence the double baffle test.

*

Now for the big guns. My two 7’ brollies were bought for maximum coverage (yet to be tested) and softness, which has been shown to be the case. I used the transluscent to shoot a group of 12 people with one light source, which it did evenly and in a very “Annie Leibowitz” way.

Very soft, even dull looking. The colour of the brolly is off-white with a pearlescent sheen and this shows in the warm, muted result. Pushing it up the stem opens and brightens it a little, leaving it back seems to be even flatter. Dropping it back fully is not an option due to weight and size. Looks like I can use it in the form you would want, up full stem for stability and a good balance of brilliance and softness.

I think in this situation, the 7’ reflected at half stem is the softest overall, removing the slight brilliance from the highlights the 42’ has.

Ok, so the silver has a lot more grunt, maybe 2 stops at half stem (1/32 power at ISO 400, f2.8 in this situation*), a full stop at no stem length. This is the Big hitter for groups, which is exactly why I bought it, so good thing It is as hoped. It is contrasty and brilliant, but also quite open due to its size.

I can fill this with two or more full strength flash units for some real throw and something I did not try, is a semi collapsed “deep” shape, which may concentrate it even more. This one also has less spill than the white, being black backed, so feathering may be an option also.

*

Now time to look at the shoot through configuration of the brollies and some Bowens mount soft boxes.

First the Brollies.

Compared to all of the S/T options, the reflected 42” base line is softer and darker, but surprisingly the 42” looks warmer than the 7’ this way around, the opposite is true when reversed. I have never liked shoot through as much as reflected as I feel the S/T light creates more hot spots, which is borne out here as well as about half a stop more light. The other effect of shoot through, is these mods start to look like the bulk of my other mods, either negating them, or just confusing matters.

As for the brollies themselves, I see only subtle differences, especially between the two smaller sizes.

*

Finally the two double diffusion soft boxes, the Art DNA 26” with Bowens mount that I will use for the Neewer point light and the annoyingly bulky, square edged 24” which has a egg crate grid option (not tested). This last one is well liked, but only folds down into a 24” triangle, which is just a pain. It looks to produce nearly the same results as the cheapo white 33” shoot throughs.

The Art DNA looks to be a good neutral option for stills and video, striking the perfect middle ground between brilliance and open softness.

I am not convinced the double diffusion has much benefit except to make smaller units look a little bigger than they are.

So, what was learned;

Any of my mods can do most jobs with a little brain power applied.

Bigger mods do make a difference, but it is a diminishing return. A well used 33” with some post can match a poorly used 7’ brolly.

I would always prefer a smaller reversed brolly to a larger shoot through given the choice.

My cheap as chips 33” white shoot through brollies are the best bang for the buck by far. They are versatile, neutral, efficient and so very replaceable (I think I got them in one of those crazy 2 stand, 2 brolly, 2 clamp sets for about $40 and picked up a pair of silver/gold ones for $10). The 42” brollies have been my go-to, but to be honest, the 33’s would likely have managed all the same jobs.

A double baffle soft box is similar to a shoot through, but the light is less “hot” on the surface and more neutral, with mine anyway. These are often the best/only option for Bowens mount lights, but if a brolly can be used, the results are often the same.

The bulk seem to be on the warm side, with only the Art DNA, silver brollies/open soft boxes and cheap white brollies bucking the curve. I don’t mind warmth for people, especially general social work, but will keep this in mind for other subjects.

Getting another brolly would not be wise without confirming I would get something different.

There is no base setting based on distance, camera and flash settings that suits all or even most of these modifiers at better than +/- a stop, but a ballpark is possible.

My base line 42” reversed are a good all purpose option, but guess what? They are some of the least efficient units, so almost anything has more grunt. With the M43 depth of field advantage, where my f2.8 is actually full frame f5.6, I will only assume at this stage that I have enough power between 5 (+) units and these mods to light up a group of 40-50 people if needed! Not bad for about $1000 all up including the flash units.

What I don’t know;

I need to find the sweet spot and best application for each mod. The all exist for a reason, so comparing them to my favourite 42” reversed, seems to be off for some, irrelevant even.

Widths and shapes of the mods, that is which will cover large groups, which are too uncontrolled for intimate shoots without thought, which have slow roll off and when etc.

How much power do I have ultimately.

Things not tested that may effect the end result;

Different distances and angles,

Semi-closing the brollies,

Changing the flash head configuration (wide without diffuser, wide with, double diffused etc.),

Using more than one flash in relevant mods,

Using more than light and mod.

Handy to get them out and use them anyway. It’ amazing the little things you find out like unforseen hassles setting up, limits in space and the feeling of crowding with some.

*so loading it up with three stobes without diffusers at 1:1, f1.8, ISO 800 at 30m+ is likely.


The 12-40 Pro as macro.

I have little use for a true macro lens. I have tried many, usually having one in the kit (several Canon, Olympus . and Fuji).

Since moving over to Olympus, I find the need for a genuine macro has fallen away.

This is partly becasue my tastes have changed and partly becasue my needs can be met by the lenses I have.

The 12-100 pro, 25 prime and even 300 pro are all good, but the 12-40 is the clear winner.

Maximum magnification allows for macro abstracts.

Maximum magnification allows for macro level abstracts.

Cropped slightly, the lens can actually focus this close or closer, but he 40mm focal length allowed me to shoot out of the fear range of the 1cm long insect.

Cropped slightly, the lens can actually focus this close or closer, but he 40mm focal length allowed me to shoot out of the fear range of the 1cm long insect.

Anther advantage of the 12-40 is the ability to do wide angle close focus images.

Another advantage of the 12-40 is the ability to do wide angle close focus images.

Latest Thoughts On My Lens Kit

I feel that the only way to really get to know a lens is to use it for a decent time, in a variety of circumstances. There are simply too many variables and combinations at play.

To purchase, you will likely read a review or two or act on a good recommendation from a user, but that is only step one of a long process. Sad to say, you need to commit at some point and deal with that choice, but my recommendation is to save judgement until some time has passed.

A lens is as good as the best image it can take and how consistently it achieves that.

Overall, my Olympus (and occasional Panasonic) lenses have been excellent, some even magnificent.

I will list them below, not in any order other than which comes to mind first, with a severely potted over view, as I have written plenty on the subject and to be honest, my images should be the gauge, not my words.

  • 40-150 Pro. Sharp, contrasty, possibly brighter than the f2.8 aperture suggests and tough. Jittery Bokeh some times with busy backgrounds, but otherwise near perfect. This lens has forced bag compromises on me, which are fully worth it. It also loves the TC 1.4.

  • 12-40 Pro. A workhorse, reliable all the way out to the edges, fast to focus and offering pleasant and fast transition Bokeh. Only issue is a slight stiffness “lump” that has developed in the zoom around 18mm. This lens is often used for video now.

  • 40-150 kit. Simply the best value lens I have. What a giant killer. The images are “crunchy” sharp, with decent colour. All other specs are great if you ignore the super light build and stiff zoom, but it’s still going and a travel/street favourite. Handily, the lens has a similar character filled look to it’s files to the 17/45 lens combo I use for street.

  • 75-300. This is a sentimental favourite, left neglected as a result of too much choice. If I have a summer sports event, something low key like younger age group events or maybe just need a long lens for un-foreseen circumstance, then I could certainly do worse. It has rich colour, smooth Bokeh and good sharpness. I actually prefer this lens to the 40-150 Pro in strong light thanks to it’s pleasant contrast and it looks as sharp at matching zoom settings. The only issue is written on the barrel, slow maximum apertures, but I knew that going in.

  • 14-42 EZ. This one is a decent video lens offering electronic zoom. Of the three “transitions” (zoom, focus shift, movement), I think zooming is the most obvious and clumsy, so should be avoided, but I have the option. In other respects it is likely my weakest lens overall, but that speaks well of the others as it is not bad by any means.

  • 8-18 Leica. The ringer in the group. I have always liked this lens over the less practical Olympus 7-14 Pro. Focus can be a little twitchy on Oly cameras (although touch screen AF on the EM1’s seems faultless), but otherwise it is a strong performer. The range also sits perfectly with MS-1 stabilising, which crops a little, making it roughly a 28-50 FF equivalent. Only issue is the easily switched MF switch on the side.

  • 17 f1.8. Once my go to lens for street/travel, this one sees little use at the moment, although recently, it has meshed nicely with an old EM5 as a good low light close-in lens. Sharp enough, small, fast and boasting “elongated” Bokeh transition, this is a great lens when focussing is a little hit and miss due to shallow depth or manual focus limitations. Biggest fault is a “ticking” sound in C-AF for video (solved by recording sound separately).

  • 25 f1.8. A workhorse with the same “big” look the 75mm has. Best Bokeh of the shorter lenses, truly beautiful and strong looking. I love this lens for tight portraits with messy backgrounds. Closer to a 45mm in reality, this lens is a keeper.

  • 45 f1.8. I have 2 of these and intend to keep them. The 25/75 combo have a “larger format than M43” smooth and effortlessly sharp look, while the 45 and 17 have a more realistic, character filled look, with tons of micro contrast.

  • 75 f1.8. The Bokeh king, this is likely the most “perfect” lens I have owned. It flattens subjects slightly and genuinely “cuts out” portrait subjects with tremendous sharpness and rich colour. Only complaint is it is a little too perfect and predictable. Biggest issue is the cold metal barrel tends to fog the rear element when mounted on a hot camera.

  • 300 f4. What a blessing it is to have this lens. The look of it’s files is quite different to the 40-150 Pro. The zoom seems lighter and brighter in low light with more obvious, contrast based sharpness, where the 300 has more delicate, very fine detail sharpness and better high contrast control. This lens loves tight cropping and strong light, while the zoom loves low light. Perfect.

The 17 in it’s natural habitat. This lens has a unique character and many very useful characteristics for street shooting.

Snap taken with the relatively weak 14-42 with an EM10 mk2 (it’s natural habitat).

Snap taken with the relatively weak 14-42 with an EM10 mk2.

Flash Modifiers

It has been a lightning ride, but barely 2 months after fleshing out my sparse flash kit, I am now weighed down with options.

I felt it time to look at these options and see if;

any were noticeably better than others,

any were more trouble than they were worth in comparison with other, easier options,

any are not worth using in comparison to others.

First up, the process such as it was.

All images were taken at the same time, in the same location (overcast day), with the same gear (except the modifiers). Some were lightened slightly in post as I underexposed them on my old EM5, by reviewing in a dark room and judging poorly, but I am more after the effects, not consistency of process.

My wife is three metres away from the light stand, 1.5m from the wall and the lens iwas a 50mm equiv.

All except the 7” diffuser set at the end were shot at ISO 200, F2 (AV), -1.5 ex comp (‘cos a wasn’t paying attention), with the zoom at 80mm (which they seem to keep defaulting to when left alone for a while). This meant that almost all of the light in the room was supplied by flash.

Flash power ranged from 1/64 to 1/32 +0.7 in 1/3 stop increments.

I should have used a tripod for camera consistency.

The dark shadow bottom left is a clothes stand between the light and wall.

37.7” umbrella/octagonal soft box. The latest to arrive, this one set up well enough for a soft box*. Nice soft light, open shadows. I rate this one second to the big brolly for softness.

37.7” umbrella/octagonal soft box. The latest to arrive, this one set up well enough for a soft box*. Nice soft light, open shadows. I rate this one second to the big brolly for softness.

Actually a 40”. Harder shadows than the soft box, but a little more brilliance/contrast. The zoom setting possibly effected this one making it a little “hot spot” prone. I will simply diffuse the flash if I cannot get to the bottom of it re-setting …

Actually a 40”. Harder shadows than the soft box, but a little more brilliance/contrast. The zoom setting possibly effected this one making it a little “hot spot” prone. I will simply diffuse the flash if I cannot get to the bottom of it re-setting itself to 80mm all the time.

The 40” white as a reflector.  Slightly softer shadows and more even light (again zoom settings). Apart from being the least efficient option, by about 1 1/2 stops to the best, it is in the top end of softness. This looks to be the flattest, most co…

The 40” white as a reflector. Slightly softer shadows and more even light (again zoom settings). Apart from being the least efficient option, by about 1 1/2 stops to the best, it is in the top end of softness. This looks to be the flattest, most consistent light, but I can spark it up with a small catch light or similar.

Harder than the white (but more efficient and controllable), the 33” silver is efficient, but would need some fill in the shadows for a group (wife clearly not impressed by this one). This would be the “drama” added option, possibly sitting in the m…

Harder than the white (but more efficient and controllable), the 33” silver is efficient, but would need some fill in the shadows for a group (wife clearly not impressed by this one). This would be the “drama” added option, possibly sitting in the mid point between soft and controlled/contrasty.

The massive 72” brolly as bounce. Not practical outdoors (or sometimes even indoors), hard to fill with a single flash and is very heavy on the mounting bracket and stand, it does however fill a room with beautiful, soft light. I could see myself fi…

The massive 72” brolly as bounce. Not practical outdoors (or sometimes even indoors), hard to fill with a single flash and is very heavy on the mounting bracket and stand, it does however fill a room with beautiful, soft light. I could see myself filling a large room group shot with this alone, maybe using two flash units.

Same thing as a shoot through. Softness award so far goes to the 72'“ as a reflector above (as it should), but in either configuration, it’s big. The “white” of the brolly looks to be slightly warm if the wall colour is anything to go by. I will hav…

Same thing as a shoot through. Softness award so far goes to the 72'“ as a reflector above (as it should), but in either configuration, it’s big. The “white” of the brolly looks to be slightly warm if the wall colour is anything to go by. I will have to use the less friendly metal umbrella brackets on the big stand for this one, and I may need 2 units to fill it, which will need the metal brackets anyway.

The smallest soft box, looks much like the silver umbrella, but with maybe a darker periphery. This does have a double baffle that was not used, but looks to be mandatory.

The smallest soft box, looks much like the silver umbrella, but with maybe a darker periphery. This does have a double baffle that was not used, but looks to be mandatory.

With the grid, the light does not seem much more focussed in this space. The grid is designed to reduce light spill, but it looks in this scenario, it made little difference.

With the grid, the light does not seem much more focussed in this space. The grid is designed to reduce light spill, but it looks in this scenario, it made little difference.

The next set were taken at different camera settings because 1/128th power at ISO 200 and F2 were too bright! Way to go little flashes.

Designed for control, the 50 degree grid on a 7” diffuser dish is much more focussed than the 24” soft box A half way point would have been the 16” soft box option. This would be good to create a gel-coloured background with semi-gentle feathering o…

Designed for control, the 50 degree grid on a 7” diffuser dish is much more focussed than the 24” soft box A half way point would have been the 16” soft box option. This would be good to create a gel-coloured background with semi-gentle feathering or for dramatic shadows on a face. Remember to, this is direct light, so colour gelling would be first hand, not diffused or reflected.

The 30 degree grid starts looking spot-lighty, as wanted. Too tight for feathered background colour, this one creates more of a halo effect for a small group.

The 30 degree grid starts looking spot-lighty, as wanted. Too tight for feathered background colour, this one creates more of a halo effect for a small group.

The 10 degree grid leaves you in no doubt that the subject is all it will cover. If I want a halo effect around a single subject or to light a single face against the flow of light this may work, or my next step is a flagged flash, maybe even a snoo…

The 10 degree grid leaves you in no doubt that the subject is all it will cover. If I want a halo effect around a single subject or to light a single face against the flow of light this may work, or my next step is a flagged flash, maybe even a snoot. I am not seeing a massive difference between this and the 30 degree at this distance.

Not tested were the 16” portable speed-light circular soft boxes and the mini soft box I bought for quick field work or the 8x32” rectangular soft box because to be honest, it is a pig to assemble, so I would only used it pre-assembled in a studio situation.


For softness in this scenario I rank them;

72” as reflector (nice and neutral)

37” soft box (much more practical than the big brolly, but slower to set up than the 40”)

72” as shoot through

40” as reflector (wins the award for easiest to use by a country mile).

If diffusing the 40” shoot-through’s make a difference, they will be the in the field standard that all others are compared to, with the soft box as a better option if time allows.

The rest are not soft enough to matter by that measure, but instead bring some level of control and contrast. The award for possibly least useful goes to the 24” soft box.

It looks like, after going through the catalogue of ideas in my head, the 40” white shoot through brollies, which I bought first, are overall the most useful and efficient of the lot.

Shopping list?

Maybe another 37” soft box and 7” diffuser for added control.

Bokeh Myth busting

There is still a lot of confusion out there about Bokeh.

What is it (really), how does it effect our photography, how or why do you apply it and where do you find it?

First up, what is it?

Bokeh (Bo as in bone - keh as in kettle) is an umbrella term coined by Mike Johnson of Camera and Creative Darkroom Techniques magazine in the ‘90’s (still very active as The Online Photographer blog) and John Kennerdell, a then resident of Japan who broached the subject with Mike after noticing it mentioned in several Japanese lens reviews.

This lead to a full magazine edition (no small thing) dedicated to the subject (May/June ‘97 edition of “Darkroom and Creative Camera Techniques”- see Books and Bags for a full run-down). Mike Johnson created the name using the term the Japanese use Boke, changing it to Bokeh to help westerners with pronunciation-not that it helps often (Apple, looking at you). It refers to the “quality or flavour of the out of focus elements of an image”, used by the Japanese in painting. As with many words or terms, it can take on other meanings such as being “fuzzy headed”.

It is especially useful to have a name for this as there is an element of out of focus or transitional focus in almost every camera made image.

Almost no photography (flat object copy work and astro photography excepted) is entirely and equally in focus at all points of the frame, so some, much or most of any image taken with a photographic tool is going to to be either slightly or more, out of focus. This is called depth of field, referring to the inevitable reality that if a single plane is in focus, every other plane is more or less out of focus. The character of this transition varies greatly in form and personal preference, but regardless, it all comes under the general term of Bokeh.

Where it has gone wrong in recent times is in interpretation. Bokeh has become a term used almost exclusively to describe super shallow depth of field and the simple optical phenomenon called “Bokeh balls”, but that is like mixing up flavour intensity with flavour type. Shallow DOF is simply a reality of physics. Longer lenses, wider apertures, higher magnification, relative distance to the background, all contribute to the effects of DOF.

A Bokeh cheap shot. A low end lens, used with deliberate out of focus induced Bokeh against a wall of ball shaped lights. The quality of the Bokeh is poor (blotchy and irregularly shaped), but the quantity is high.

A Bokeh cheap shot. A low end lens, used with deliberate out of focus induced Bokeh against a wall of ball shaped lights. The quality of the Bokeh is poor (blotchy and irregularly shaped), but the quantity is high.

The term Bokeh refers to the quality of blur, not the quantity.

Many photographers have been responding to Bokeh or the different rendering their lenses create since photography became main stream, often proudly stating that an image was made with lens “X” rather than “Y” based on a “feeling'“ or sharpness rendering of the favoured lens, but this was more from an awareness of individual lens character, not a defined measure. They were often responding to the Bokeh, but without having a recognised term to describe it substituted terms like “swirly” or “rough”.

The difference in Japan is there is a defined set of terminologies that can be and are used regularly and seamlessly. “Ni-Sen” for example referred to “cross-eyed” or double lined Bokeh. The problem for us stems from the lack of an over-arching term to describe all of these individual types of blurring in a way western users could understand. The term Bokeh unfortunately describes the phenomenon, not the individual set types within it, but has become the one term we use to describe…what exactly.

What effect does it have?

The reality is, we respond to it whether we are aware of it or not.

Have you ever used a lens that makes images that just look right, especially when there is a lot of out of focus information in the composition? Maybe another that, for some reason you dislike on a fundamental level, but you are not sure why? Chances are this is Bokeh at work. I purchased the Olympus 12-100 F4, fully aware that I disliked it’s Bokeh rendering, but intended to use it exclusively for deep depth of field landscape work, where it’s superior sharpness and versatility would shine. The 12-40 is much preferred when some background blurring is likely.

A personal favourite, the Olympus 45mm f1.8. The Bokeh is not measurable “perfect” and the lens sometimes even suffers mediocre reviews for it’s Bokeh, but that does not change the fact that I respond positively to many images, especially focus near…

A personal favourite, the Olympus 45mm f1.8. The Bokeh is not measurable “perfect” and the lens sometimes even suffers mediocre reviews for it’s Bokeh, but that does not change the fact that I respond positively to many images, especially focus near misses, that would otherwise be binned.

The right and wrong of it are very subjective. One person’s need for silky smooth, even blobby” backgrounds is at odds with a another person’s “story telling” long transition rendering.

This image has the main subject (the facing woman) out of focus (f1.8 used in very low light). The rendering of the lens (Olympus 17mm f1.8) allows, regularly, for these mistakes to be tolerated as it’s transition is long and proportionate. A differ…

This image has the main subject (the facing woman) out of focus (f1.8 used in very low light). The rendering of the lens (Olympus 17mm f1.8) allows, regularly, for these mistakes to be tolerated as it’s transition is long and proportionate. A different lens (Panasonic 20mm f1.7 for example) would show a more modern fast transition to blur, making the man’s back the only fully in focus element, therefore making the image a useless miss. Notice the old woman in the back of the image is still fairly clearly defined.

In the past, mainly due to technical realities of slow films on larger format cameras (both contributing to shallow depth of field as a constant reality), lenses were designed to show deep and graceful transition. As cameras got smaller and film faster, tastes changed. Shallow depth became a creative tool rather than an avoided curse and our preferences for Bokeh changed also.

Pleasantly non-intrusive Bokeh, from and back. The 12-40 is a favourite when smooth blur at the expense of detail retention is desired.

Pleasantly non-intrusive Bokeh, from and back. The 12-40 is a favourite when smooth blur at the expense of detail retention is desired.

The two images above were both taken with different 25mm lenses at the same distance with the same f2.8 aperture and the same camera (the slight magnification difference is down to the modern lens being actually slightly wider than marked). The thing to look at here is the rendering of the hose, pot and flowers in the background.

The left image was taken with an old Olympus Pen lens from the 60’s, where the extra (micro) contrast and complication of the image would have possibly been seen as a benefit. The right hand image was taken with the newer Olympus 25mm f1.8, a lens that shows lots the modern trend for the fast and smooth transition favoured by many. The actual sharpness of the two lenses is similar.

Taken with the unusually good at Bokeh Olympus 75-300 zoom. This lens has good enough sharpness at 300mm wide open to be used regularly, but it’s ability to compress and good Bokeh (when it is possible) strengthens the effect of sharpness.

Taken with the unusually good at Bokeh Olympus 75-300 zoom. This lens has good enough sharpness at 300mm wide open to be used regularly, but it’s ability to compress and good Bokeh (when it is possible) strengthens the effect of sharpness.

You can ignore Bokeh, but you cannot escape it. Some photographers, such as landscape specialists have less need to worry about the Bokeh of their lenses, as they tend to shoot with maximum DOF, but many other forms of photography, such as portraiture play in this area constantly.

Next time you are responding positively or not to an image, consider the Bokeh as well as other compositional elements. It may be the core of an emotional response rather than a purely technical one.

On Light 3

The next type of light we will look at is back-lighting.

Back-light is basically any light that is coming directly towards you, with the subject in between. It may surround the edges of the subject, or filter through it, but either way, back-lighting adds a level of strength to light that is often in contrast to the lack-lustre or contrast-less direct light striking the subject on the other or facing side.

The light beams are a result of back lighting. The strong light needs to be diffused by the subject,s edge, creating the contrasting effect.

The light beams are a result of back lighting. The strong light needs to be diffused by the subject,s edge, creating the contrasting effect.

This is doubly effected light, diffused by the internal environment, then lighting the window from behind.

This is doubly effected light, diffused by the internal environment, then lighting the window from behind.

Very late afternoon back light has given this image brilliance, in stark contract to the darkness around it.

Very late afternoon back light has given this image brilliance, in stark contract to the darkness around it.

The natural filter of back-lighting renders, makes details powerful, without washing out the natural colour of the subject.

The natural filter of back-lighting renders, makes details powerful, without washing out the natural colour of the subject.

The silhouette created here by the back-lit glass adds strength and mystery to the image.

The silhouette created here by the back-lit glass adds strength and mystery to the image.

Often a cause for some photographic trouble shooting, back-lighting is an ideal fix for otherwise ordinary or flat lighting situations.

On Light Part 2

In the second part of our tour of light, I would like to look at one of my favourite types, reflected or bouncing light.

Reflected light has a property that is clearly different from direct light. The look it produces has been used for years by fashion photographers, usually out of necessity (with flash also), to fill in shadows on faces, then over time modified to be deliberately warm, neutral or cool by using gold/silver or white surfaces.

Window light reflected on garden

Window light reflected on garden

 Reflected light is very clean, travelling only short distance to the subject, without atmospheric diffusion and often focussed by the reflecting surface.

untitled-4201914.jpg

If the surface is soft, the reflectance is also soft, even glowing.

This light can look like a Hollywood film set, as this is often the very technique used to control the amount and quality of light.

Personally, I love this drama. I am drawn to the beauty and complexity of the light. The contrast it renders is both compelling and controlled.

I also appreciate it’s intimacy.

Often, it grants you a similar feel to a Renaissance painting, directional, deep and enhancing which is no coincidence, as this is also a technique embraced from that period.

untitled-4210423.jpg

Where do you find it?

One of the best places is any modern city. Lots of reflective surfaces, often multi directional and plenty of near subject matter.

Sometimes the subject provides it’s own reflectance.

Sometimes the subject provides it’s own reflectance.

Light is the air that photography breathes, so it’s quality and quantity is crucial to the process. Reflected light is surely one of the best and most desirable forms of creative light available.

Olympus lenses, an ongoing review january 2019

The lens collection seems to have settled down after some frantic acquisitions.

Looking at the kit a couple of things have surfaced that show a general change in my attitude towards my kit and in it’s use.

Awh.. the touching family portrait. There is one lens missing (the silver haired step child?), the second, silver 45mm that took the image. Most of the hoods are ebay cheapies. I like metal screw in hoods on top of filters ad throw the caps on a box…

Awh.. the touching family portrait. There is one lens missing (the silver haired step child?), the second, silver 45mm that took the image. Most of the hoods are ebay cheapies. I like metal screw in hoods on top of filters ad throw the caps on a box until it’s time to sell the lenses.

The first big change is the super zoom 12-100. Not a zoom lens guy, especially not a super zoom exponent, this lens is effectively glued to the front of my Pen F as the high art landscape specialist. It is brutally sharp, minimises cropping, covering almost my whole landscape range (24-200 equiv), adds extra stabilisation in the only area I deem relevant (emergency low ISO, deep DOF shots without tripod) and doubles as a more than useful macro stand in. It also adds a premium AF performance, fairly long/fast tele if needed.

It’s weaknesses, such as they are, are also minimised in this role. The so-so Bokeh is avoided due to deeper DOF landscape shooting where it’s slightly better OOF coherency (messier Bokeh) helps rather than hinders. Landscape use also fixes any issues raised by it’s slower f4 maximum speed, making every aperture a landscape relevant one.

The size and weight of the lens is laughable when I compare it to any previous top end landscape kit I have owned (6 lens Canon FF prime kit was the worst!) and the minor limitation of 20mp, compared to other shooter’s 30+ is alleviated by it’s corner to corner sharpness through the whole range, the 0% cropping needed in post and the Pen’s electronic shutter. It even eliminates my zoom lens bias with it’s results.

Hard sharp 9/10, generous and smooth 7/10, creatively beneficial 8/10

untitled-180133.jpg

*

Next is the lens I suppose is most at risk of being redundant, the 12-40. It is the second time around the block for me with this one. Purchased in a rush because I had money to spend and a need for a versatile portrait/holiday lens over Christmas, it proved to be the best money I have spent in a while. It is different enough to the 12-100 to stay useful. It is equally sharp, but slightly gentler, showing smoother portrait Bokeh (faster and cleaner DOF drop off), it is an excellent semi macro (both zooms give 1:3 magnification but at different distances/compression) and finally it is a stop faster and noticeably smaller, making it a better travel option. Last but not least it just takes nice images with a minimum of fuss. This lens may go on the next trip to Japan as an experiment in style and process.

Hard sharp 8/10, generous and smooth 8/10, creatively beneficial 8/10

untitled-1280242.jpg
untitled-290078.jpg

*

The final zoom is the 75-300. I am on record as saying that this plasticky, cheap end tele is a surprise packet, especially in the 75-220 range. There is possibly a longer or better lens in the future, but maybe not and this one will not be going anywhere. For landscapes it is ideal (see the 12-100’s weaknesses), for event and sport it is adequate and for candid portraiture it shines. If (big if) I find myself shooting more sport, wildlife or event’s, then maybe the 300 f4, 150-400 f4.5 or 40-150 f2.8 are in the wings.

Tonally this lens is generous, the colour lush and it shows few faults out side of it’s obvious run-of-the-mill specs and basic build quality. it manages to be an “invisible” lens even with it’s inherent power. Most slow long lenses are best only in good light, but it is fair to say this one is brilliant in brilliant light (I find it hard to pick from the 75mm prime in good light).

Hard sharp 7/10, Generous and smooth 8.5/10, creatively beneficial 8/10

untitled-4250104.jpg

*

Far right in the back row is the jewel in the crown, the 75mm f1.8. The lens most capable of creative results difficult to achieve on M43. There is no way that any smaller format (yes even full frame) can provide the amazing 3d “snap” of a larger format camera, but some lenses in these smaller formats give you enough power to get close. A little long for normal portraits, it is ideal for exaggerated DOF drop off and candid portraits.

It is so sharp wide open and has such a pronounced flattening of perspective (even for a 75-85mm), that you can achieve the near majestically super sharp to instantly soft look larger format cameras do effortlessly. The effect is even stronger than the dearer and more specialised f1.2 portrait primes for M43. This is my “secret weapon” lens, although I avoid over using it.

Hard sharp 9.5/10, Generous and smooth 8/10, creatively beneficial 9/10

untitled-8180117.jpg
untitled-050318.jpg

*

The little brother(s) to the 75mm are the pair of excellent 45mm f1.8’s. They are not as perfect, but are equally useful. Under a lot of pressure from a closer focussing Panasonic, two pro end f1.2 models and even a 0.95 Voigtlander, they are still my favourite lenses in this or any other kit. They remind me of the Canon 85mm f1.8 in that they are gently sharp wide open, but get really sharp a couple of stops down. Their Bokeh is neutral to in-offensive and their colour lush. Even if I was gifted a 45mm f1.2, I would keep one of these as a point of difference.

*

Next in line is the 25mm f1.8. If a lens was to leave this kit, it would probably be this one. Having said that, there is nothing I can honestly complain about with it and I even discovered recently, that it is actually closer to my preferred 40-45mm equivalent focal length than I realised (or is marked). Like the 12-40, the lens has high sharpness, but an unforgivingly quick and smooth focus drop off. This led in both cases, to a deep felt suspicion that they were not consistently sharp, when in reality I was miss-identifying a useful trait and not my own technical errors (with face detection activated, both hit the mark). Other features are a lushness and brilliance and very good close focus, making it the third semi macro in my kit. Although I pay it too little respect, I am always surprised how many images I have taken with it.

Hard sharp 7.5/10, Generous and smooth 9/10, creatively beneficial 6.5/10

untitled-060064.jpg

*

The last regular lens and one that has become a firm favourite, but against the odds. The 17mm f1.8 is a true paragon of the street shooter’s trade. Not loved by some reviewers, or even by me early on, it has few detractors amongst actual users. I find it reliably well behaved. The design seems to be specifically aimed at the street/journalist shooter, with size, AF speed and long transition Bokeh advantages ideal for these applications.

It is not designed for fast drop off Bokeh portraits, but rather it renders with a more old fashioned elongated and coherent Bokeh and strong micro contrast ideal for grab shots at wide apertures (the last image in the set was shot at f1.8 in almost complete darkness!).

It is a story tellers lens. The Leica/Pana 15mm or 17mm Pro Olympus are superior on paper, but this lens shows enough difference in character and application to earn a place along side either. It loves to tame strong light, has gorgeous colour and lightning fast AF (and alternatively the MF depth scale is very useful). Use this 17mm lens for it’s designed purpose and there are few that come close.

Hard sharp 8/10, Generous and smooth 7/10, creatively beneficial 9/10

untitled-4220249.jpg
_1010041.jpg
untitled-4220210-3.jpg
untitled-1230338.jpg
_4060325.jpg

*

Last, but not least is the ancient Pen 25mm lens I saved from the junk bin at work. It is not a real contender for serious work and was not apparently even the best of it’s type back in the day, but when I get the urge for some “legacy therapy” or just want a less predictable or different result I have this at hand.

Hard sharp 6/10, Generous and smooth 7/10, creatively beneficial 8/10

Hazy, but sharp wide open, the lens cleans up well and has little to fault at f4 or smaller.

Hazy, but sharp wide open, the lens cleans up well and has little to fault at f4 or smaller.

What is missing?

I still do hold a torch for the 15mm Panasonic. It is clearly a different lens to the 17mm, but the new zooms have added what it would bring, a better landscape option with corner to corner sharpness.

Something longer? Ideally Olympus will release a fast medium prime (200 f2.3/280 f3.5 with extender has been rumoured). The Leica 200 is too dear, so i will wait and see. If the rumoured 150-400 f4.5 is affordable (not!) that may also be too hard to resist.

Something wider? The Laowa 7.5 is interesting. Maybe.

One of the 1.2’s? Probably not. The 75 is very close to the same effect when needed and I actually prefer the f1.8’s for their character, value, size and weight and for being known factors. I think one of the super fasts would end up being an expensive waste in itself and dilute the role of already excellent lenses.

Thinking about printers

Presentation is the final and often over looked part of the photographic process. Unless an image is only ever intended for a web page, then printing, displaying and selling/gifting are to me the whole point of the exercise.

My ideal is to print genuine fine art prints from home, but I have several small issues that need to be addressed before I can consider this a serious proposition.

My flow would be something like; Print a file to the best of my skills at A3. When satisfied, print a run of 4 more. This should cover my outward needs and leave at least 1 print in storage as a permanent record of my work and reference. Archive the file settings (relying on good calibration for consistency).

I have 500 sheets of A3+ printing paper on hand which is my self imposed limit going forward for the fine art printing and photography experiment. Every time I think about fine art printing I come back to printers.

My current printer is the Pixma Pro 9000 mk2. It has many good points;

  • Low maintenance. It basically sits there, idle for months some times and prints as needed without issue. I have had maybe 2 roller marks at the leading page edge, both resolved with a little home maintenance and that is all.

  • It prints sharp, fine droplet images with brilliant colours (an ink-jet strength) and quite quickly.

  • I know it. The printer offers a lot less support to the user, but I am “in tune” with it. Like anything, my comfort level using the EM5 files through Lightroom to this printer is pretty high.

It has some minor issues going forward.

  • It is old and has done a reasonable amount of amateur work (7 years and about 15-20 full sets of ink - that is about $2000 au!). The heads have not been replaced yet, so that is a real consideration for the near future, especially if my work rate increases (still cheaper than a new printer though).

  • It is ink-jet ink not pigment dye. This means that, although it produces brilliant, colourful prints, it does not offer genuine museum grade longevity. The better estimates in good conditions come in at 20-25 years, which is realistically enough for domestic archival storage (how precious is my work going to be really?), but when displayed would probably reduce premium viewing life to about 5 years maximum.

  • It eats inks and annoyingly tends to ignore it’s red and green tanks* (curiously replaced with grey’s in the Pro 100, it’s successor), so buying the bulk packs leaves me with unwanted left overs, eliminating the benefit of buying that way. Also the support for this ink line seems to be dropping to half the range, supporting some cheaper printers, but not this 9 tank line, especially the photo magenta/cyan tanks, where the printer is hungriest.

  • Like a lot of ink-jet (and dye) units it likes some papers and less so others. Having one printer of each would cover most paper types.

  • There is little profile support and nothing “built in”, something the newer printers offer a lot more of.

  • It is ok at mono work (but I do lack anything to directly compare it to) and much of my displayed work is black and white. The owners of these prints seem happy, but I know that maybe I could have done better. The printer only has 1 black/grey cartridge, the Pro 100 has 3 (dropping the useless red and green) and the Pro 10 the same, but the Pro-1 has a 50% grey and colour ink split.

The things that I think are recurring issues for me are the running cost, printer age, ink colour range and print longevity. Lesser considerations are the ease of use and maintenance.

The contenders;

Nothing. Stick with the Pro 9000 and milk every bit of quality out of it, poring another $1000+ into inks and paper, even a new head if needed. Sell or gift my prints with the expectation they will only be displayed domestically for a period of relevance (tolerance) and their longevity will come from original electronic files or stored prints. The printer’s output is still relevant, probably exceeding my skills and knowing your tools has benefits. If a genuine archival print situation comes up, then I use a pro lab and align myself to their output.

Canon Pixma Pro 10. This has often been close to a real purchase. Pigment dyes are the main benefit as the inks are not a lot bigger, leaving me with the usual issue of constant drip feeding, but there is a lot of support from good third party suppliers and apparently you can refill and reset the chips on the cartridges easily. There are other smaller benefits such as WiFi and profile loading. It is priced well ($6-700 au), but some of this saving could be off set by running costs. A small commitment to addressing the main issue, archival dye instead of ink, but no other real benefit.

Canon Pixma Pro 1. Having a reputation as one of the best black and white printers in it’s class is not a strong pull for me. I would probably do a pretty even split between colour and mono, but it does use bigger tanks. The contradiction is there does not look to be much support for the printer by second party ink makers, nor a chip reset/refill option. A couple of sites actually rate it as the most expensive to run (+$1 per A3 print) and it is not much cheaper to buy than the model up. On the bright side, where I work keeps the cartridges on hand for a local pro. It is also huge for an A3+ printer with a foot print close to many A2 models. Premium quality with similar running issues to the printer I have? It looks also like Canon has dropped it in favour of the Pro 1000.

Canon Pixma Pro 1000 (way to be cryptic with your model numbers Canon). The premier desk mountable (just) printer from Canon, this prints A2, which to be fair is bigger than my paper hoard and likely bigger than I would ever print. The real draw is the print quality, printing support, head longevity and cartridge size. Although expensive, these cartridges are industrial sized, making them cheaper in the long run and less prone to sudden depletion surprises like the Pro 9000’s. A commitment to a printer on this scale would force the issue, almost demanding a commercial scale output, maybe even some custom printing. The only real problem I have with it is room, but it is Wifi, so it could realistically be set up in another room. Oddly, in Australia, it is not a lot more expensive than the Pro 1 (see above). Short term pain for long term gain?

No Epson? I still have an issue with some of the wastage and maintenance needs of Epson’s, but their cleanable heads (Canon heads are replaced) are enticing. I have not used one lately, but memories of banding especially after a period of disuse, ink feed wastage when switching paper surfaces and complicated cleaning have put me off. I may need to get over this and look at the P800 (still has the wastage issue) as a real option as their ink tanks are bigger generally. I do not feel there is any real quality difference between the two brands except in specific circumstances and the results are often evenly split.

*This wastage issue has been partly alleviated by using red and green for unimportant or draft document printing

Arguments for micro four thirds

In a time of many photographic formats, micro four thirds (M43) sits either at the bottom of the serious or top of the super mini formats, depending on your perspective. The original lure of small and good is still very relevant, but as the market shifts emphasis, size is not the only consideration.

The Micro Four Thirds (M43) is the only digital SLR/Mirrorless format deliberately made to best suit lens design, with no hold overs to the past. In other words it is the only format that ignored what came before and started from scratch.

Opinions are divided and the tone of the conversation is often determined by preconceptions and bias. Ranging from those who argue for mobile phone cameras to one eyed “full frame” users all have a strong lean towards the benefits offered by their favoured format, usually at the expense of all else. All formats have benefits and all formats have their issues, that determine their functional limits.

The arrival of the mirrorless full frame camera split the field, as did the emergence of the powerful 1” sensor at the top end of the compact camera market. At the other end of the spectrum, ever cheaper sensor manufacture and pressure for the mobile phone “monster” has made medium or near medium format more affordable adding confusion.

“Is it too big, is it too small, do I have enough pixels?”

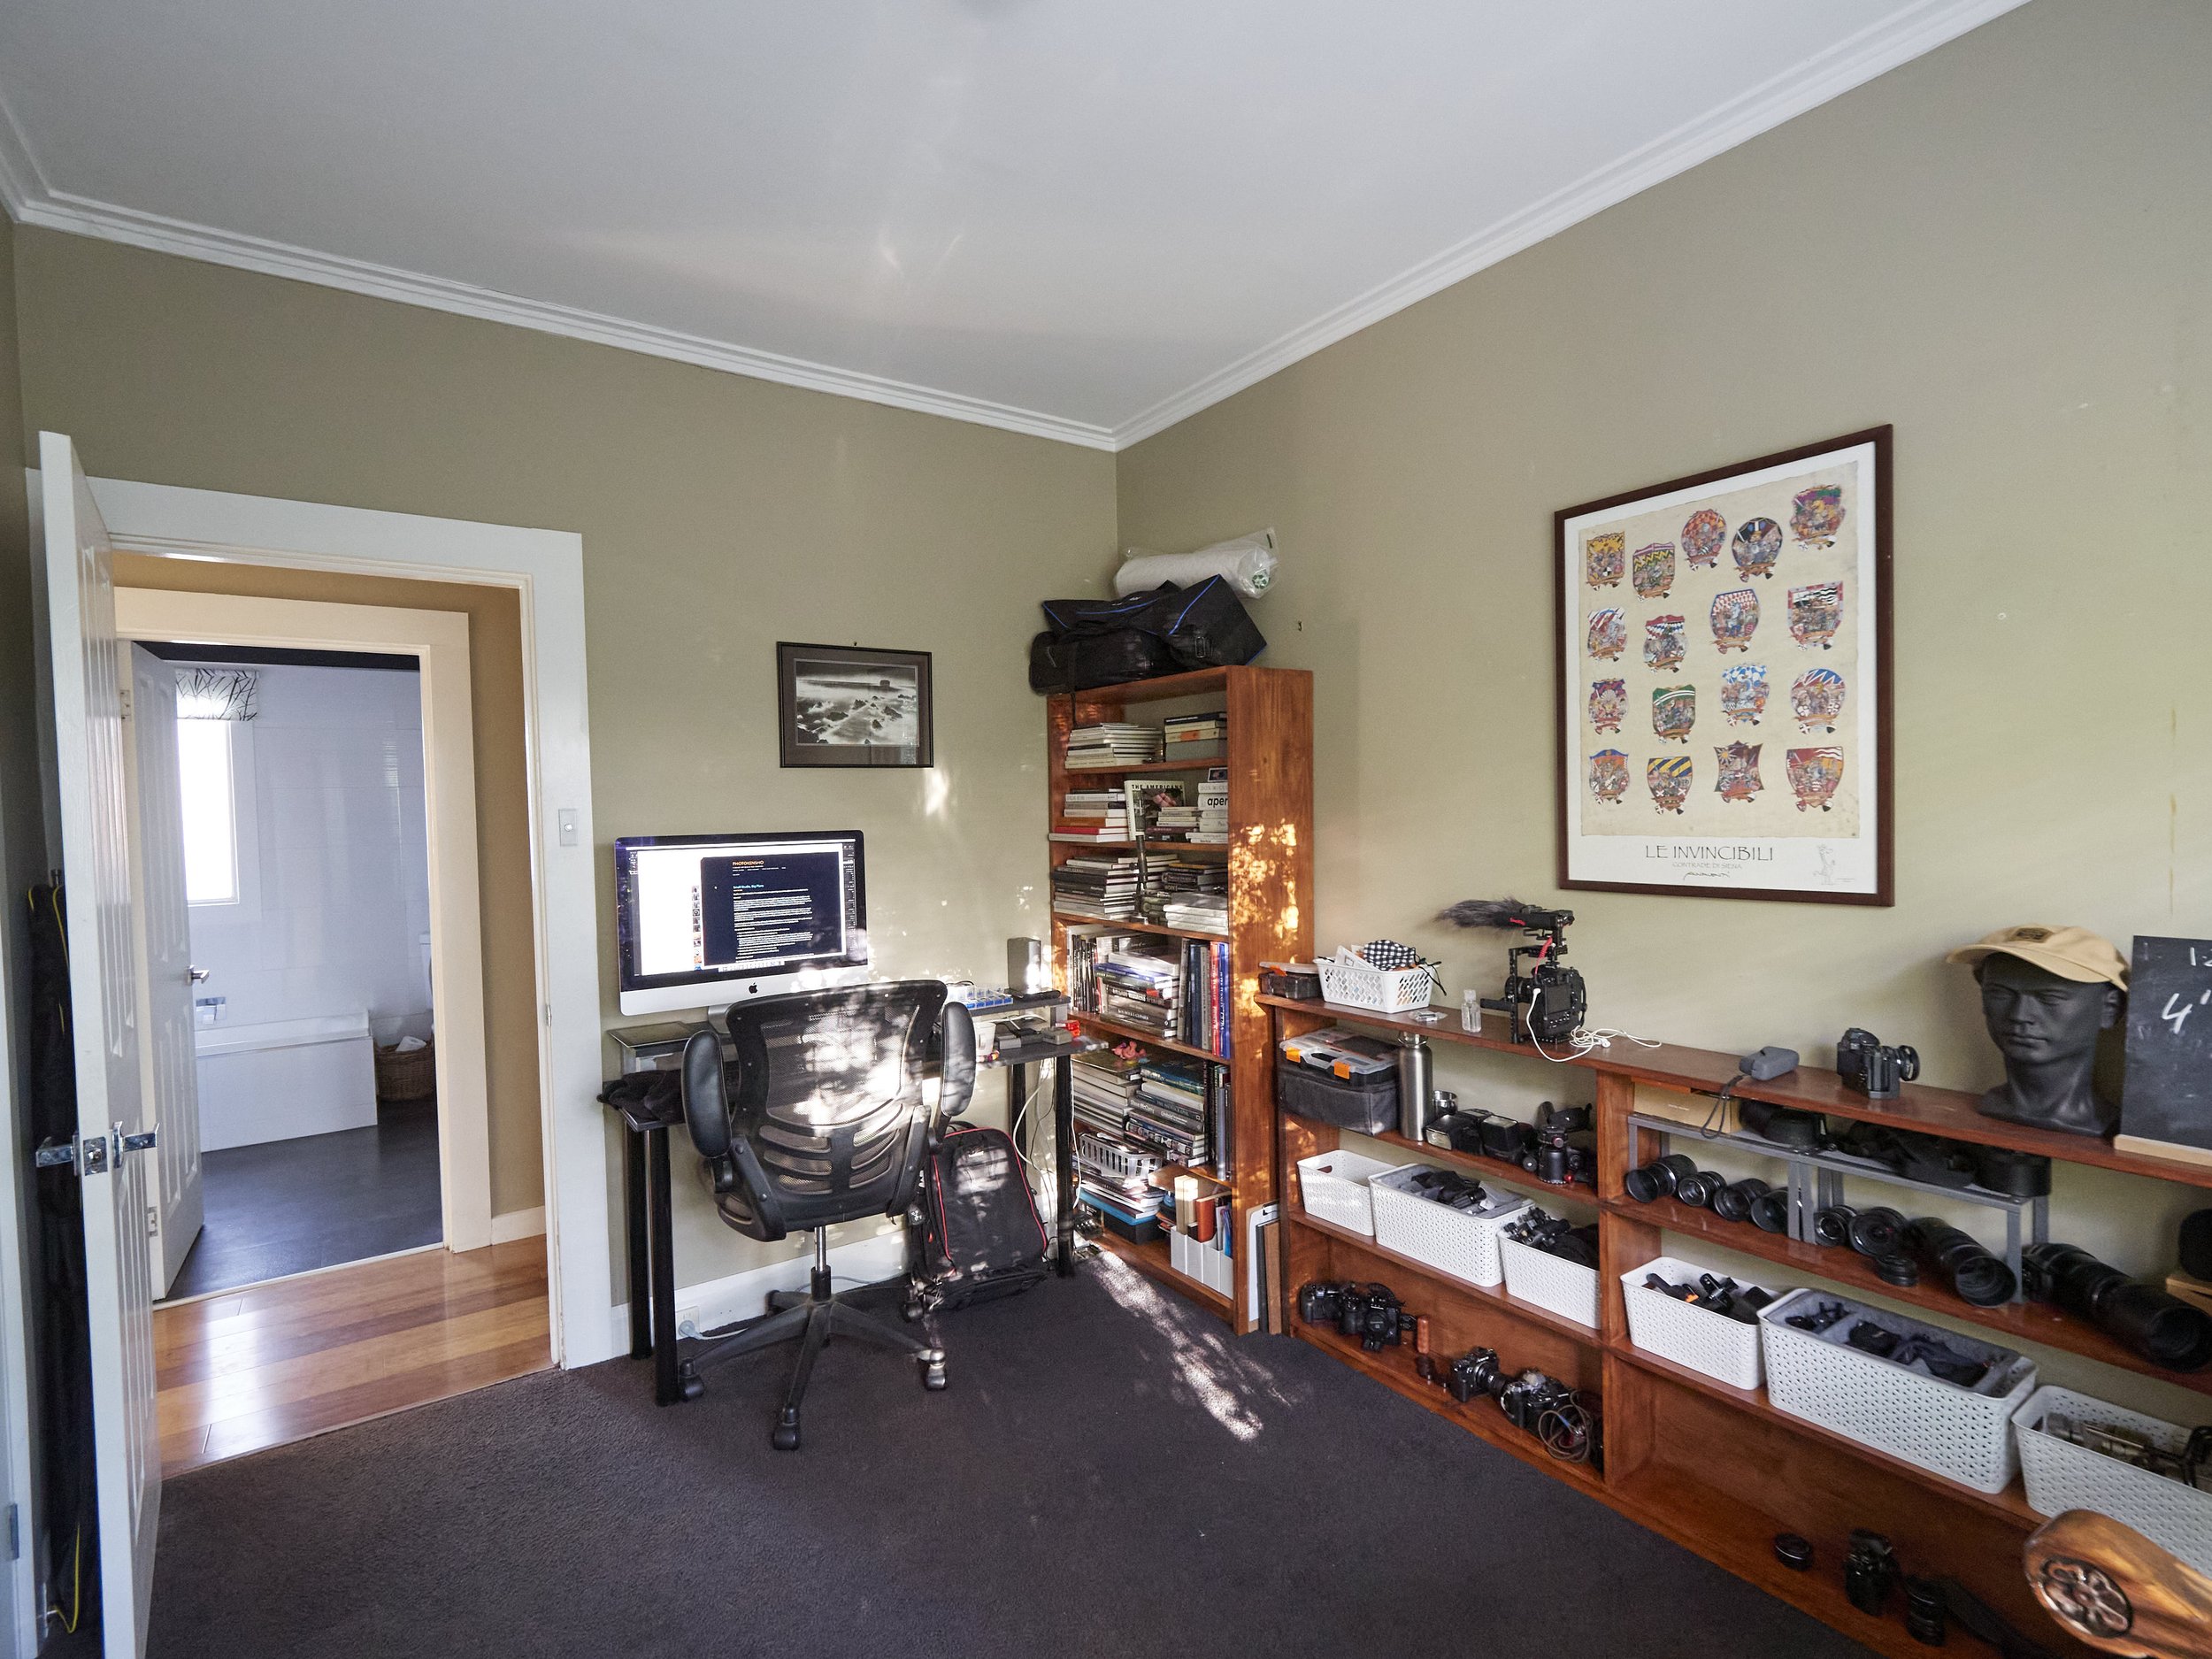
My format of choice is M43. I would like to explore the real benefits, limitations and practical applications of m43 and it’s neighbouring formats, not out of a need to defend my choice, but simply to explain it.

Depth of Field

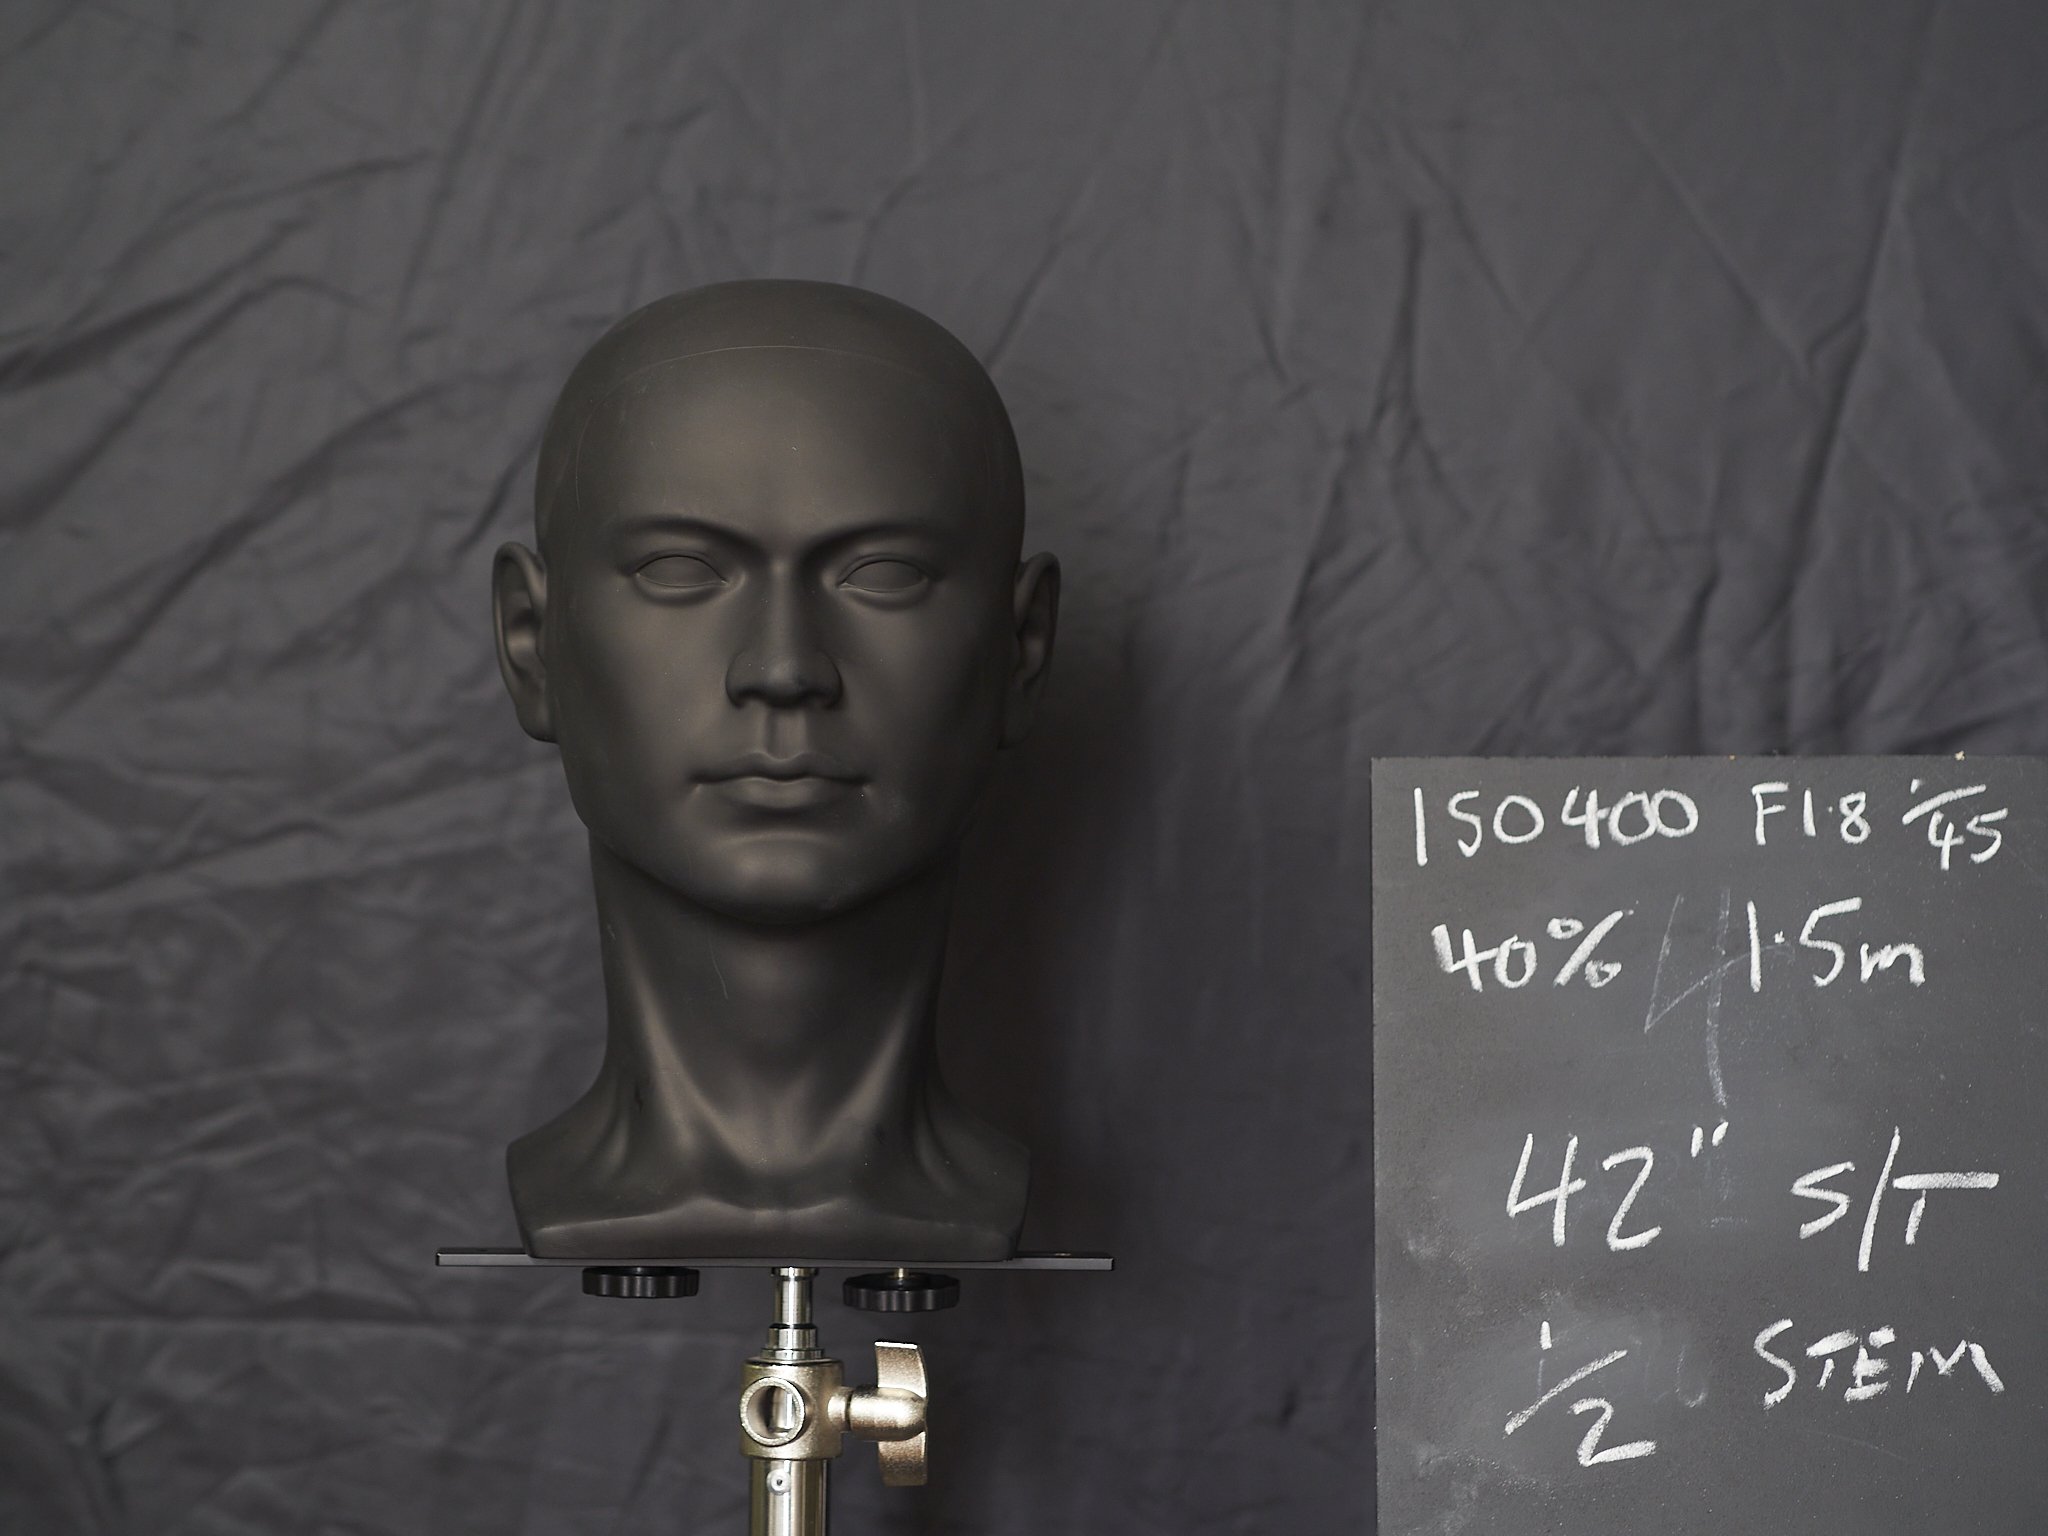
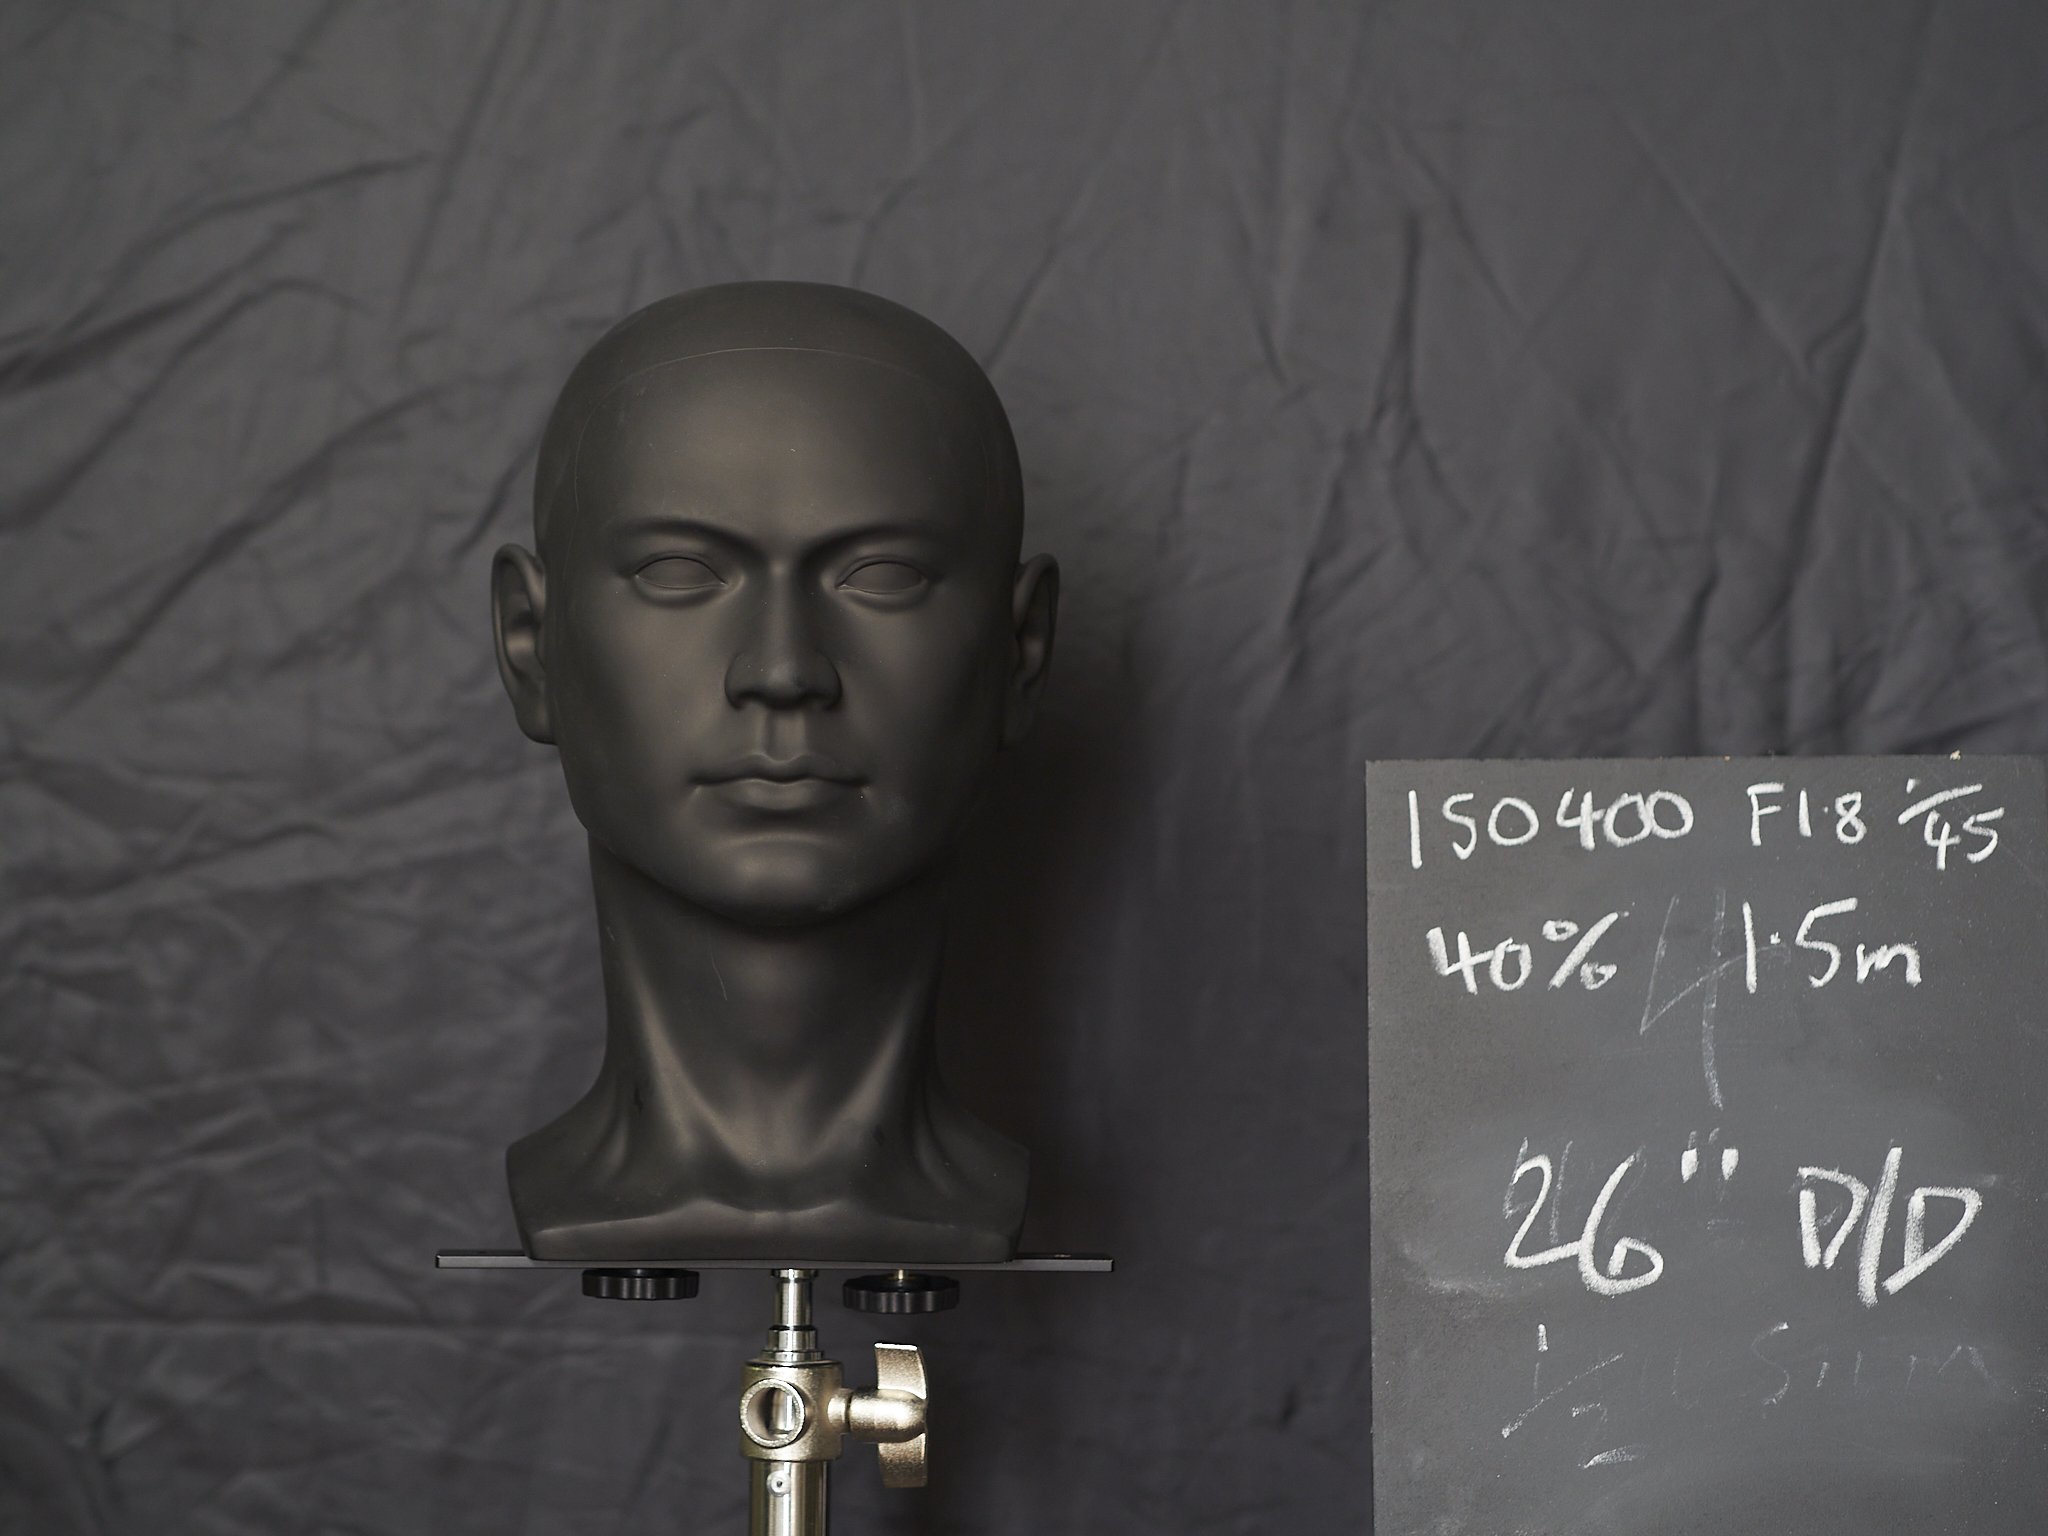
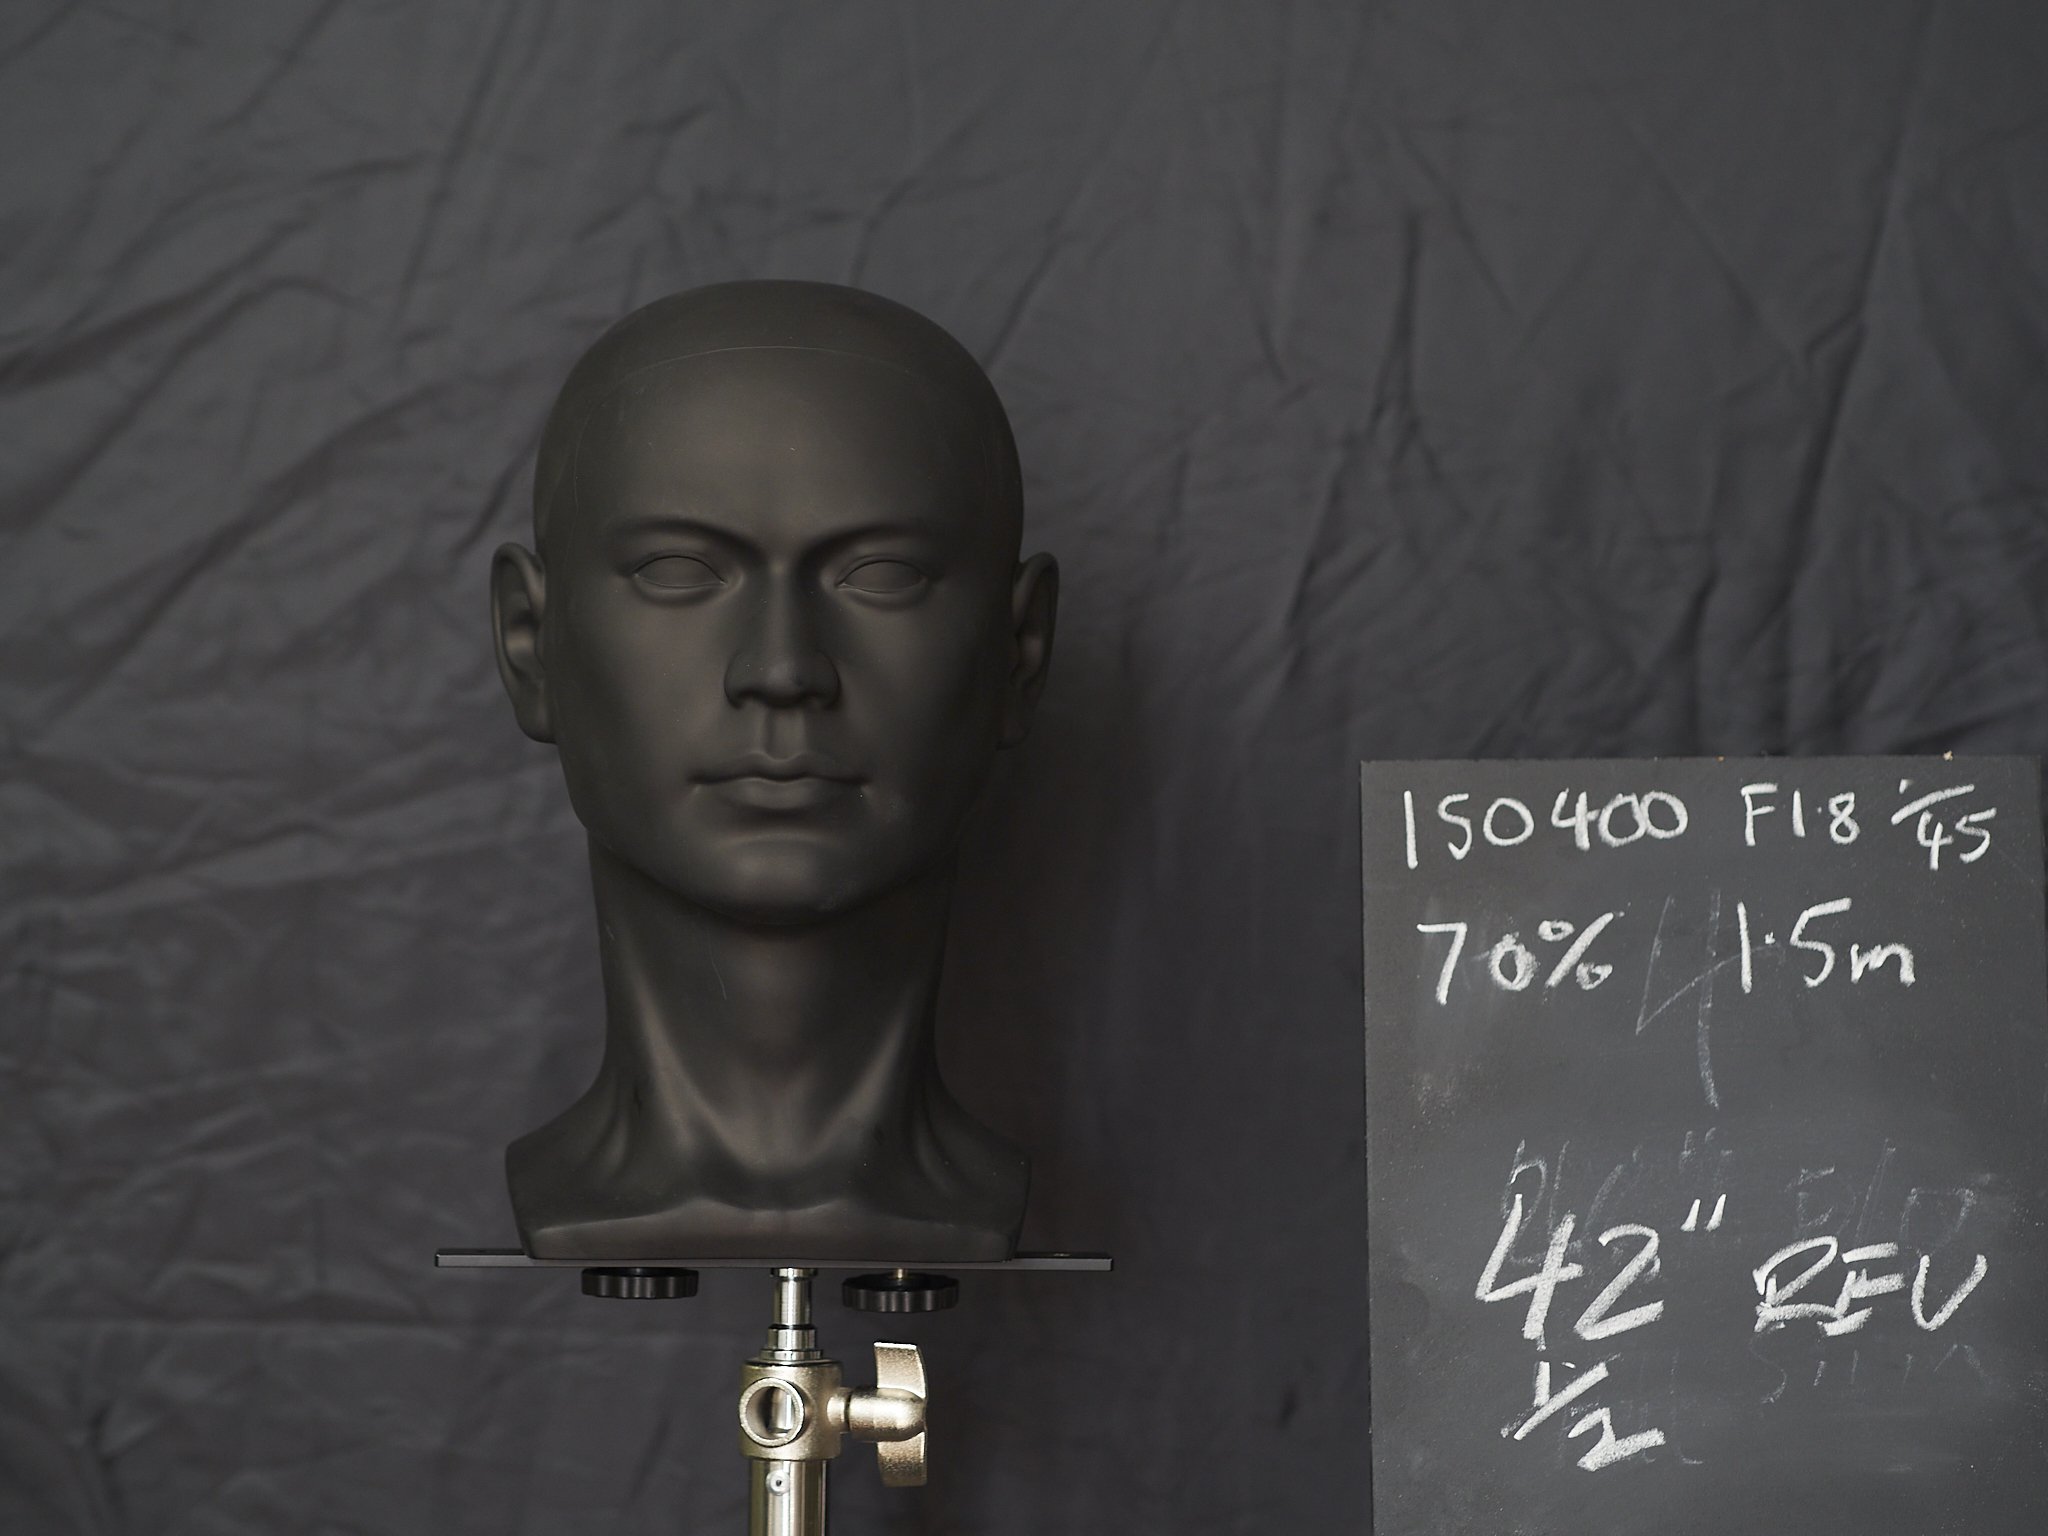
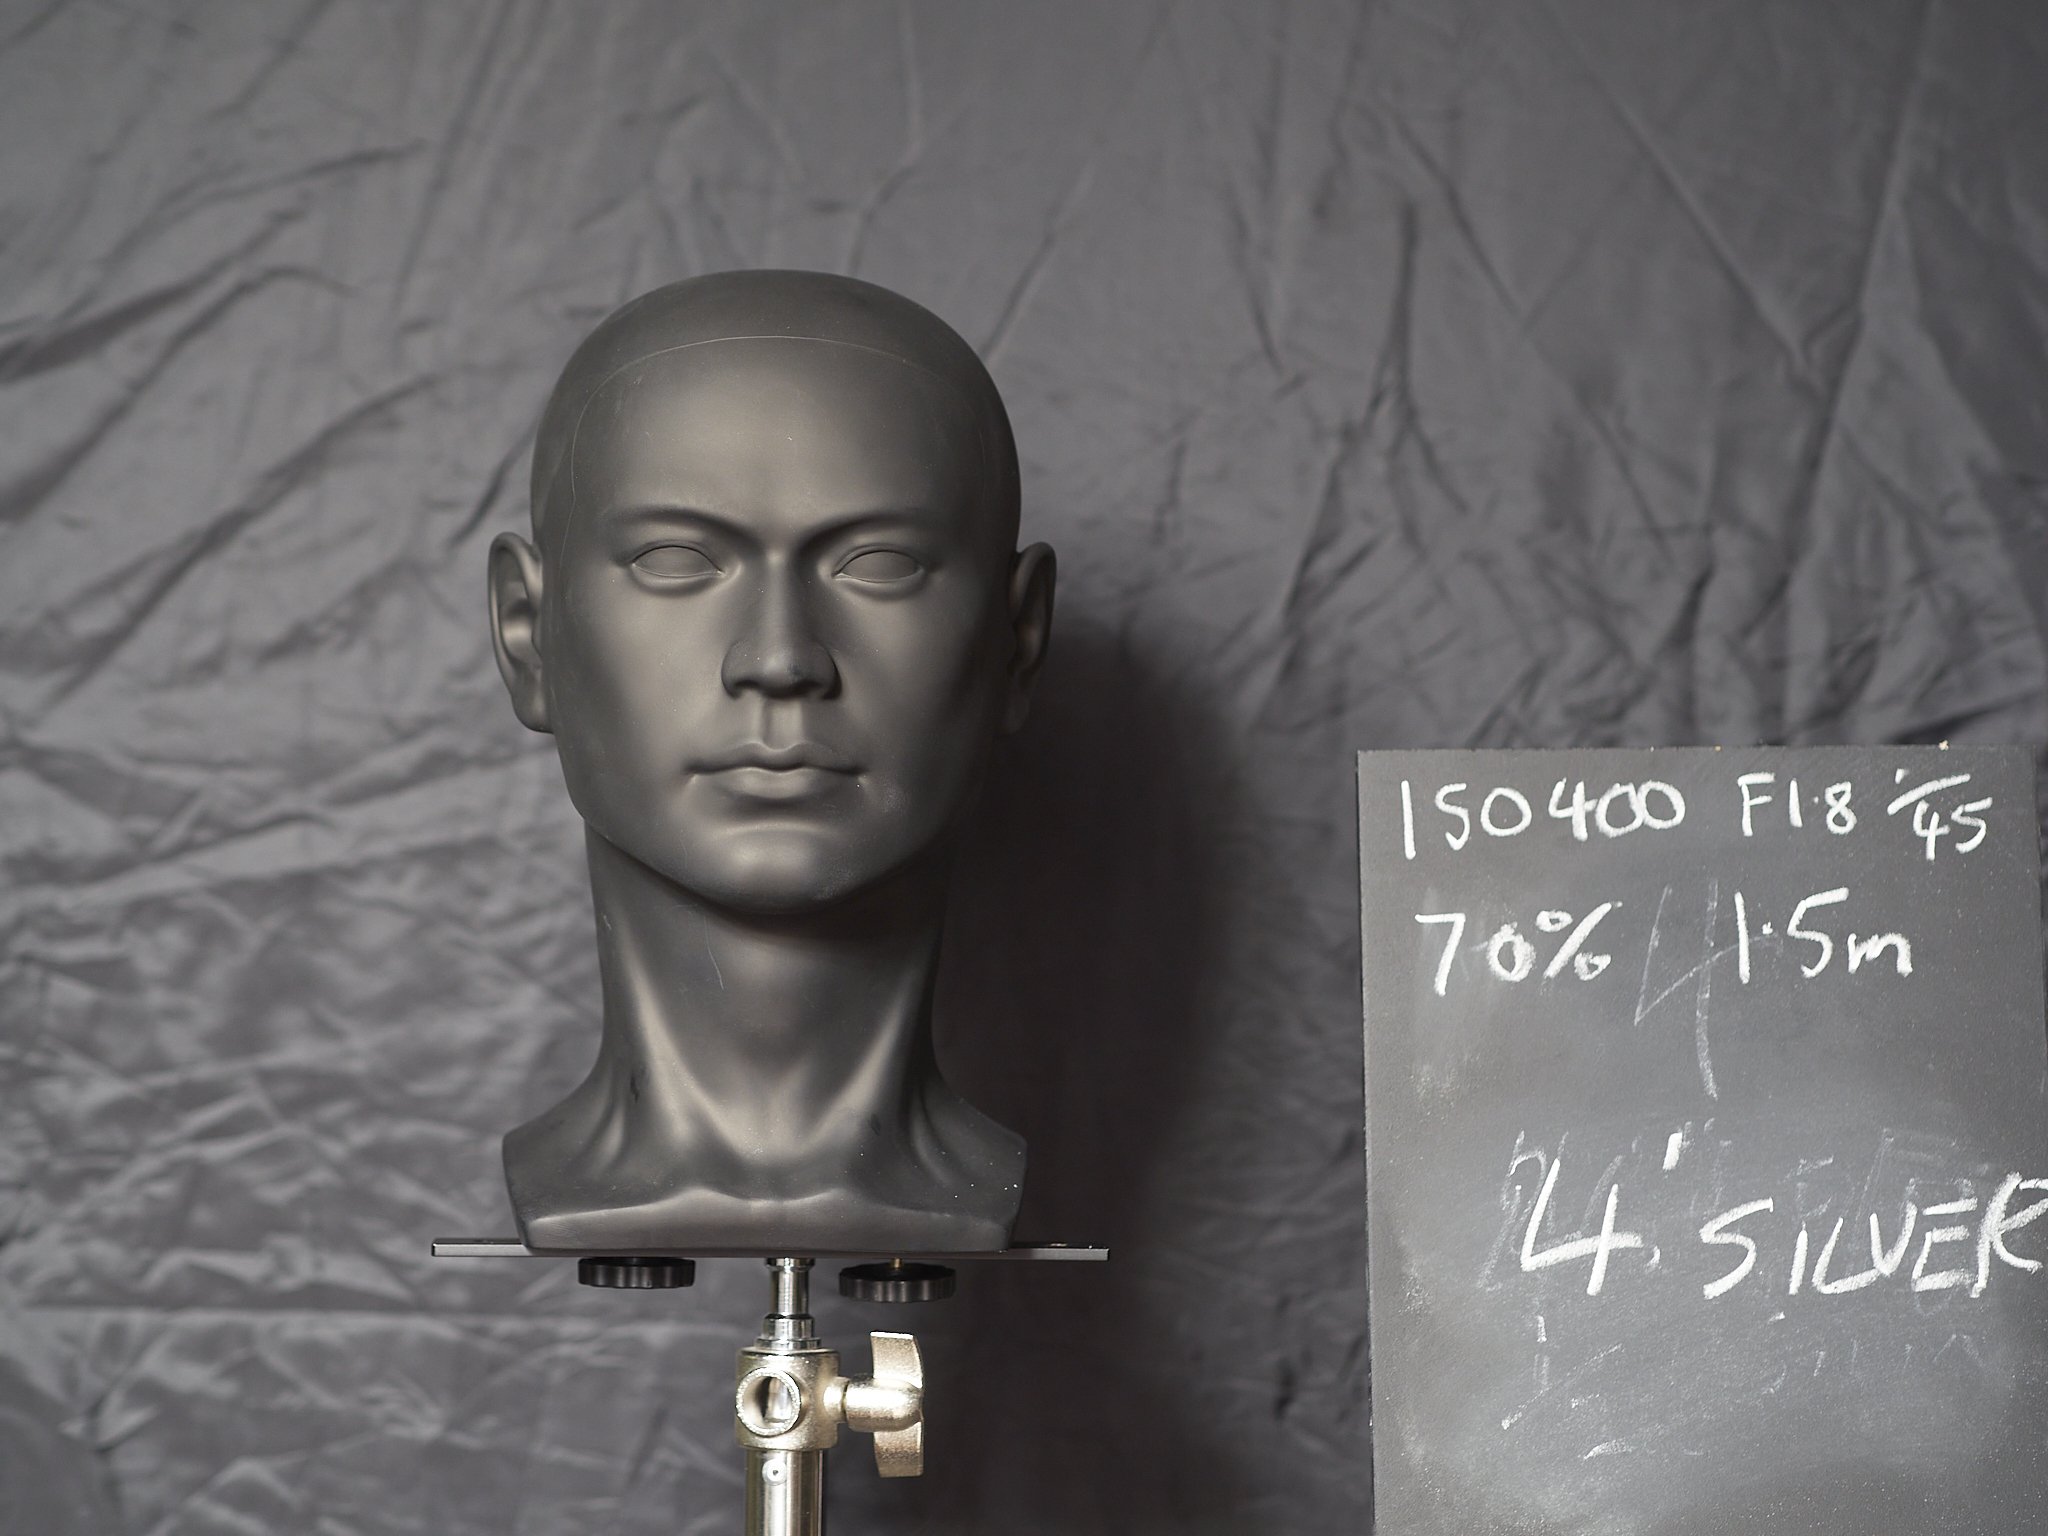
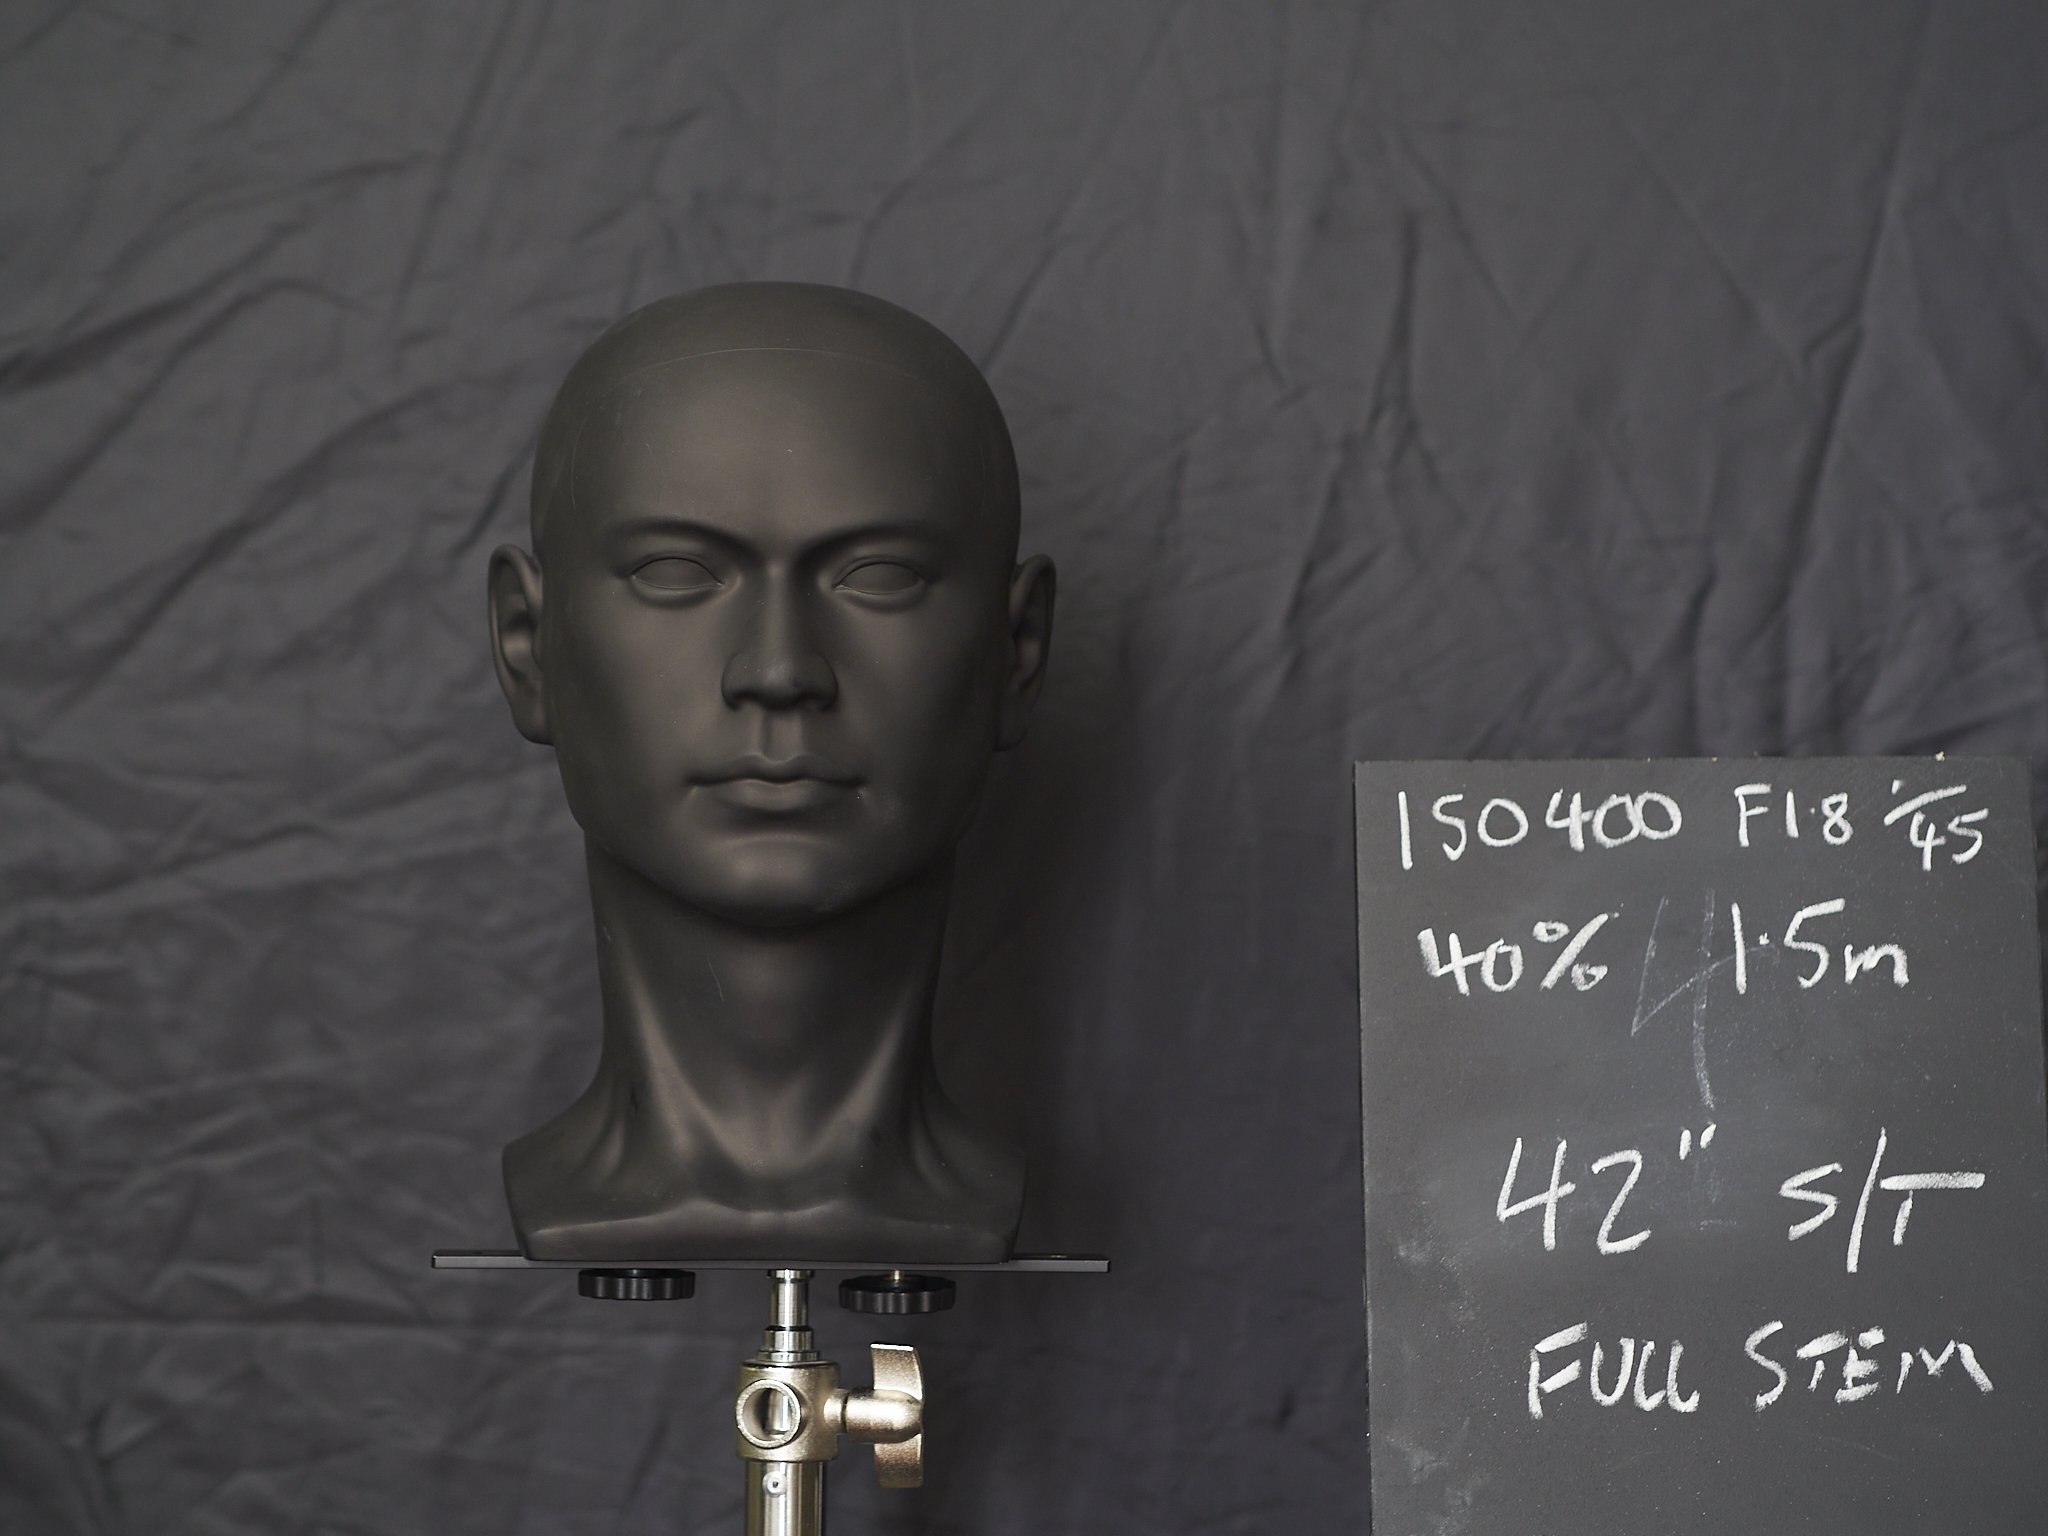
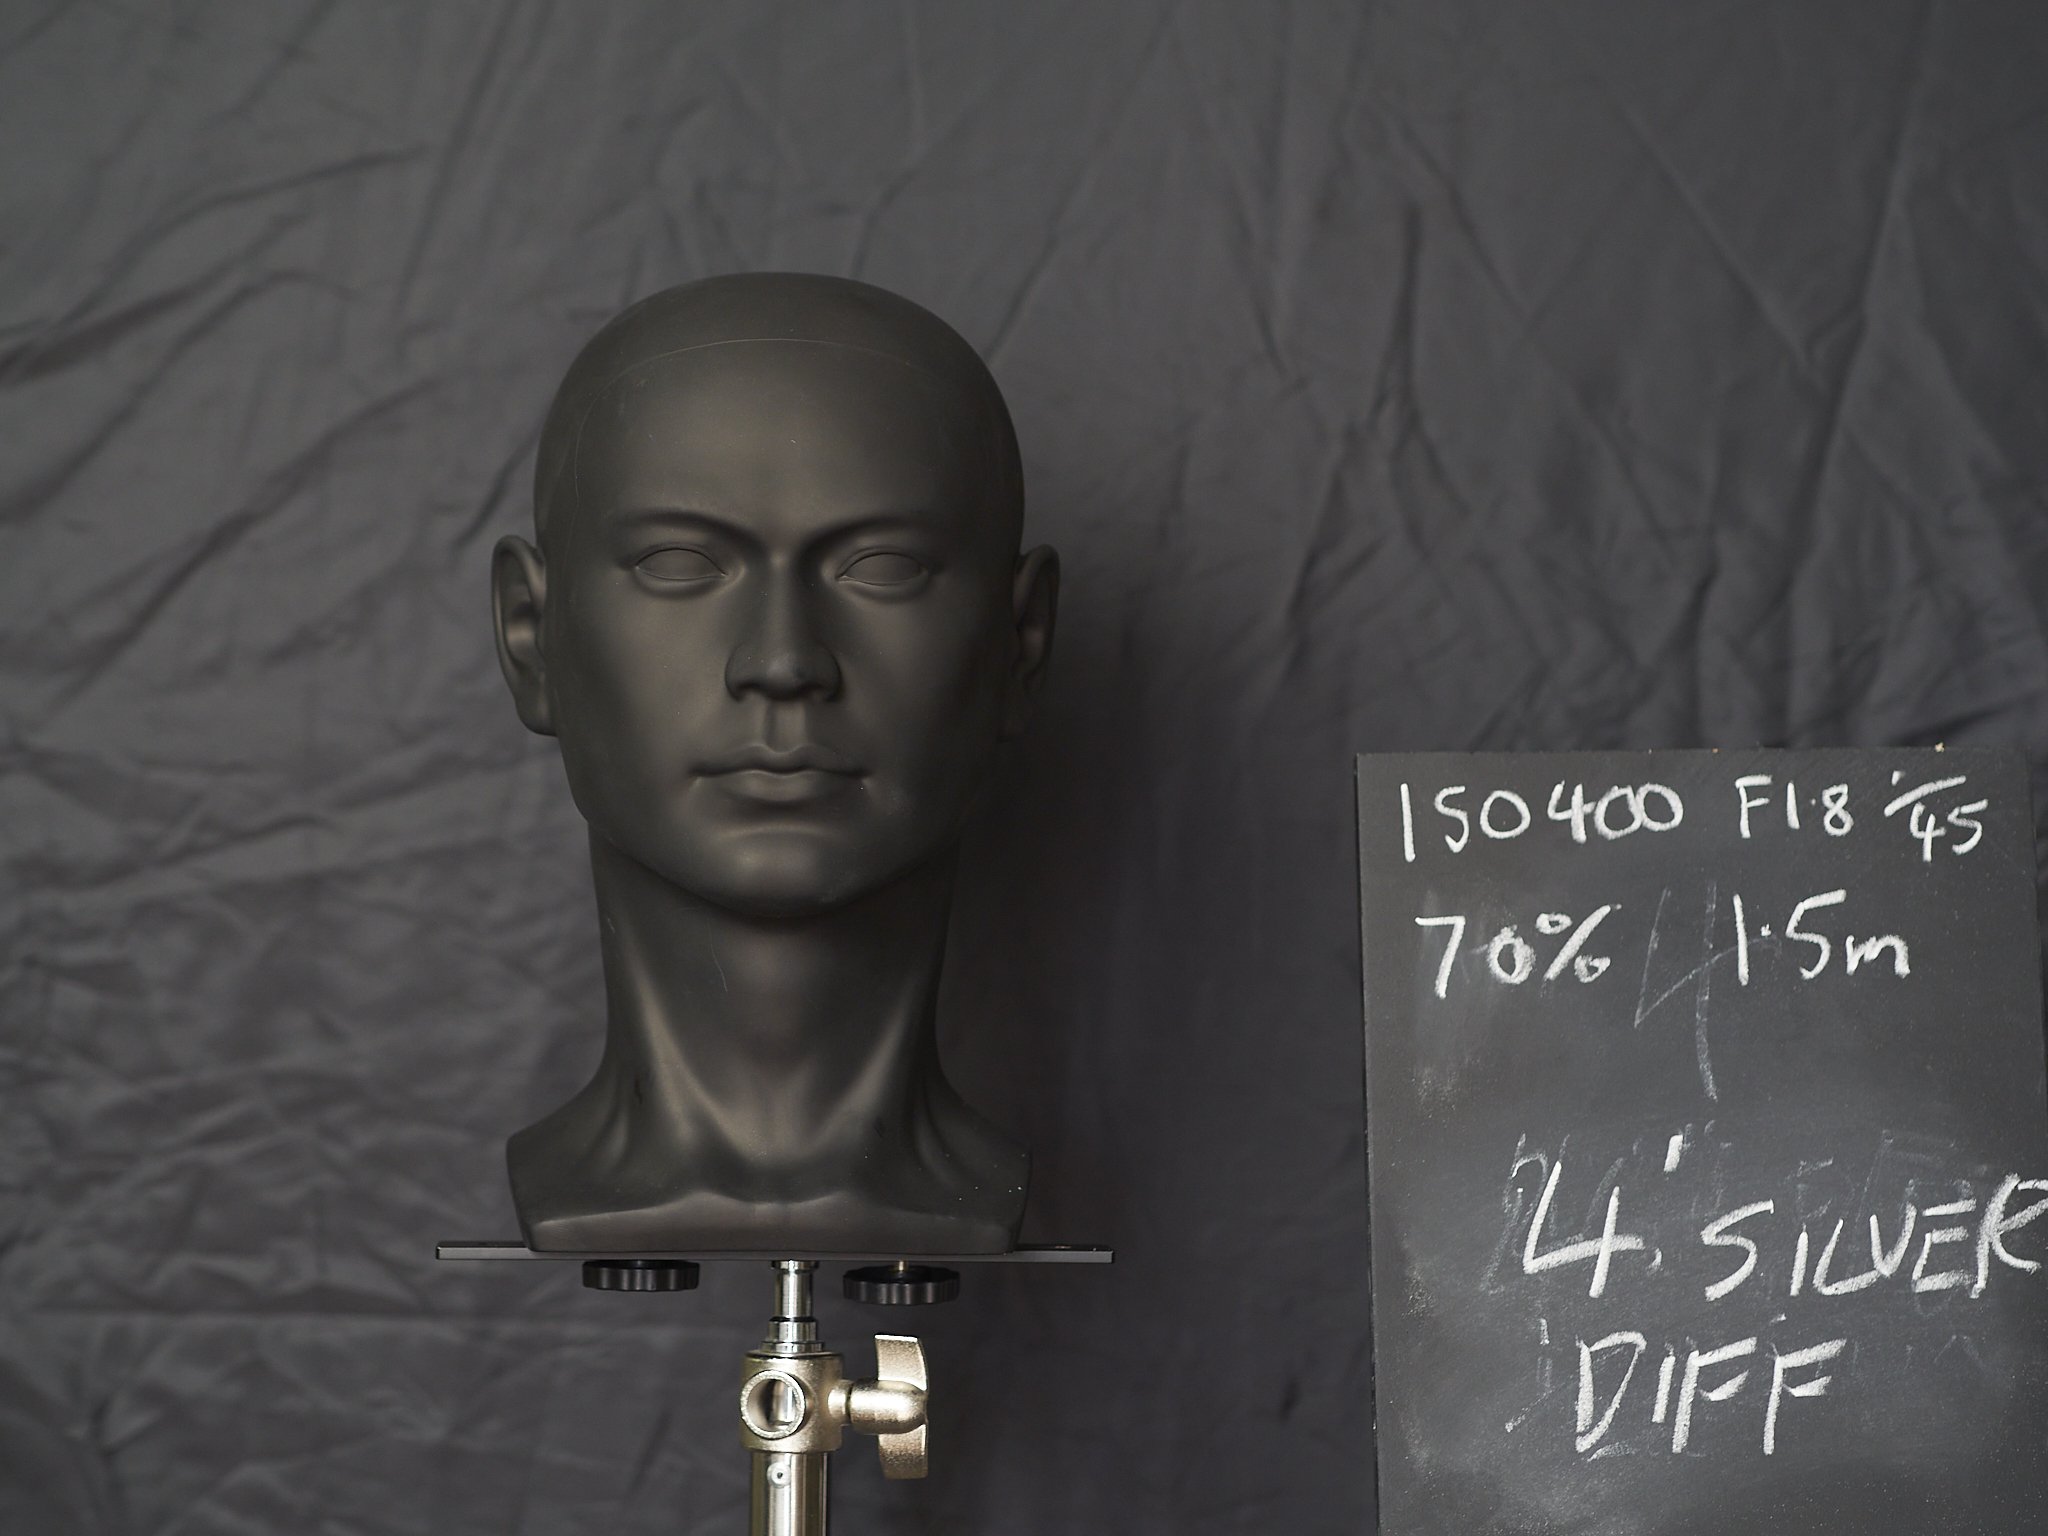
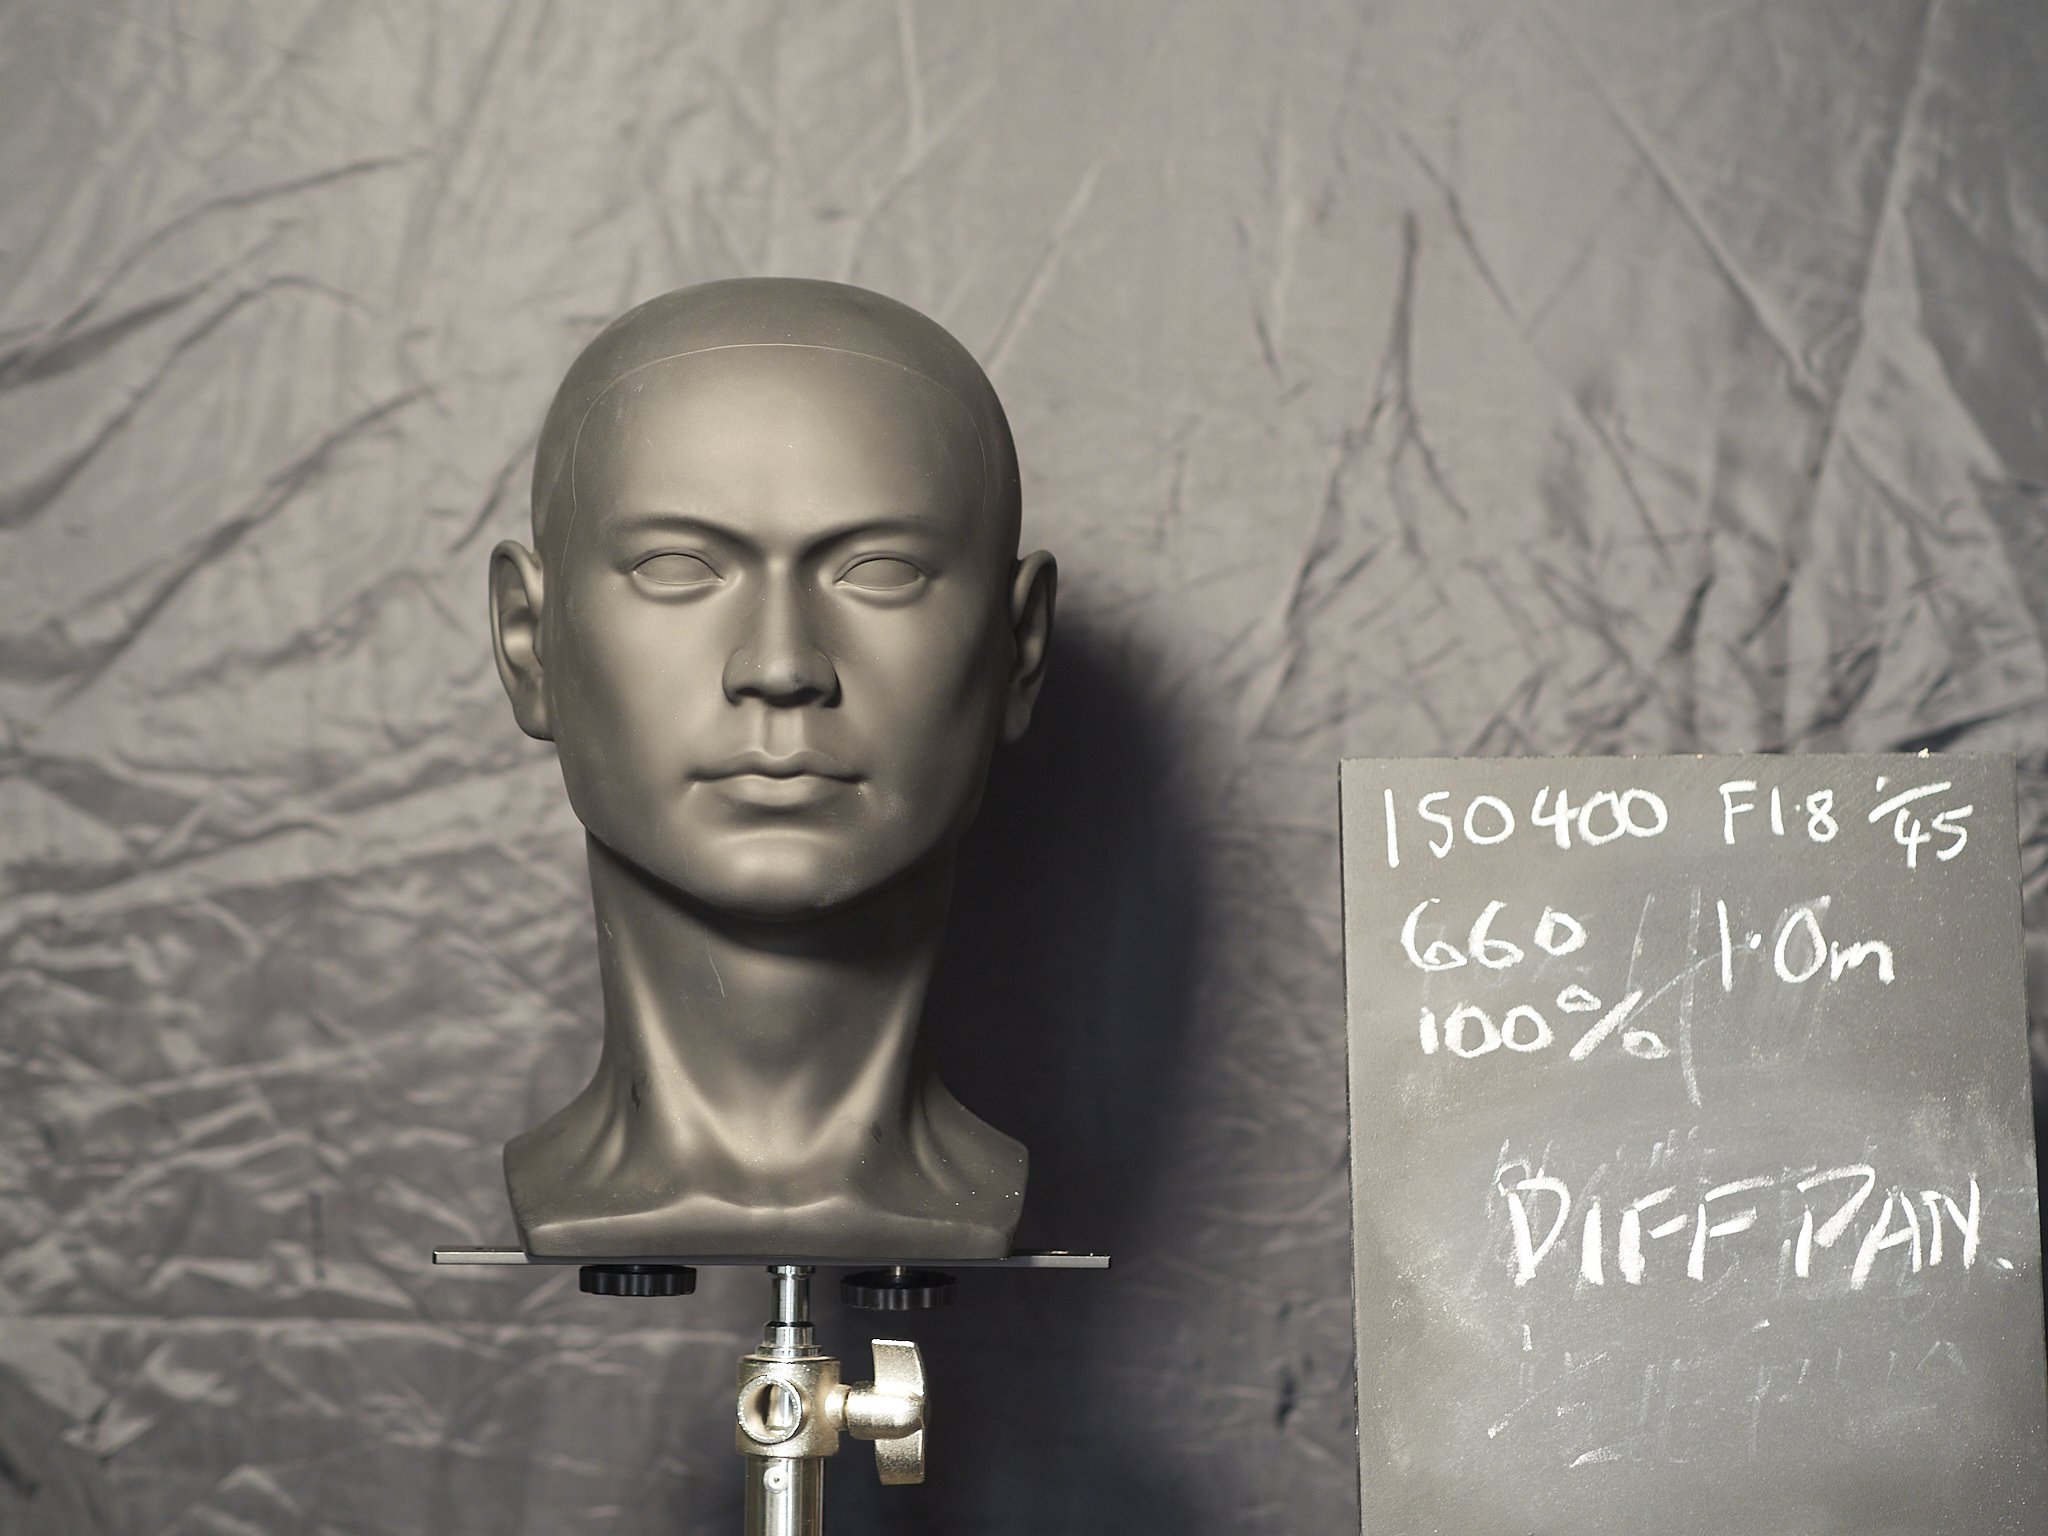
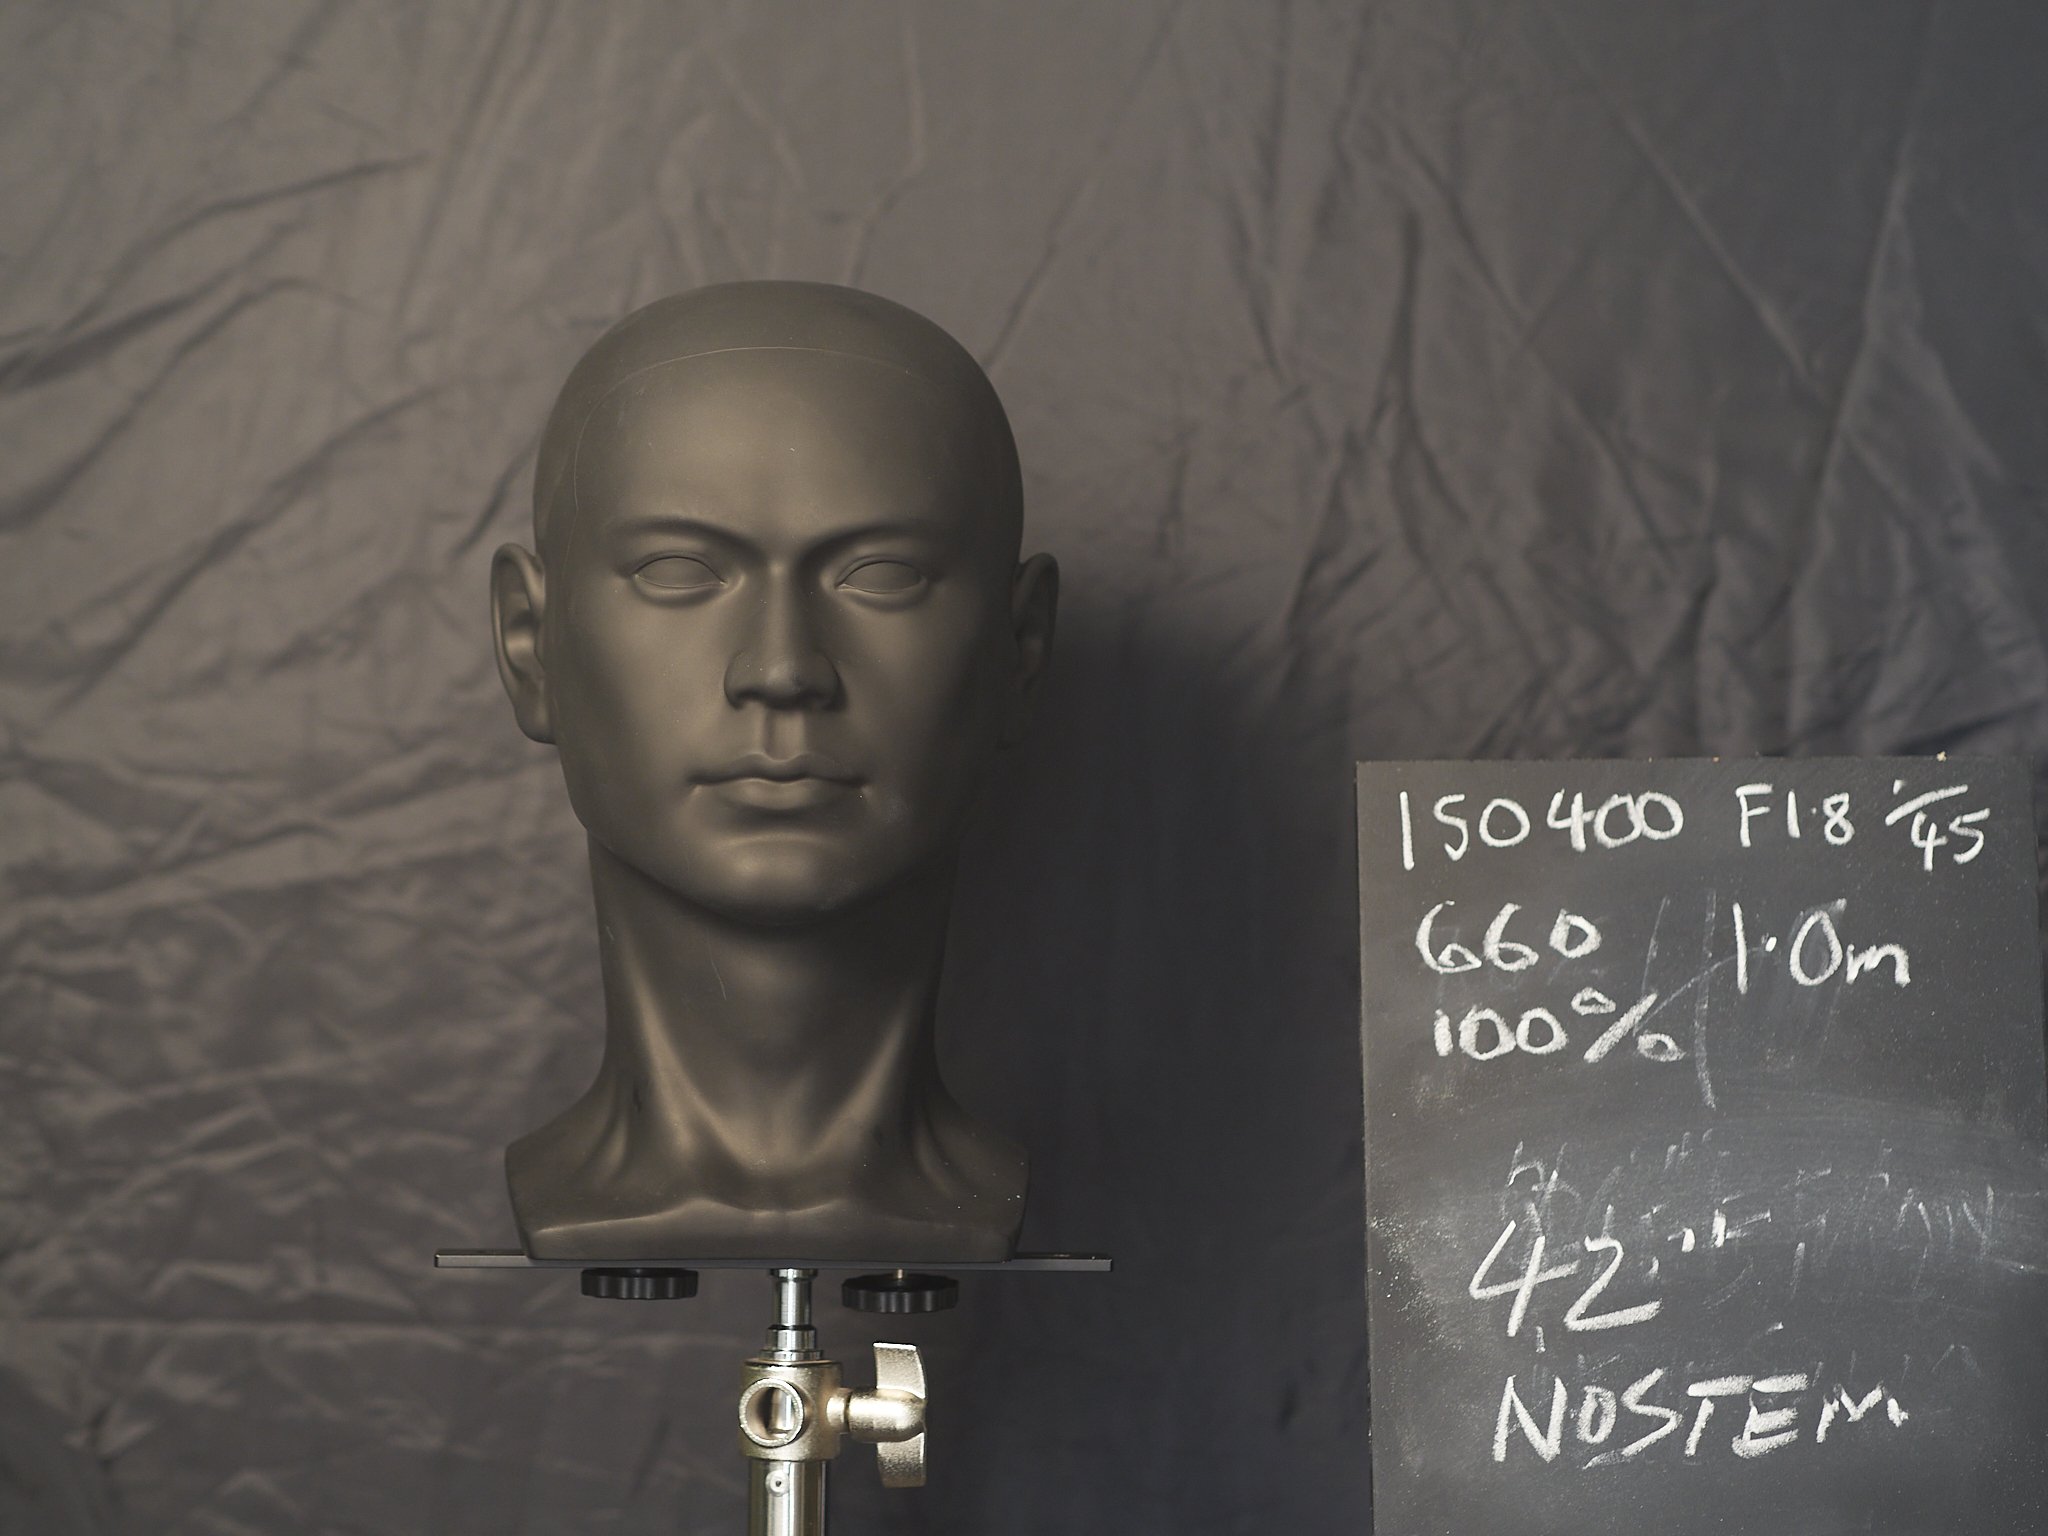
A common misconception is that M43 does not have enough Bokeh or shallow depth of field (DOF), which is not actually Bokeh, but the current manifestation of it’s meaning. The usual comparison made is to “full frame”, the poorly named 35mm film aligned size. In this direct comparison, if wide open DOF drop off is all that is important, and all else is equal, then a bigger sensor will always win (a 50mm lens on any format renders the same DOF, but the focal length chances, making smaller sensors use shorter lenses for the same magnification, so an M43 25mm is the equivalent of a FF 50mm for magnification, but has more natural DOF). It’s physics. If a more practical and realistic eye is cast on the subject, then maybe not.

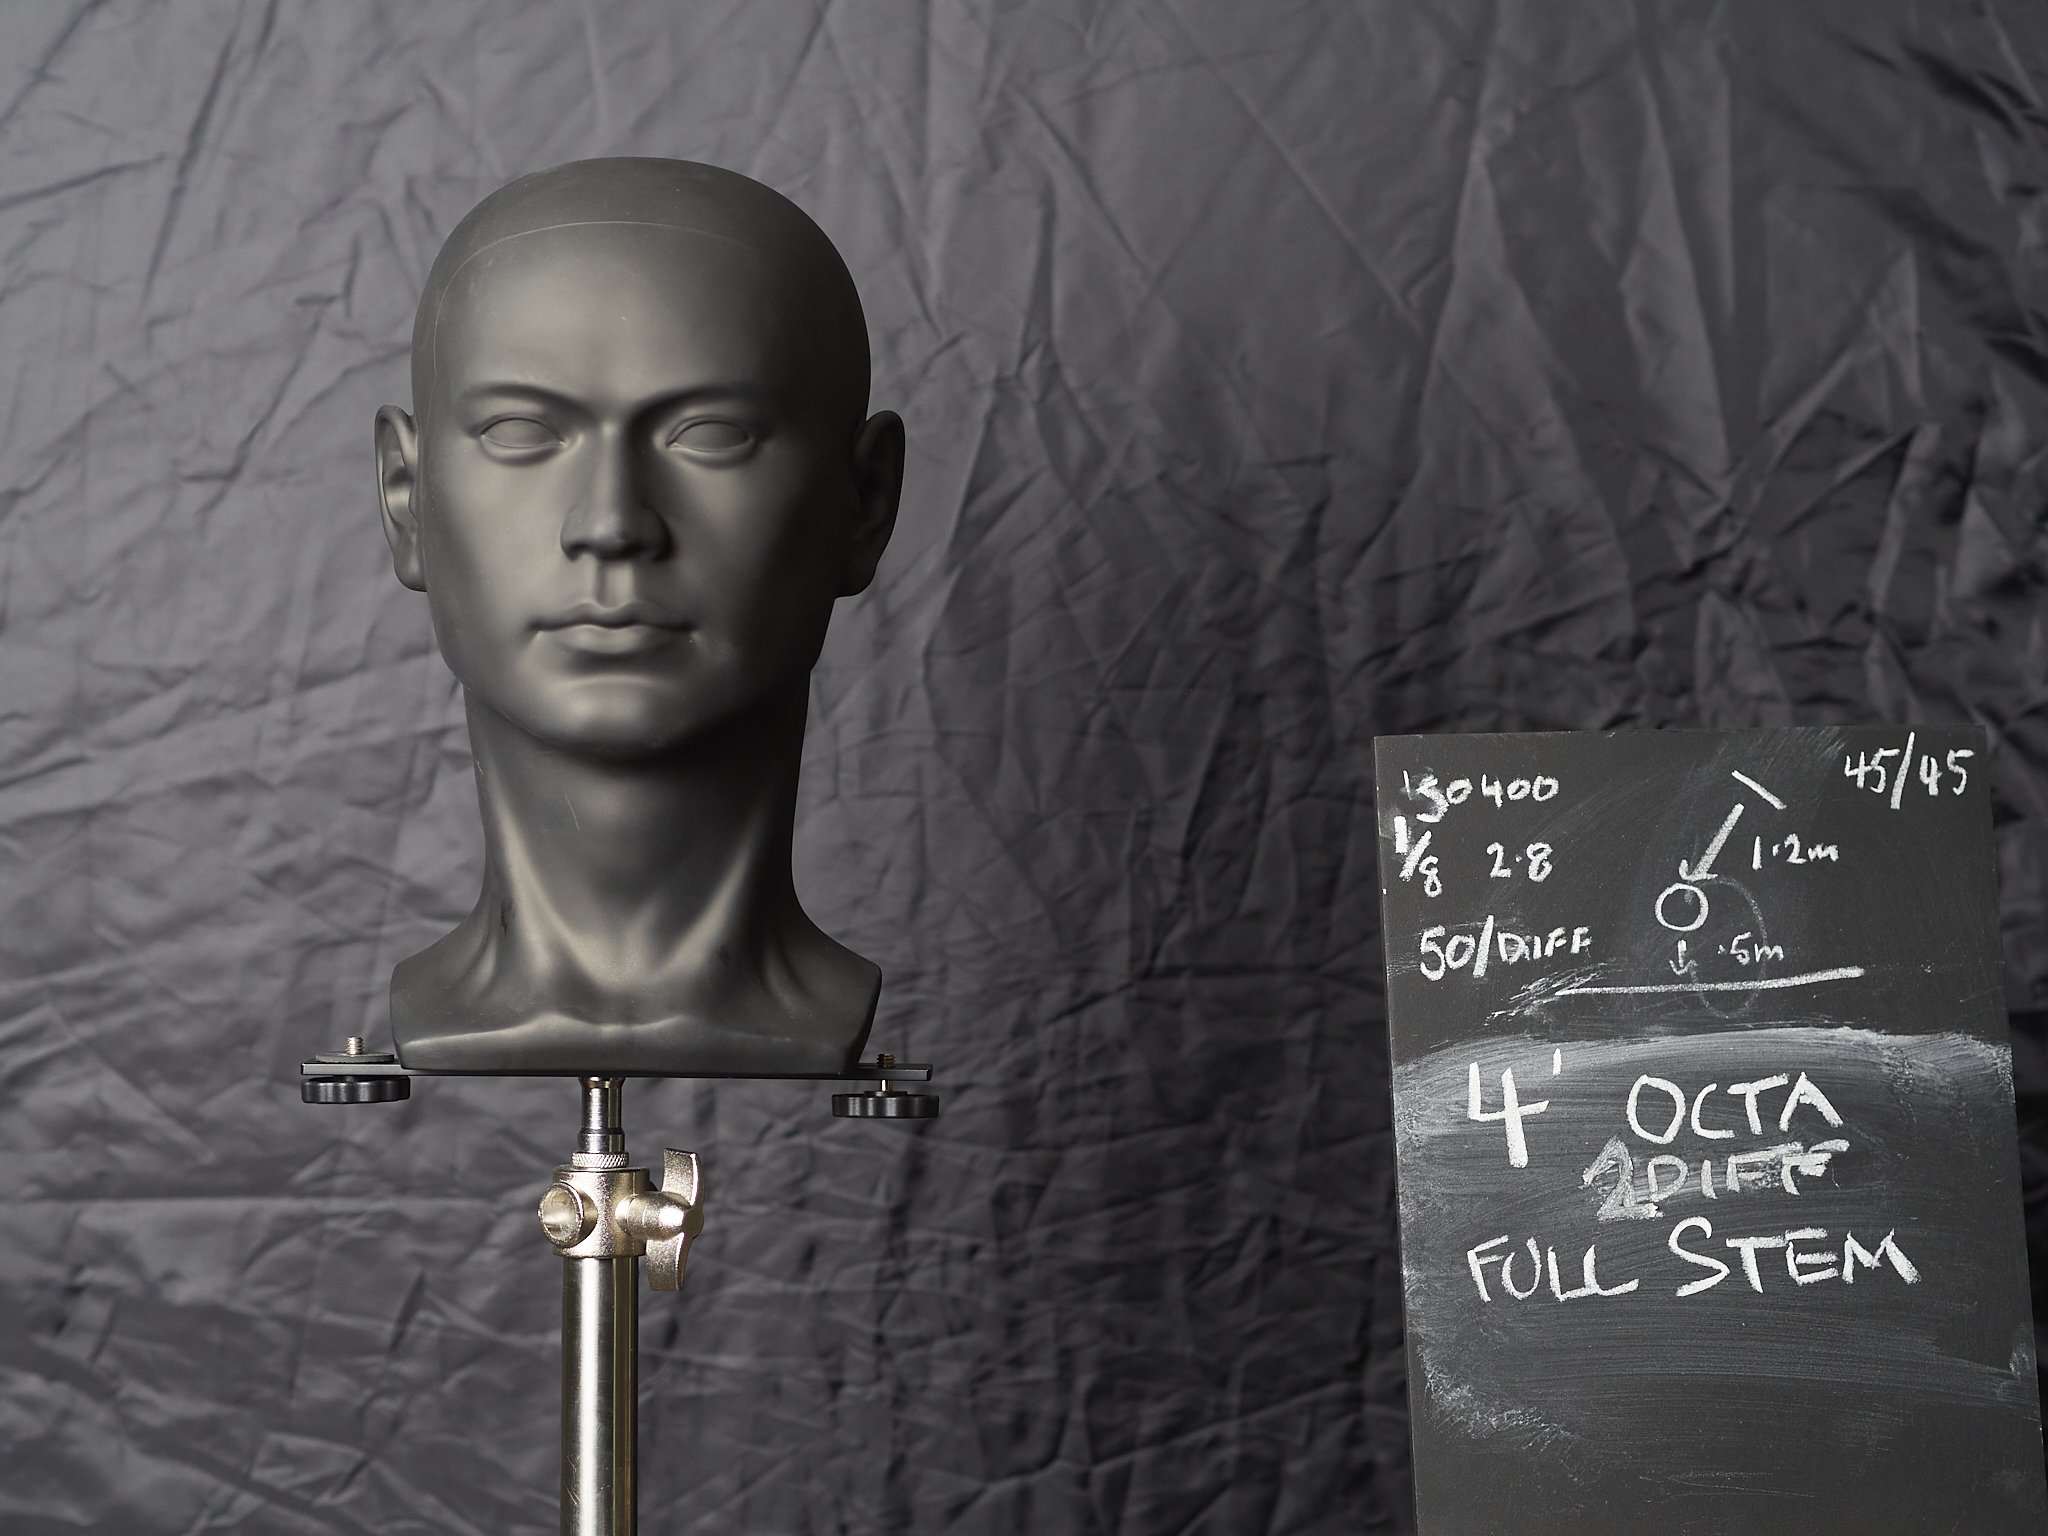
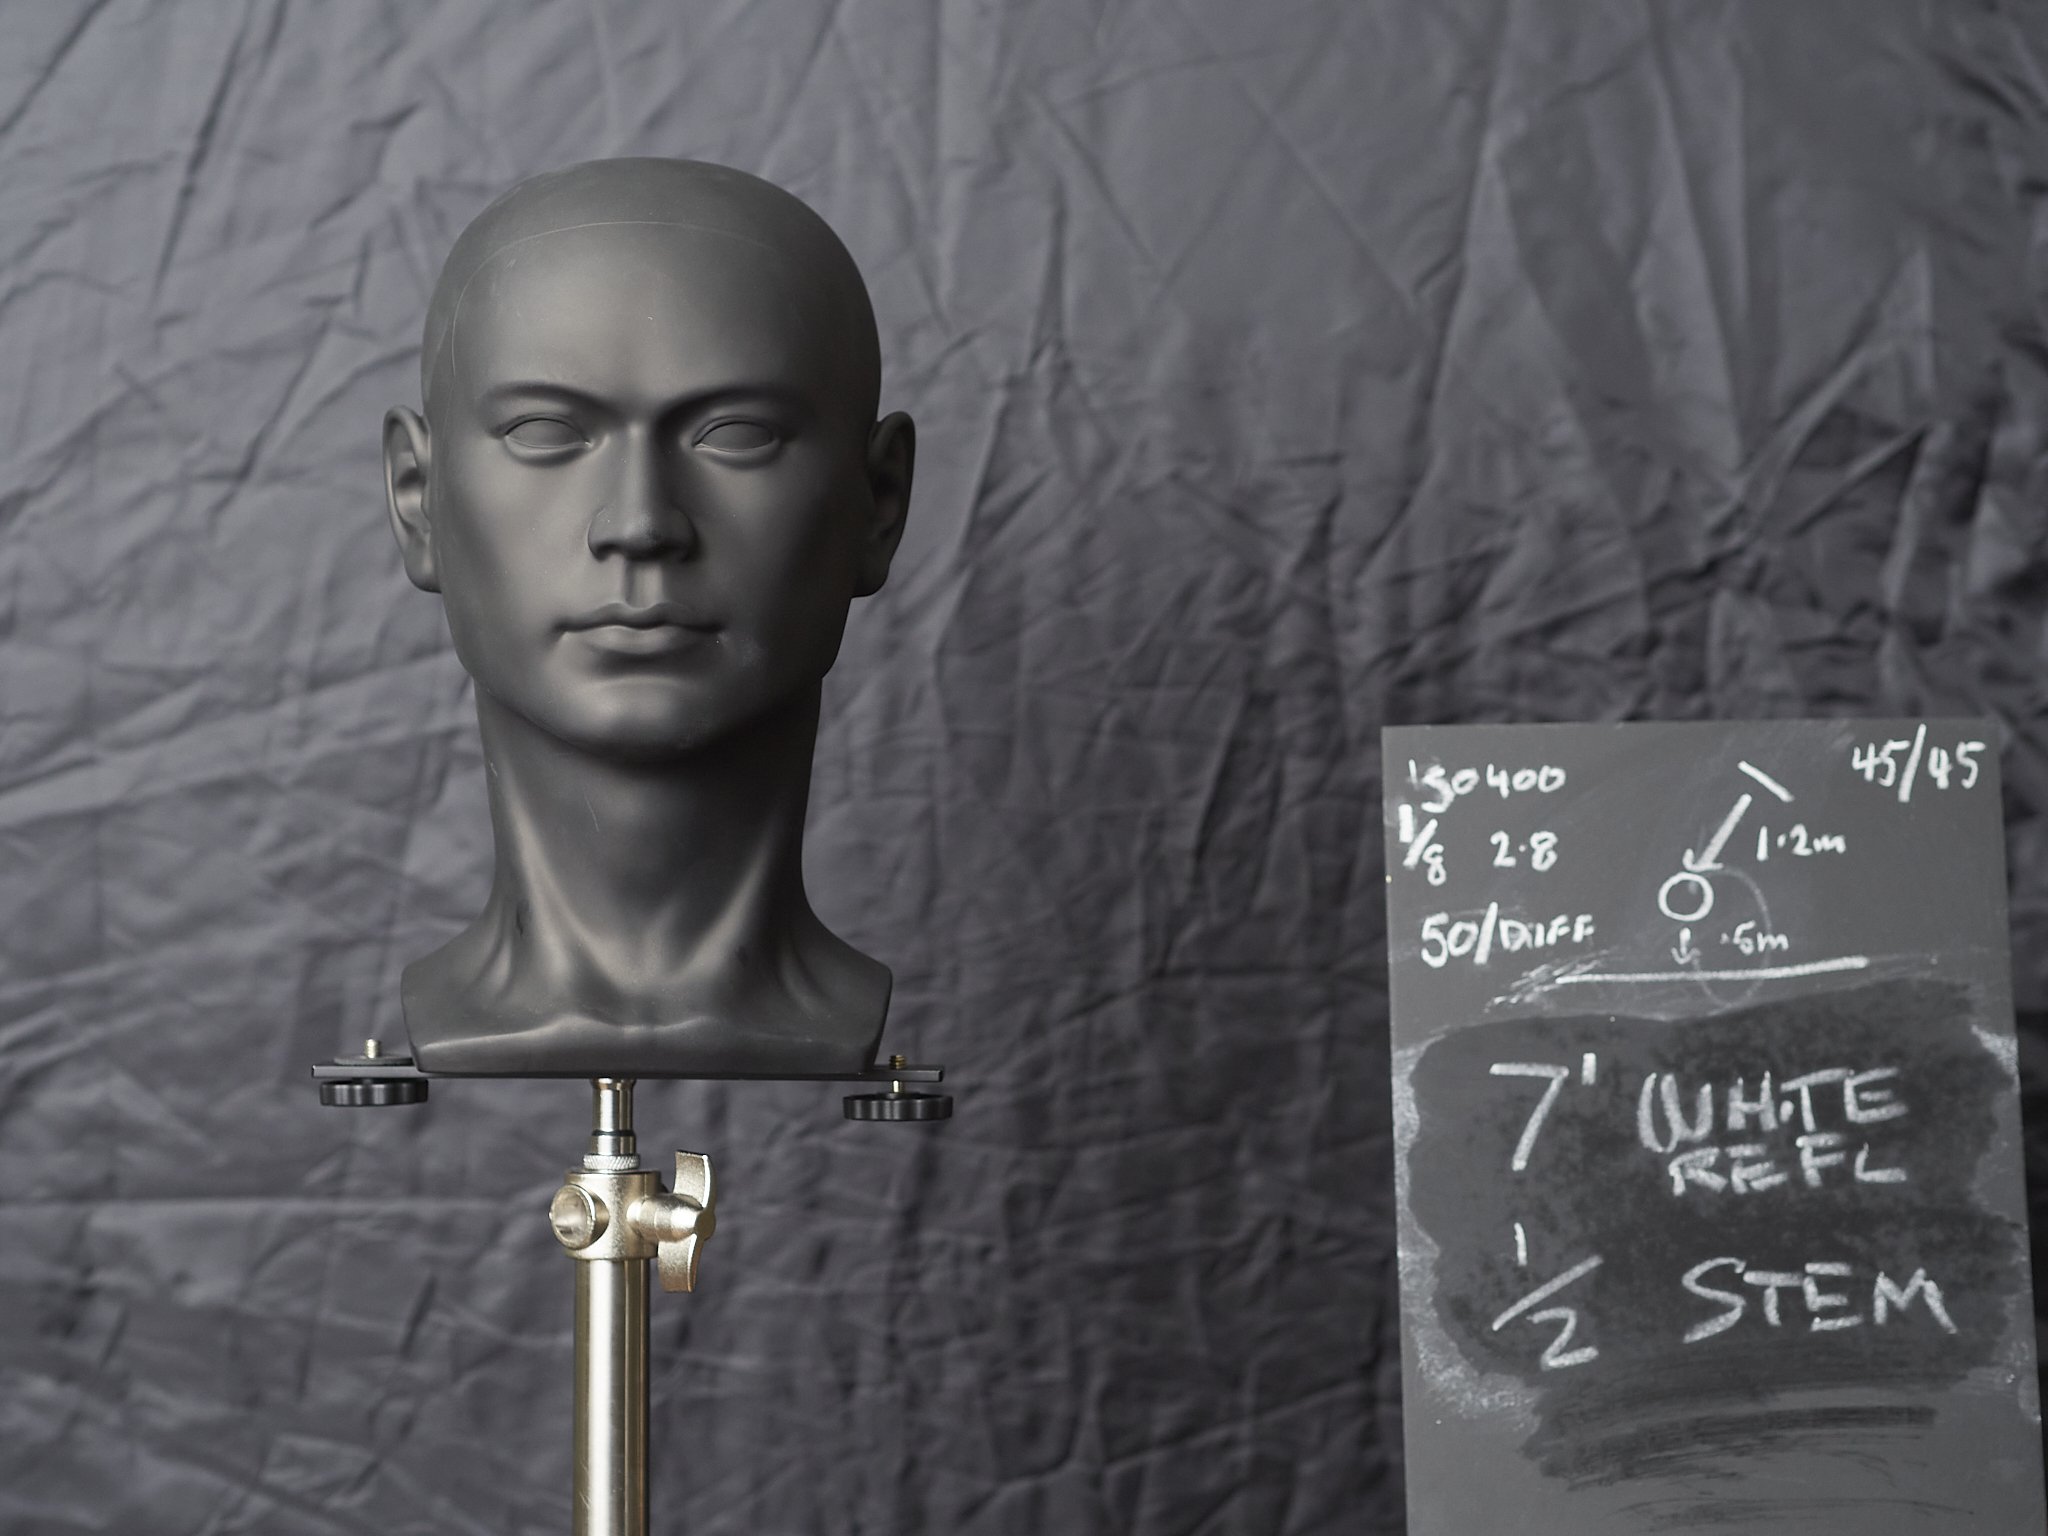
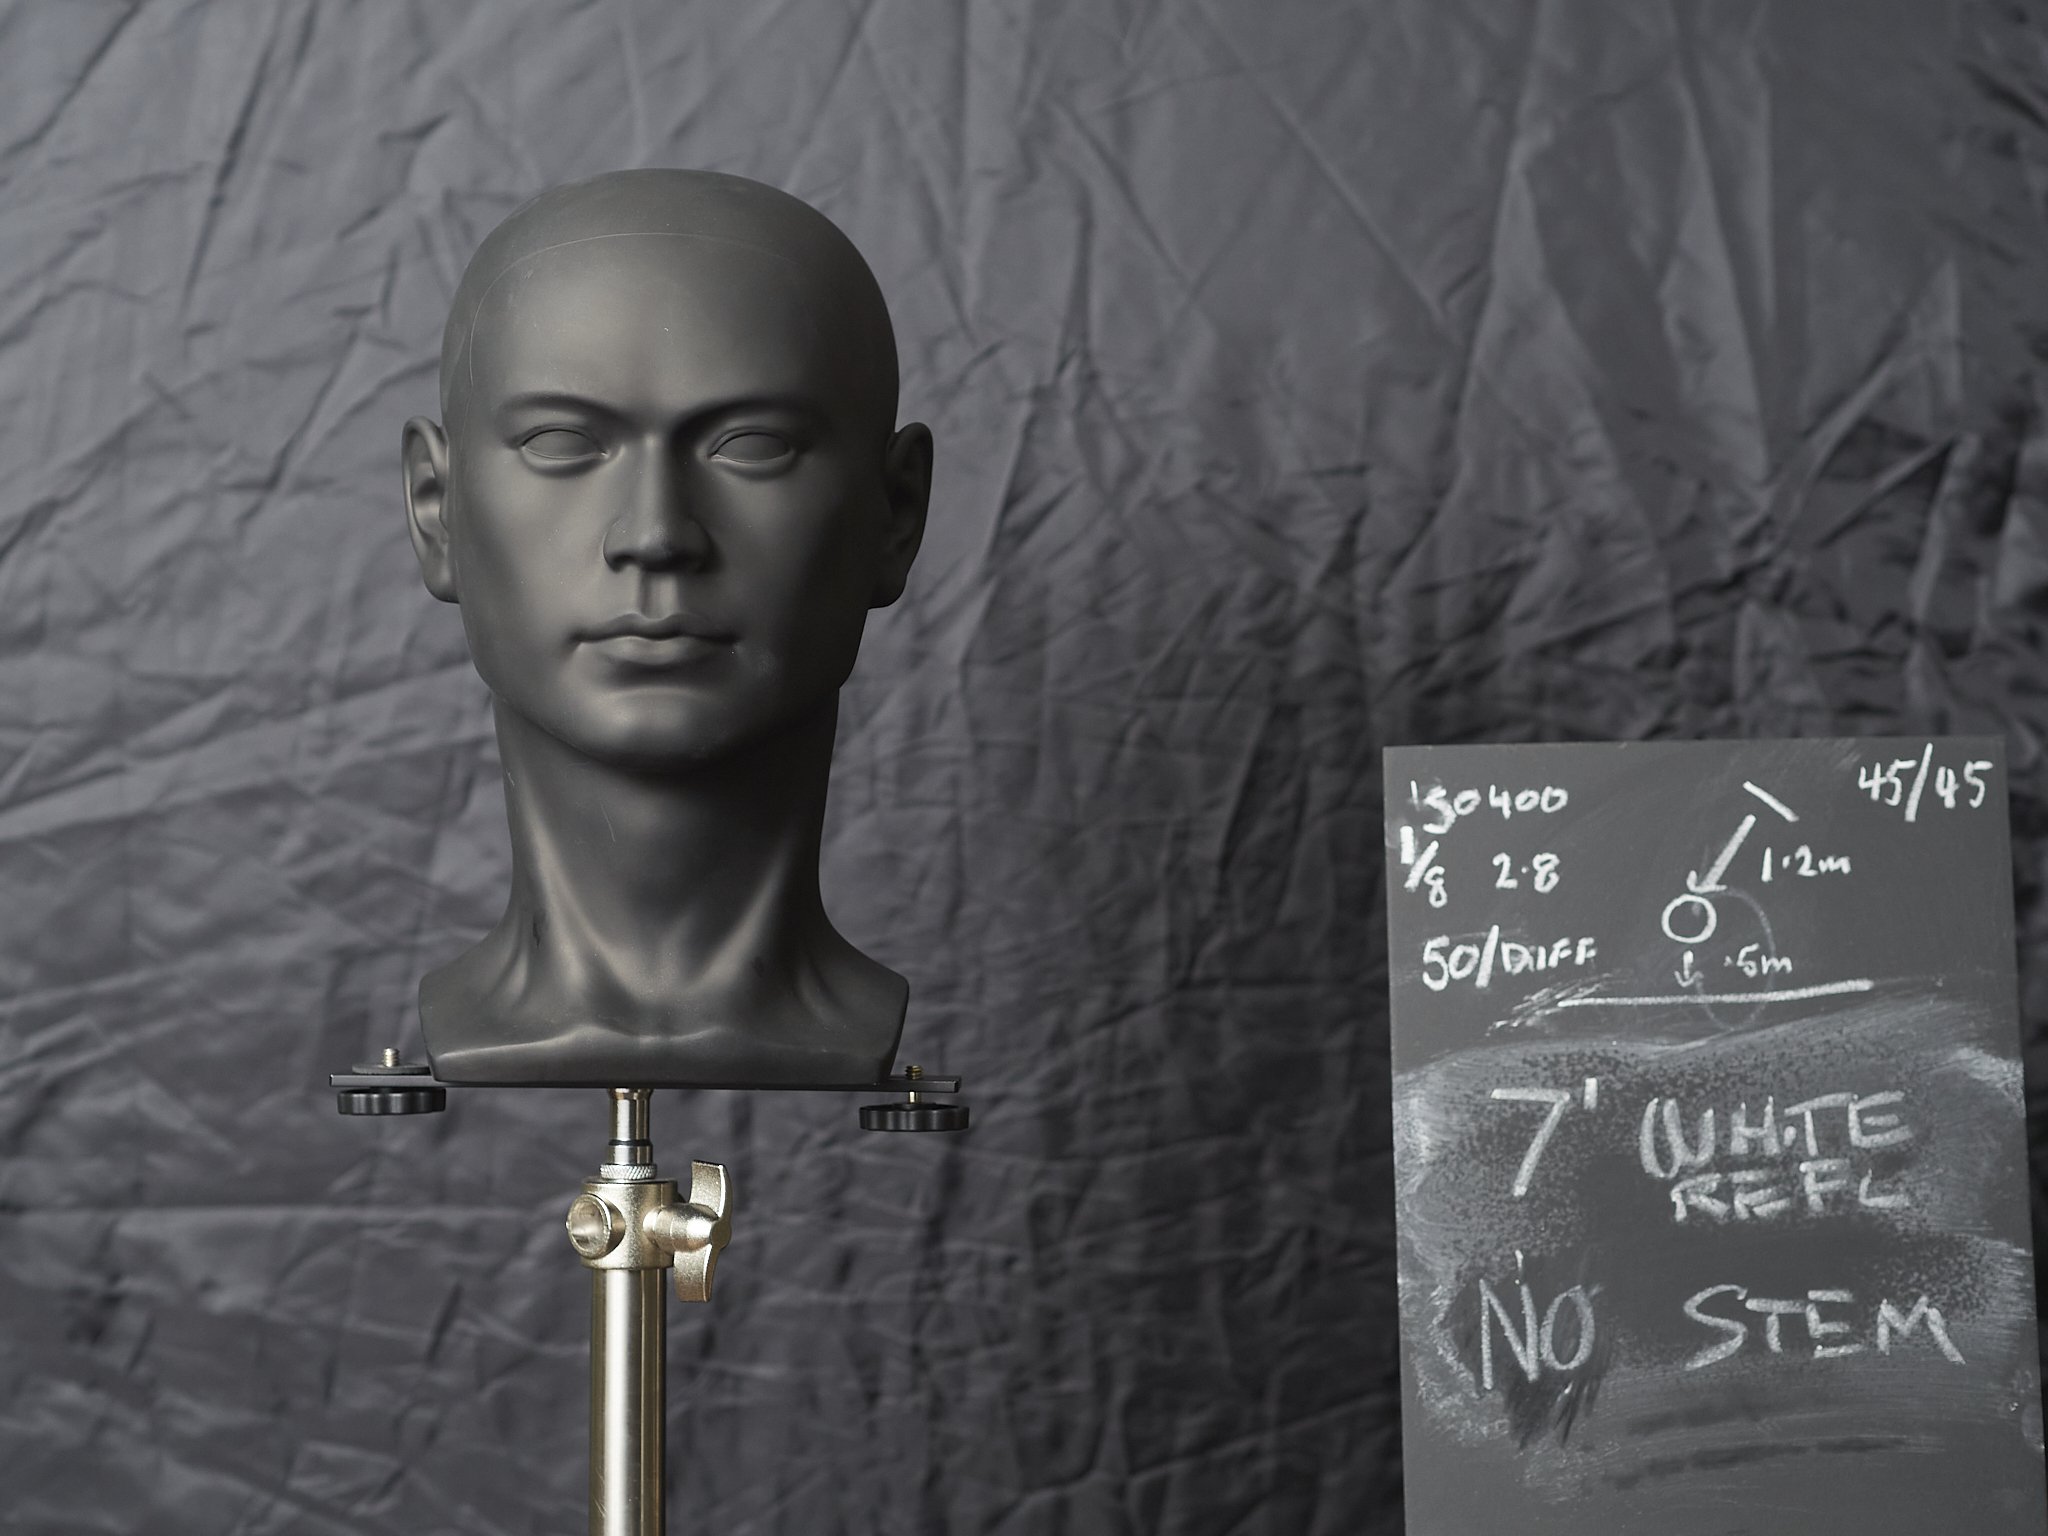
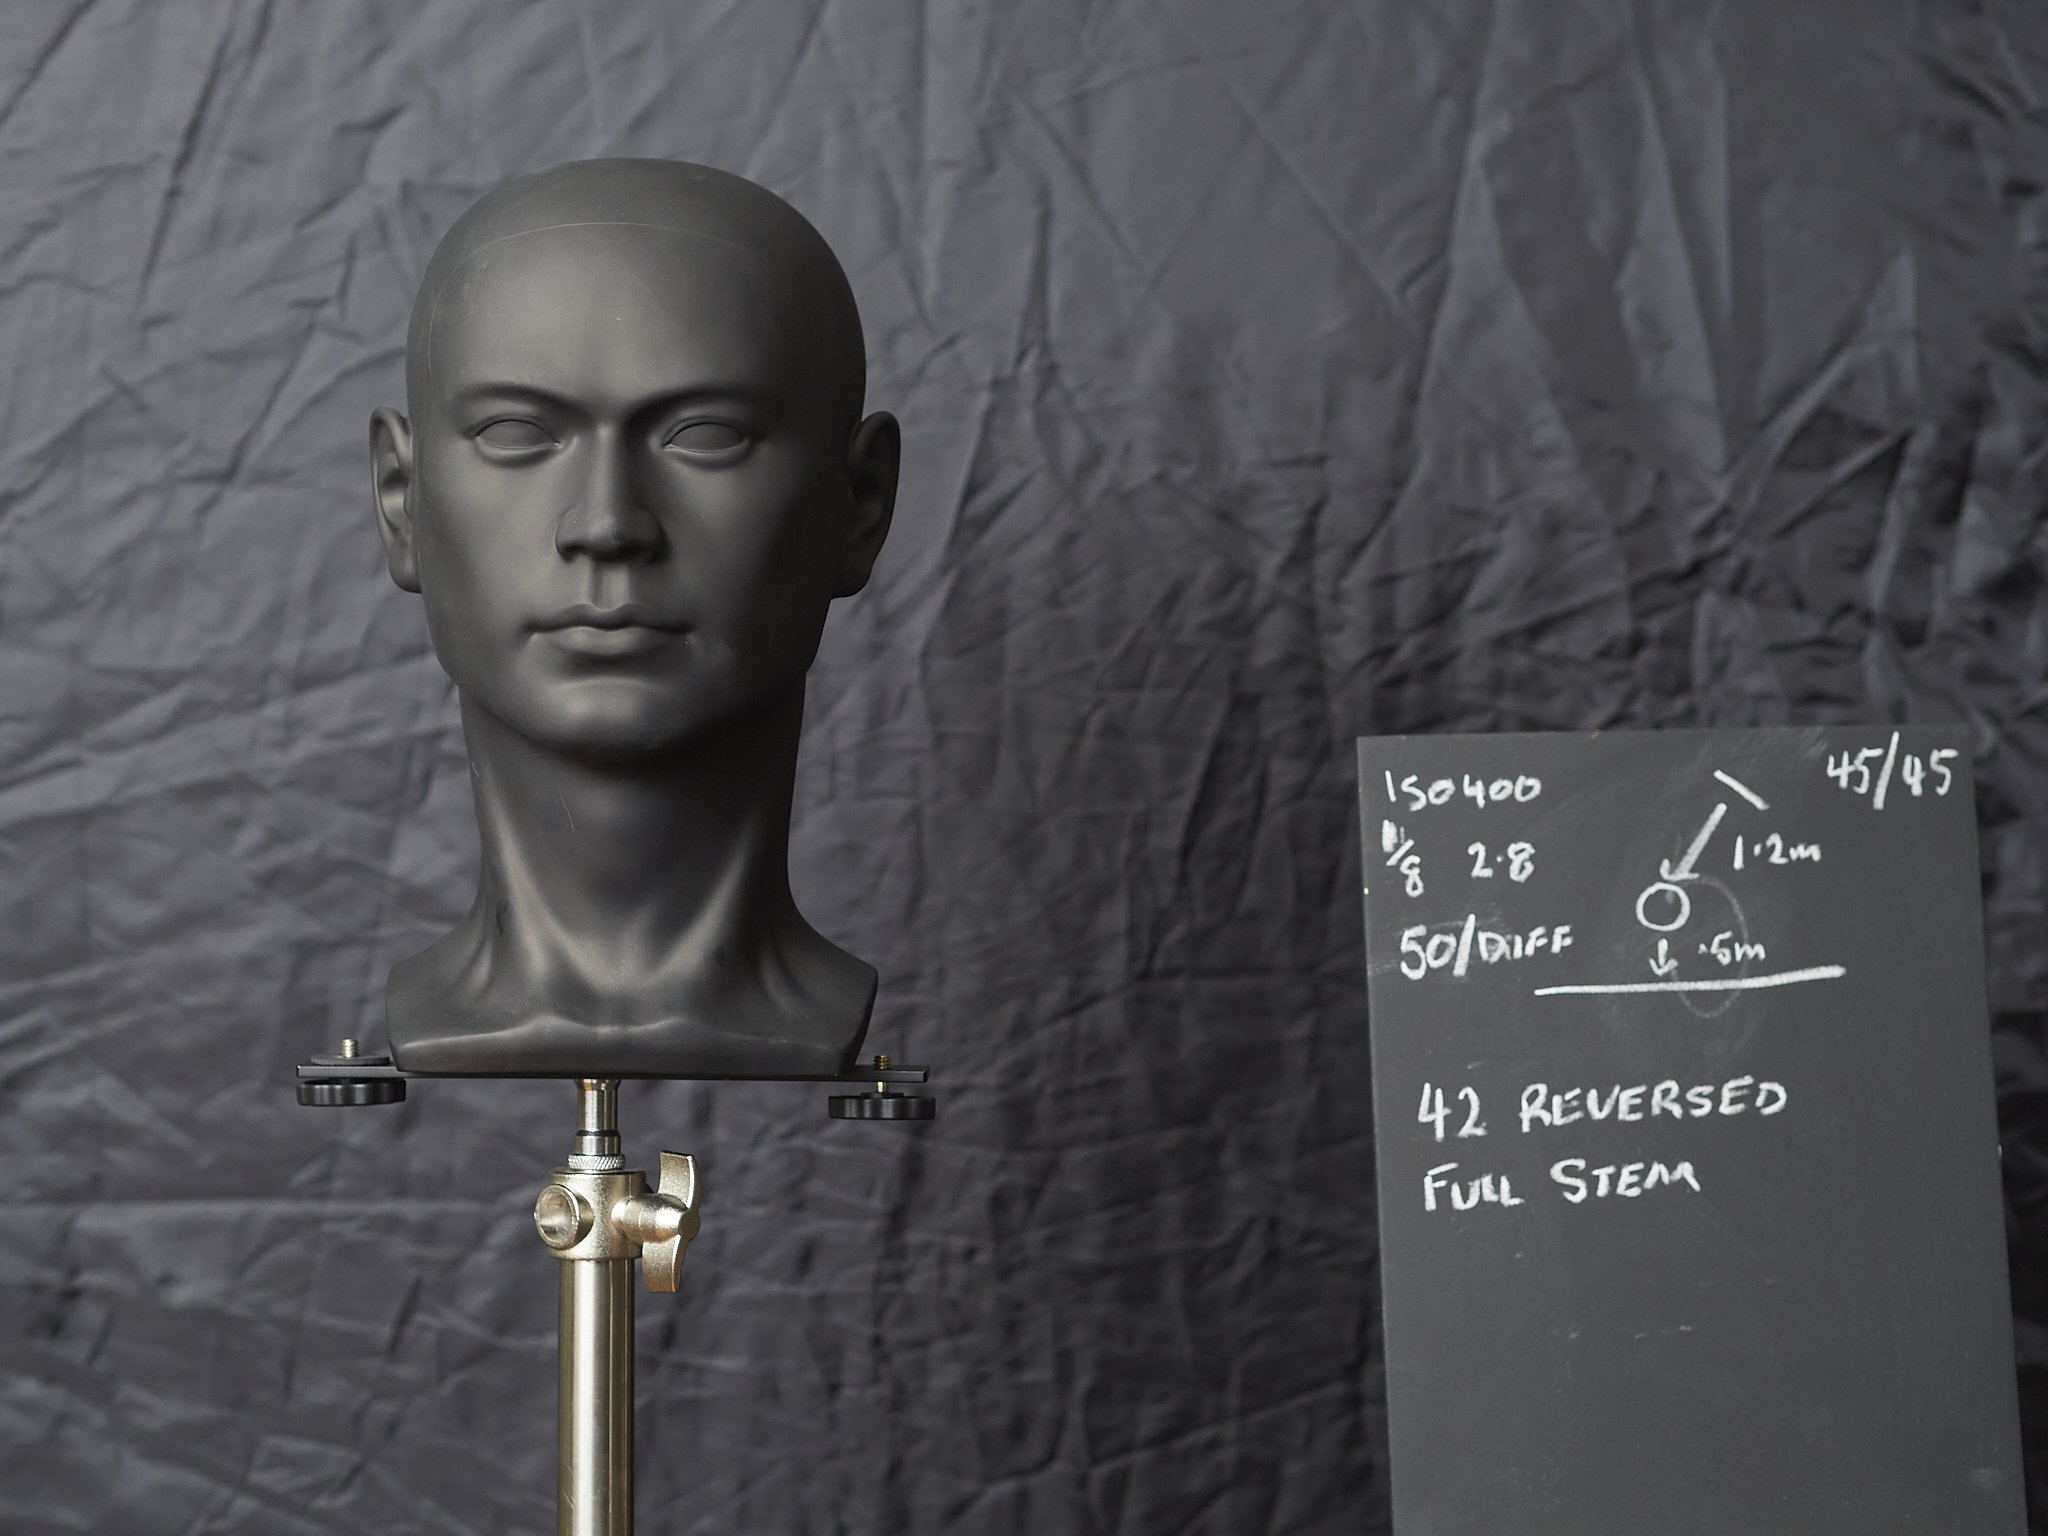
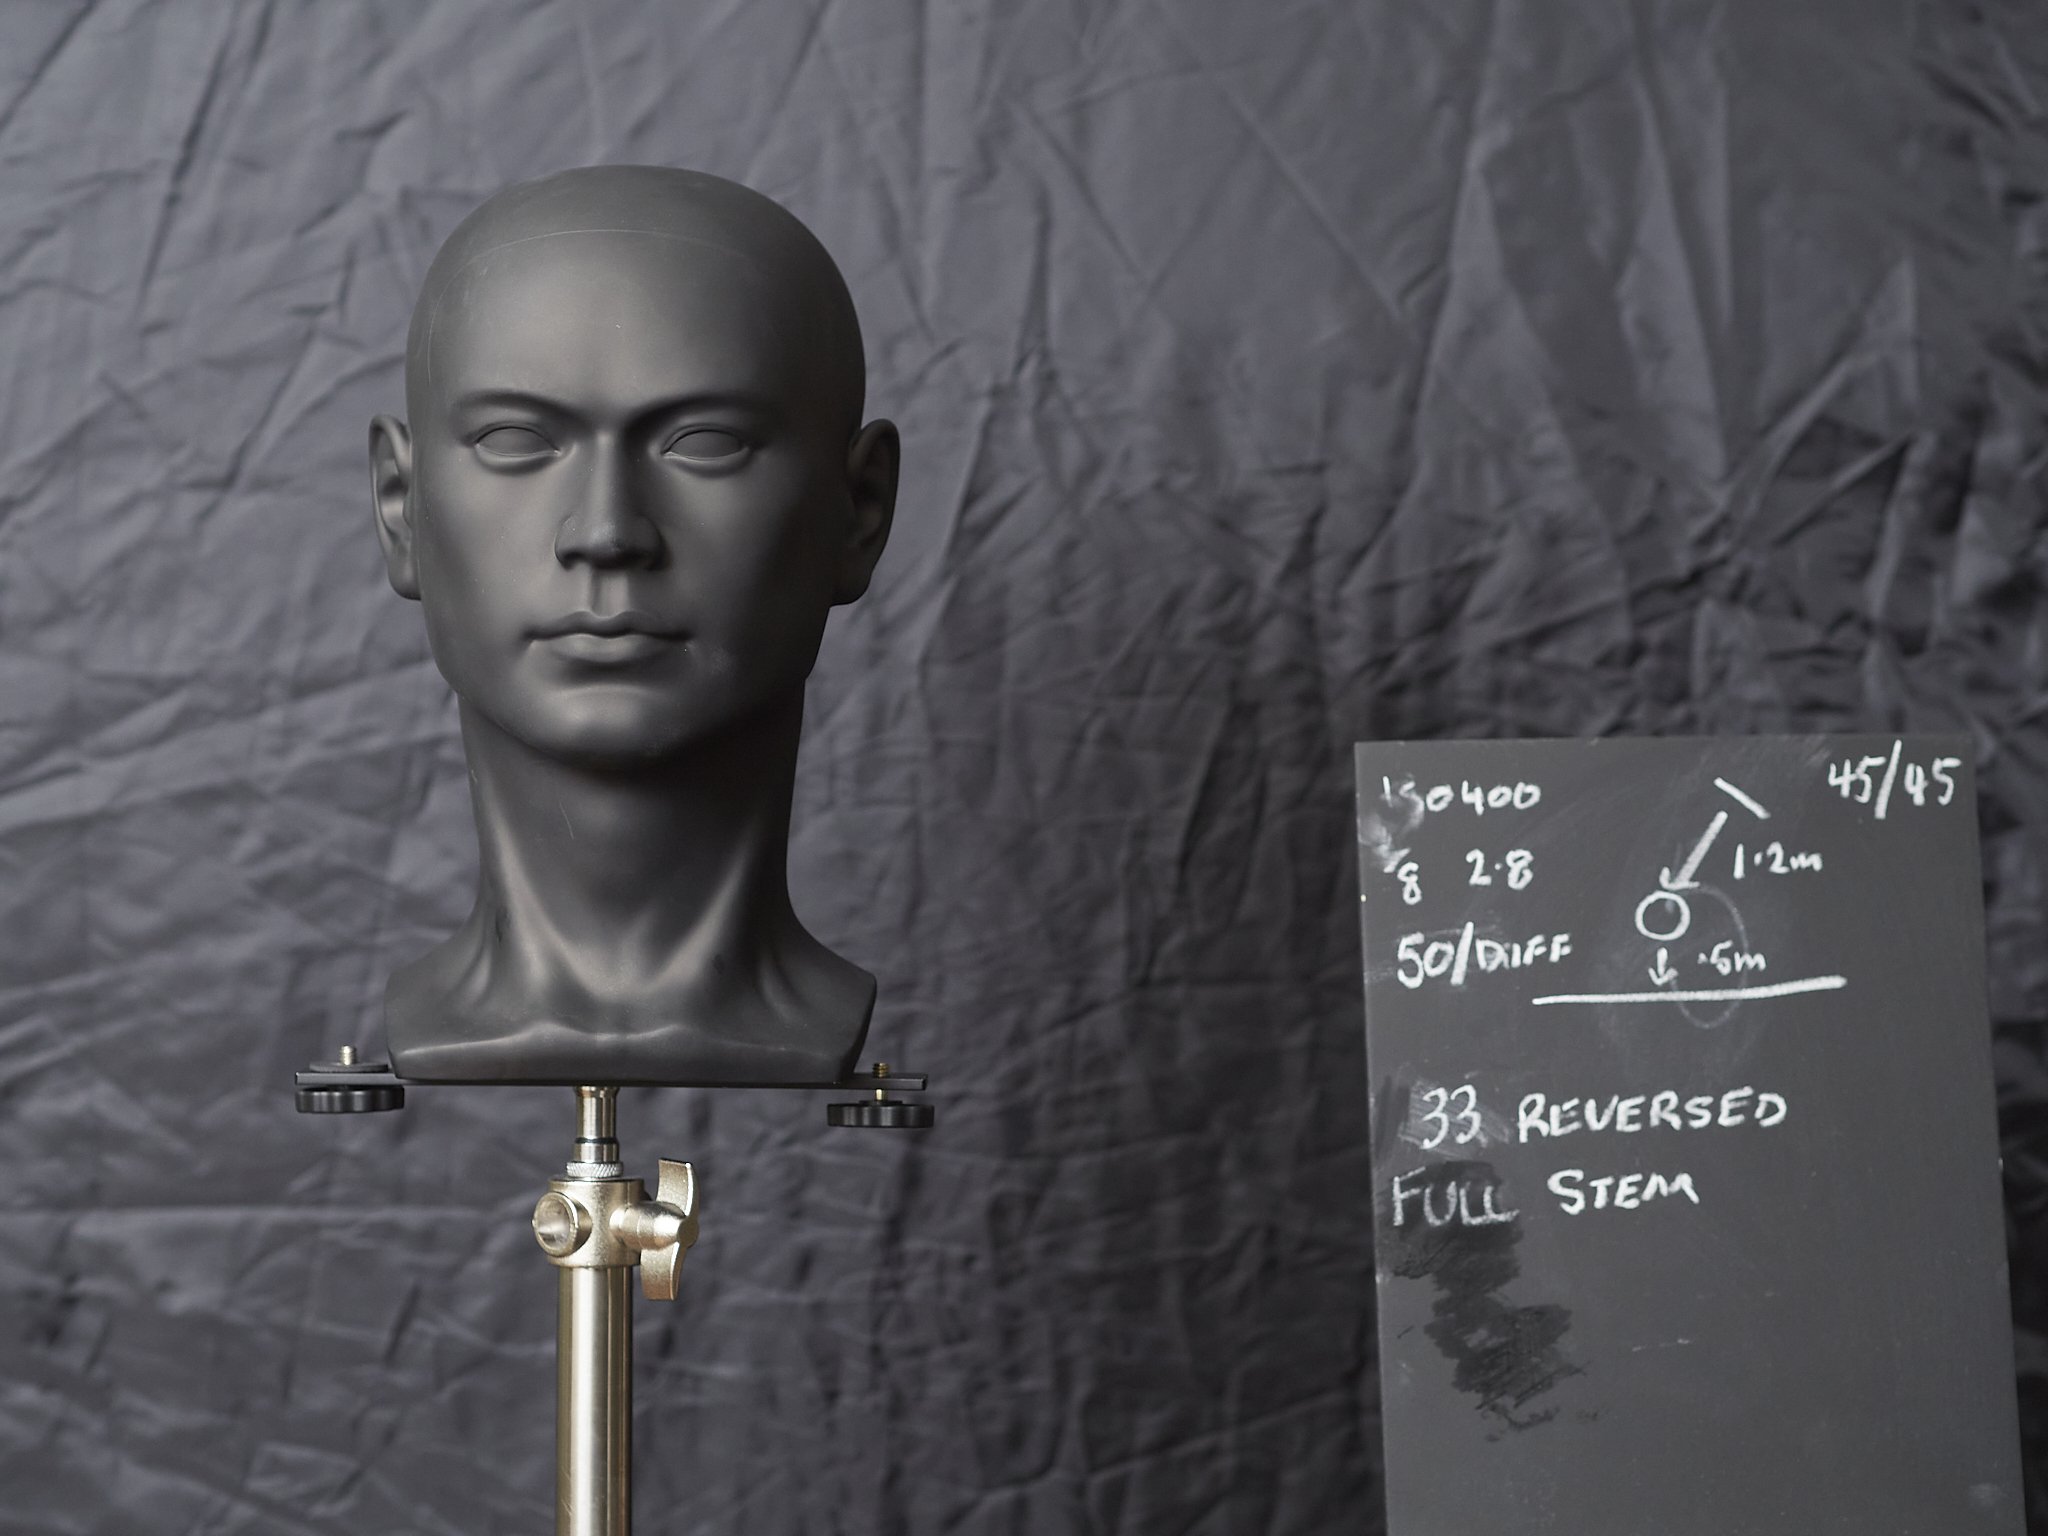
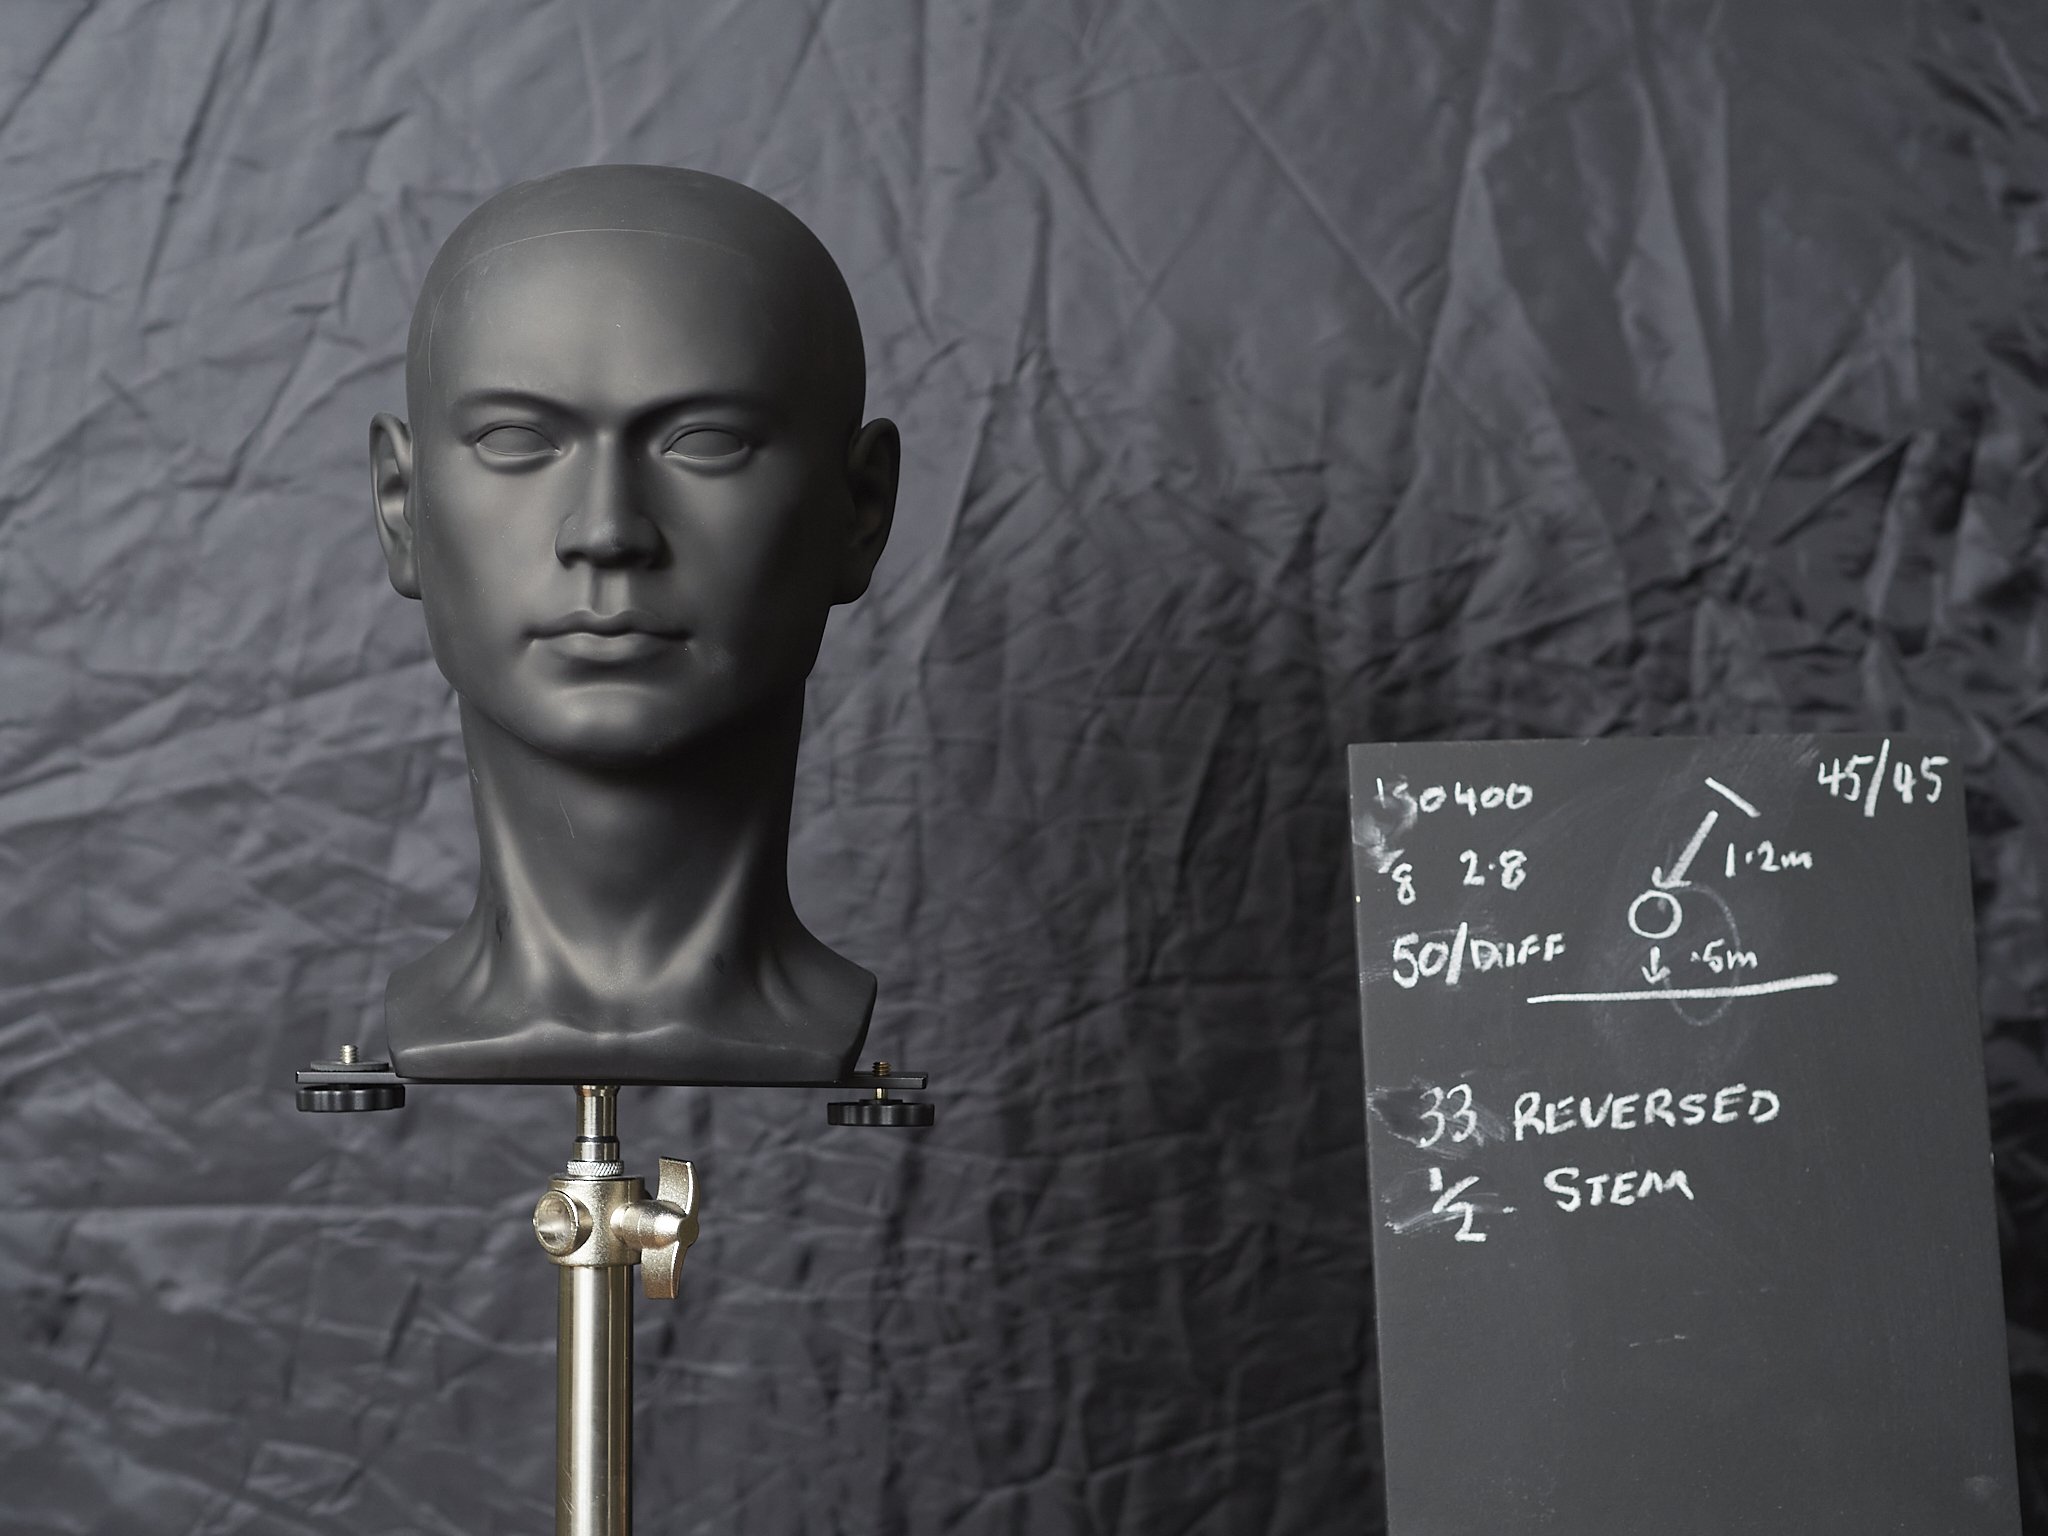
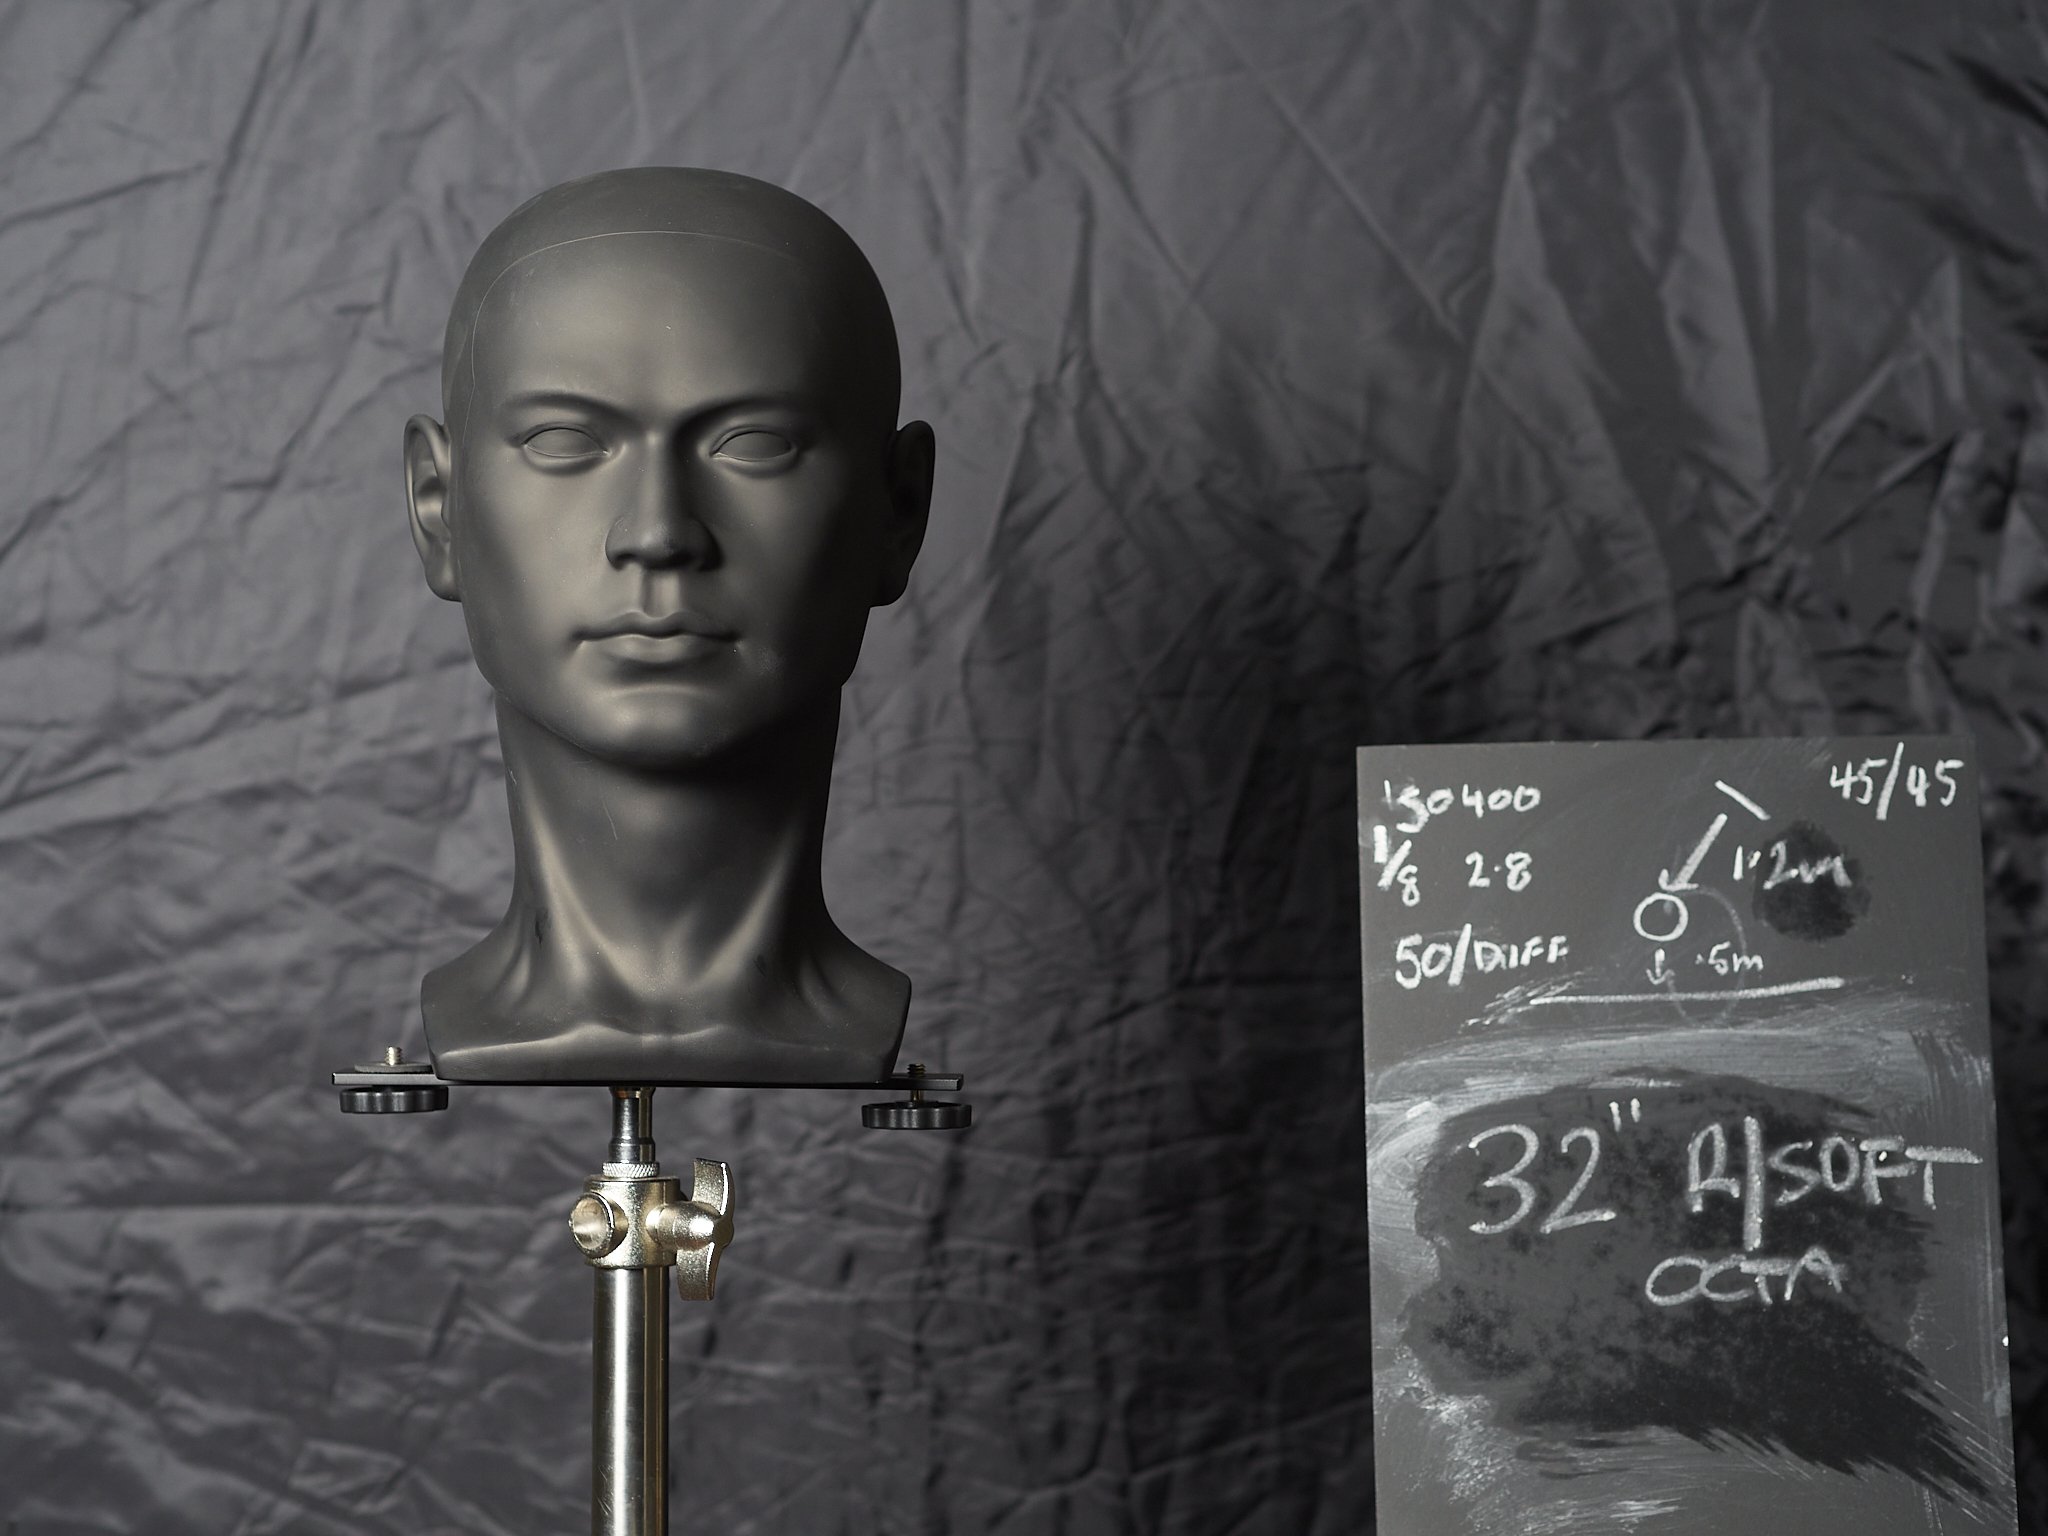
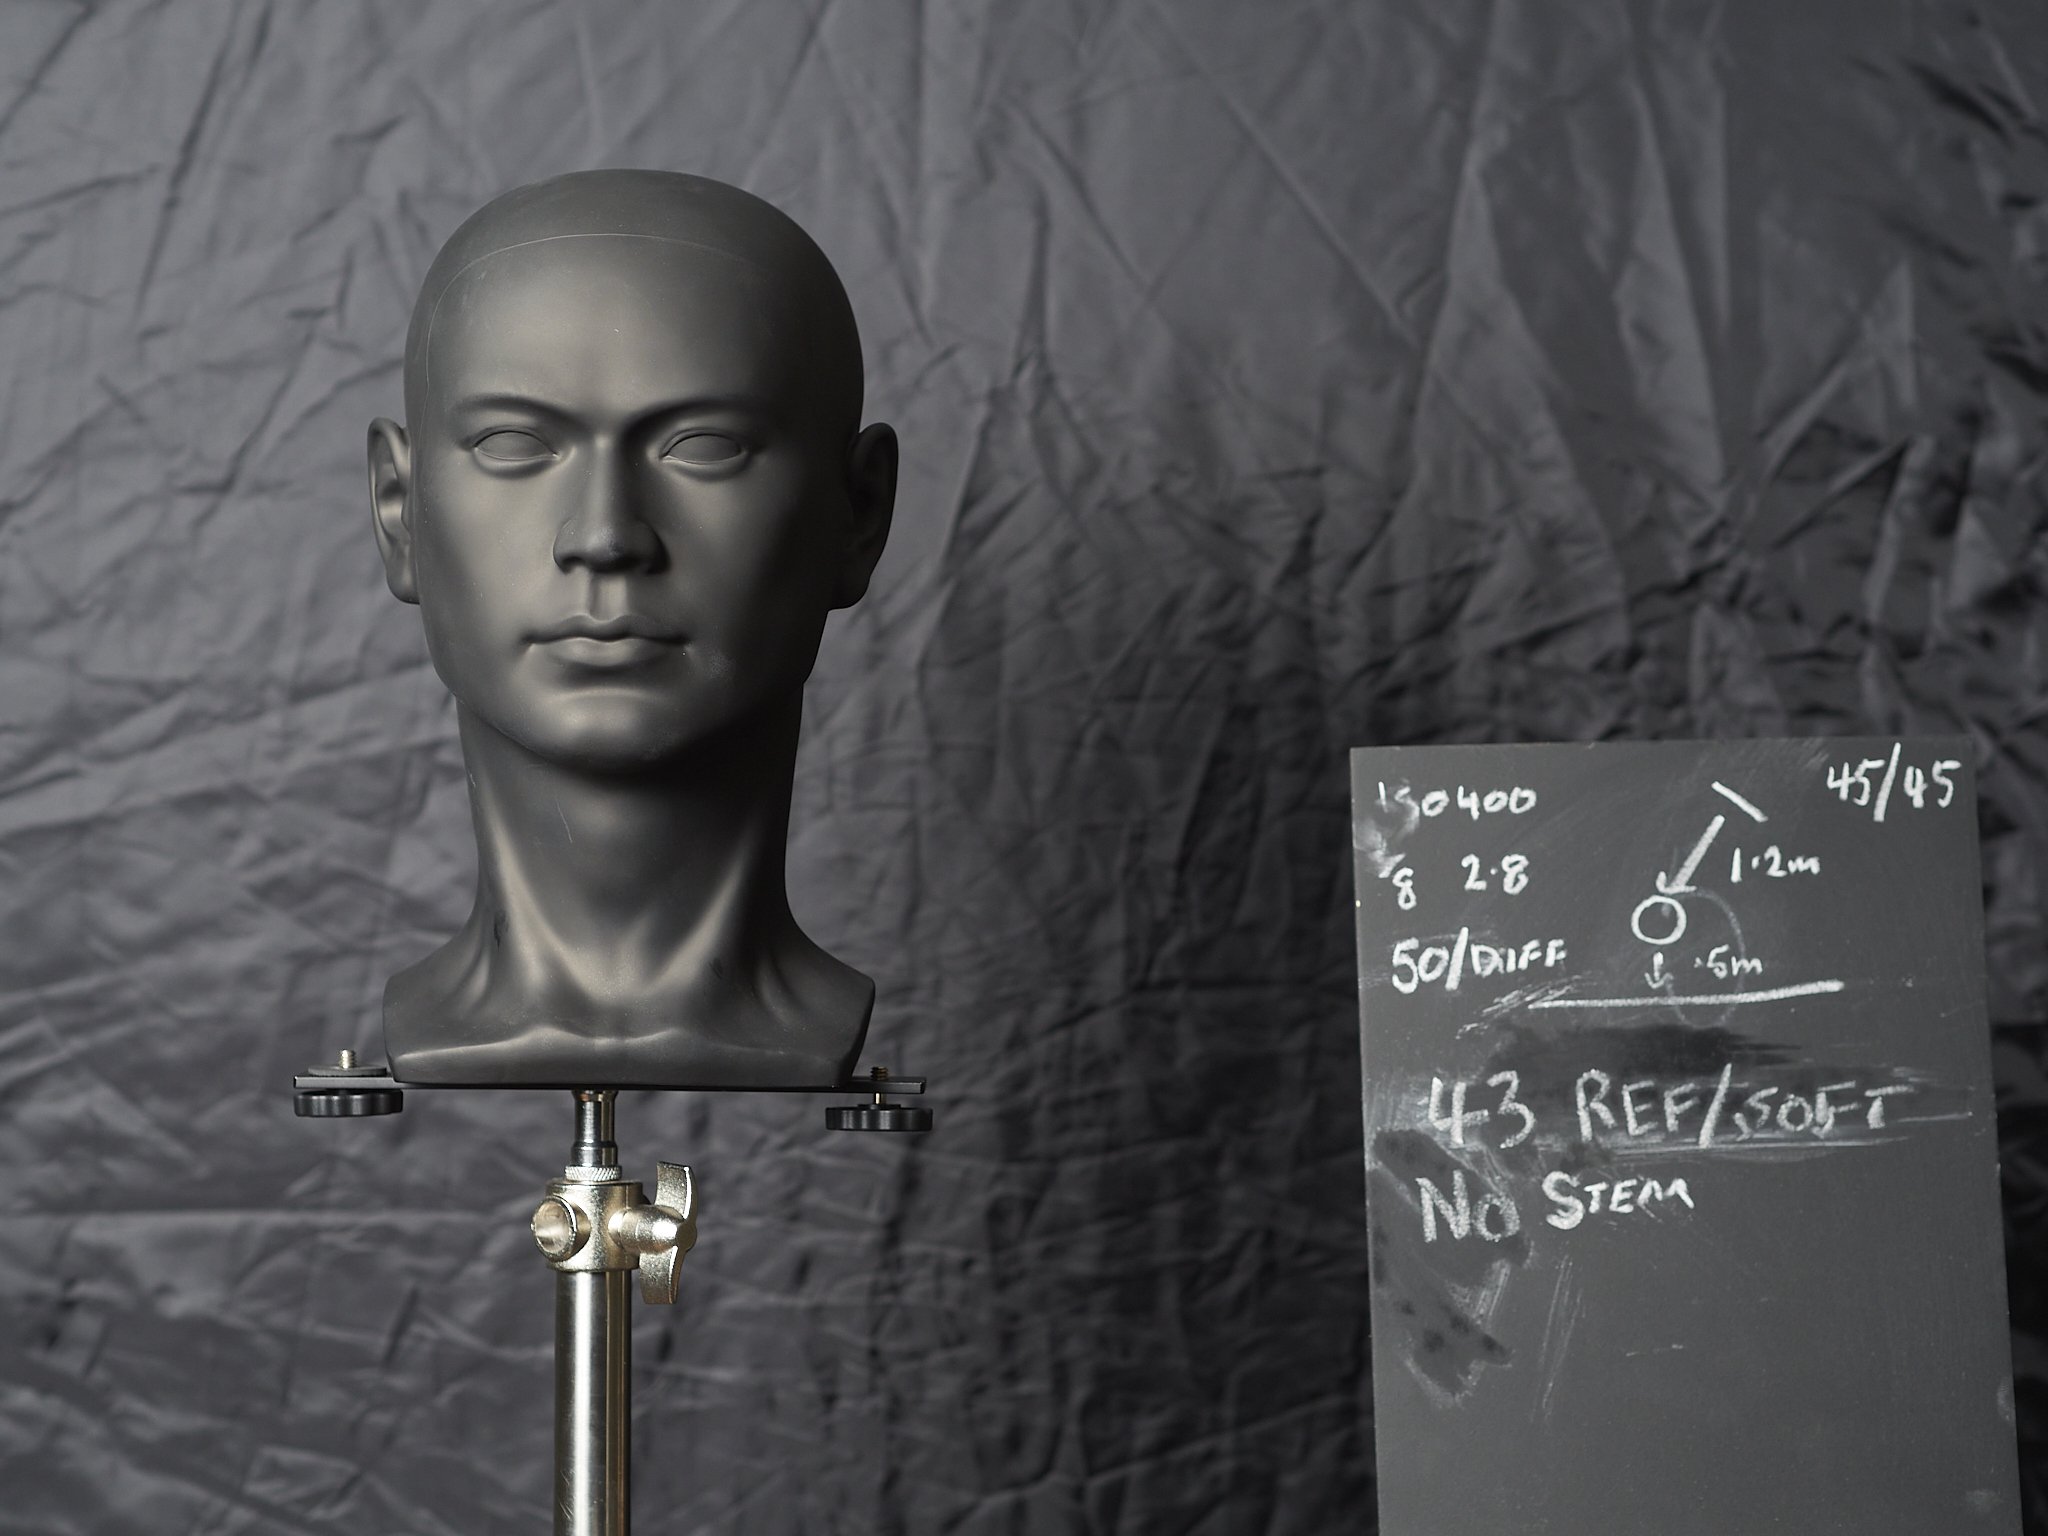
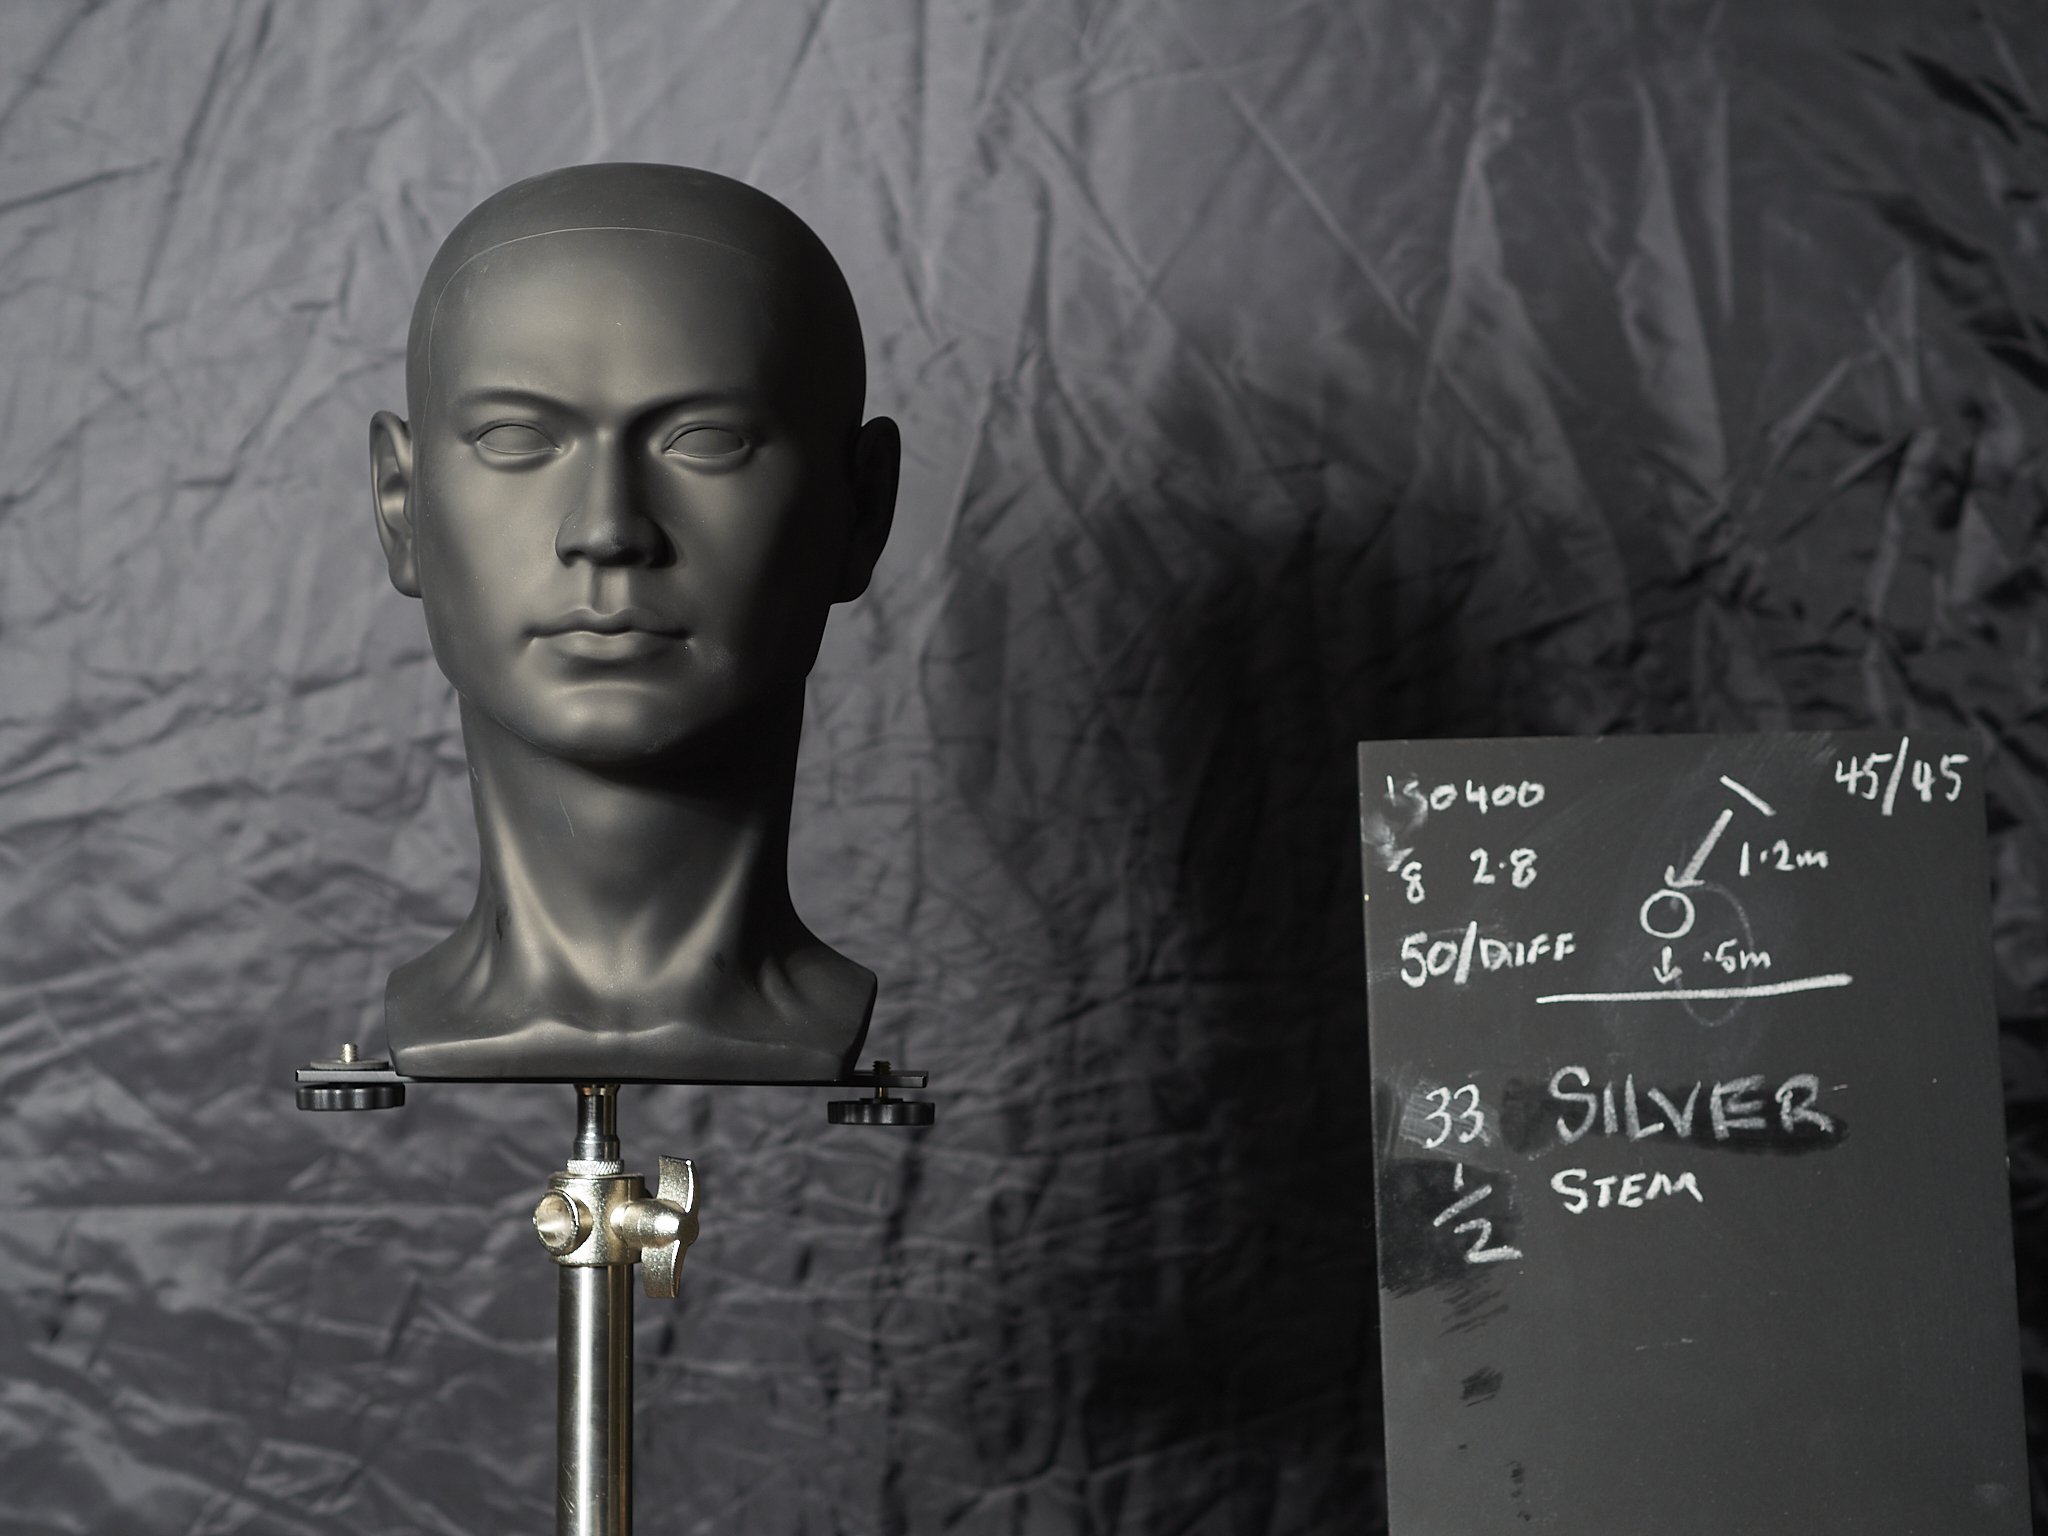
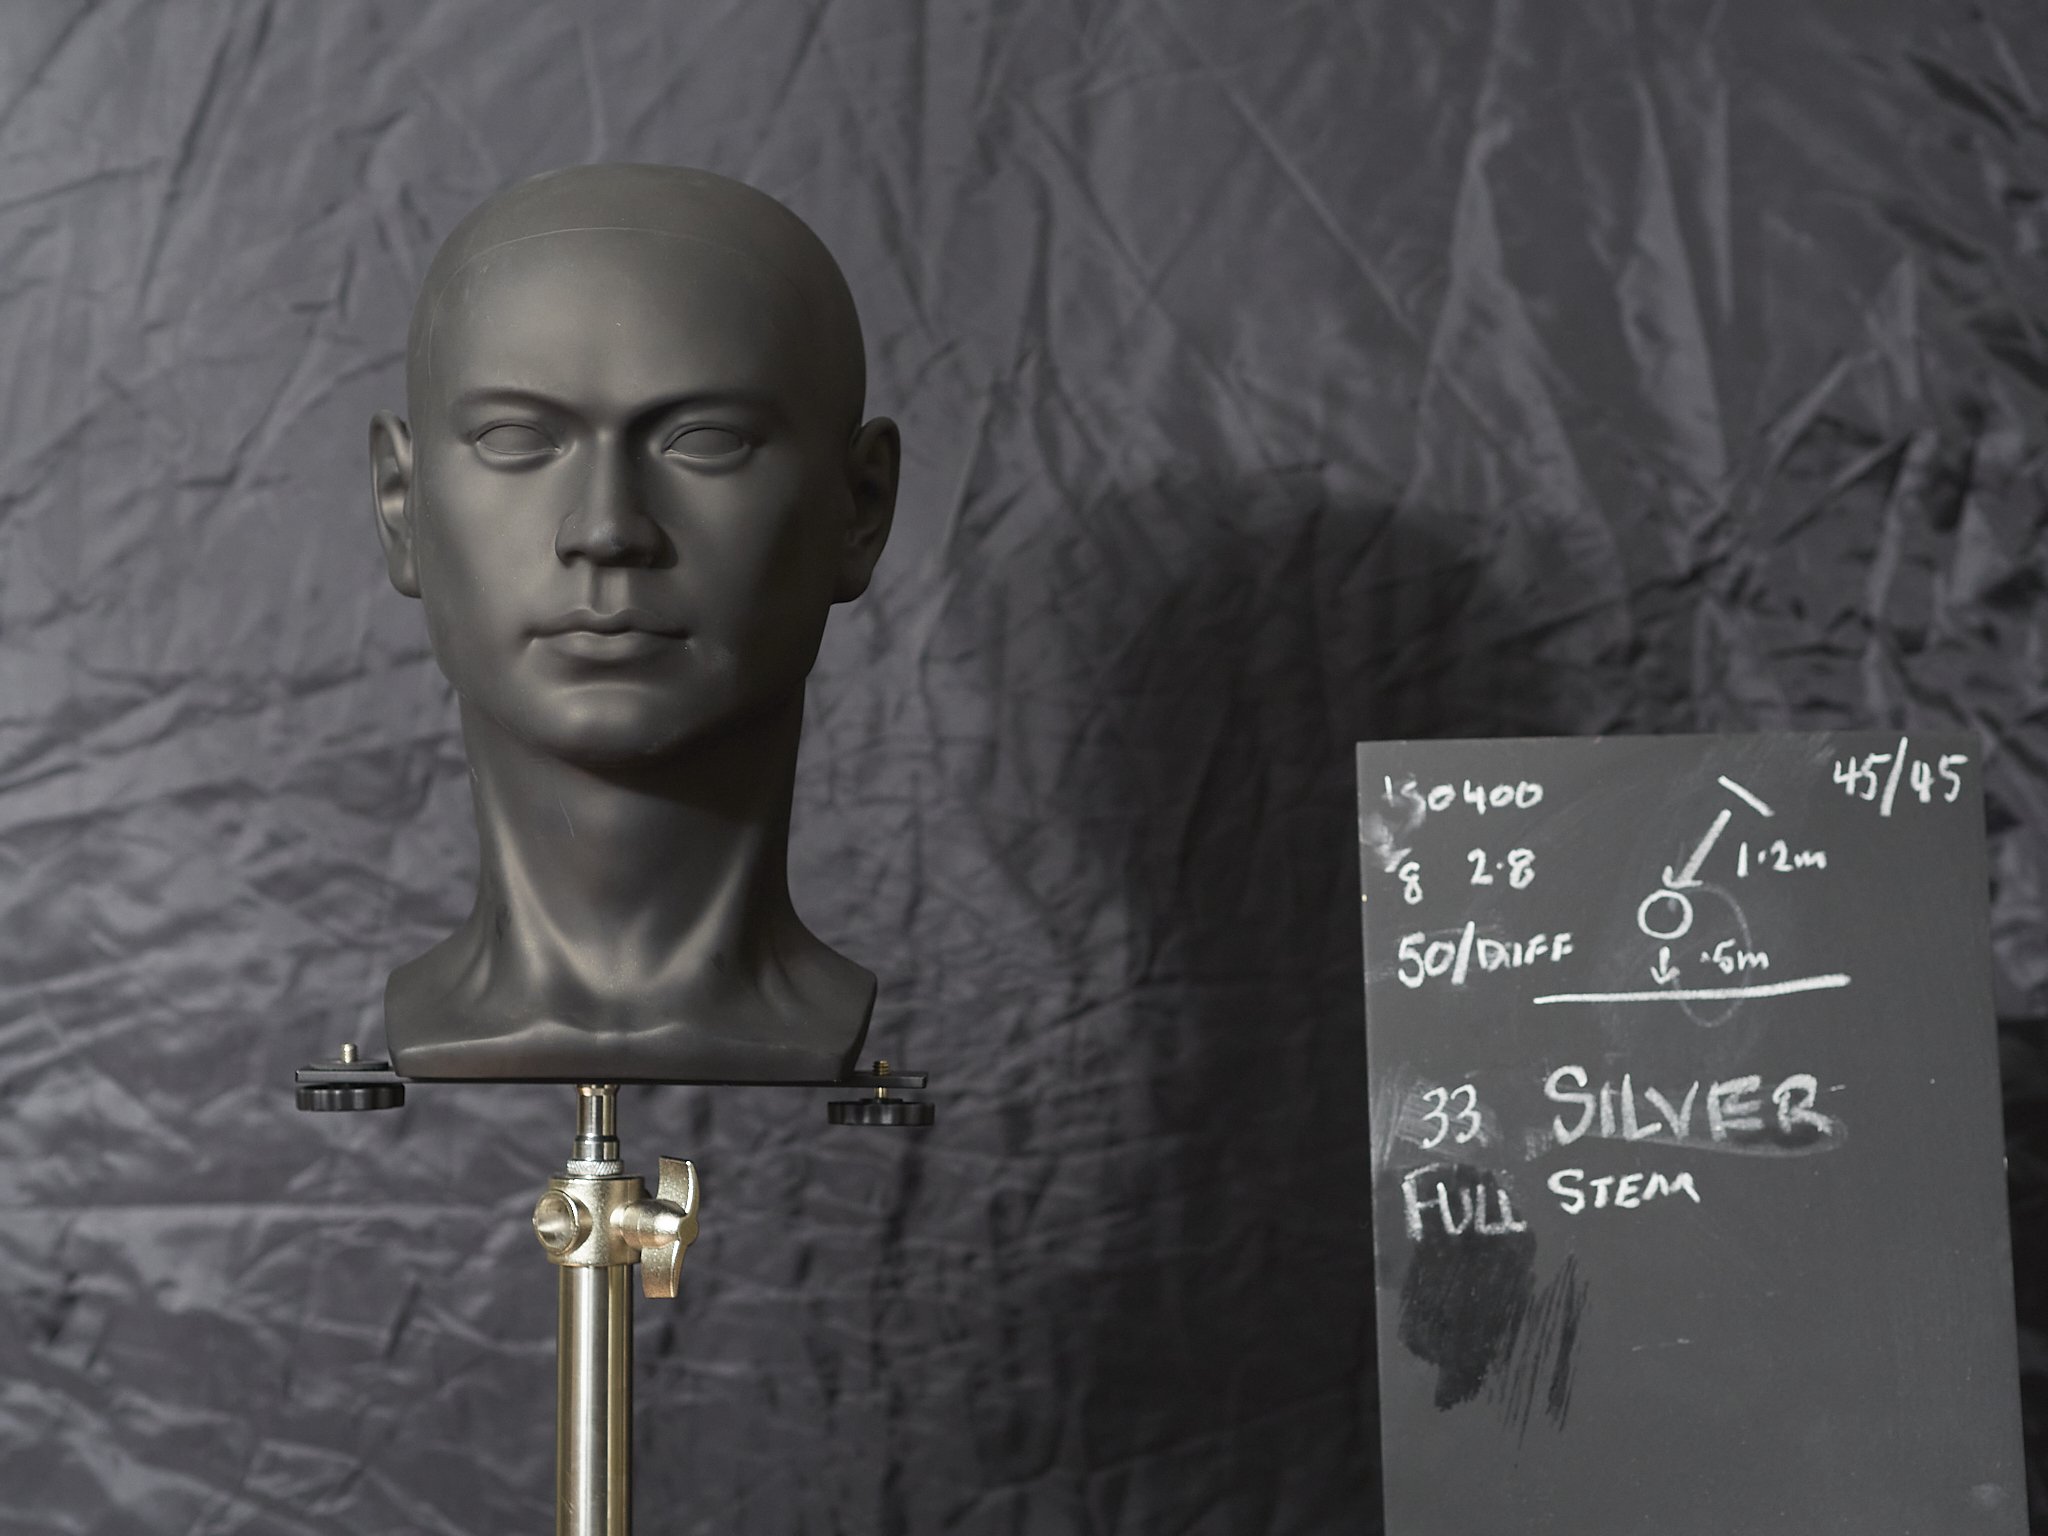
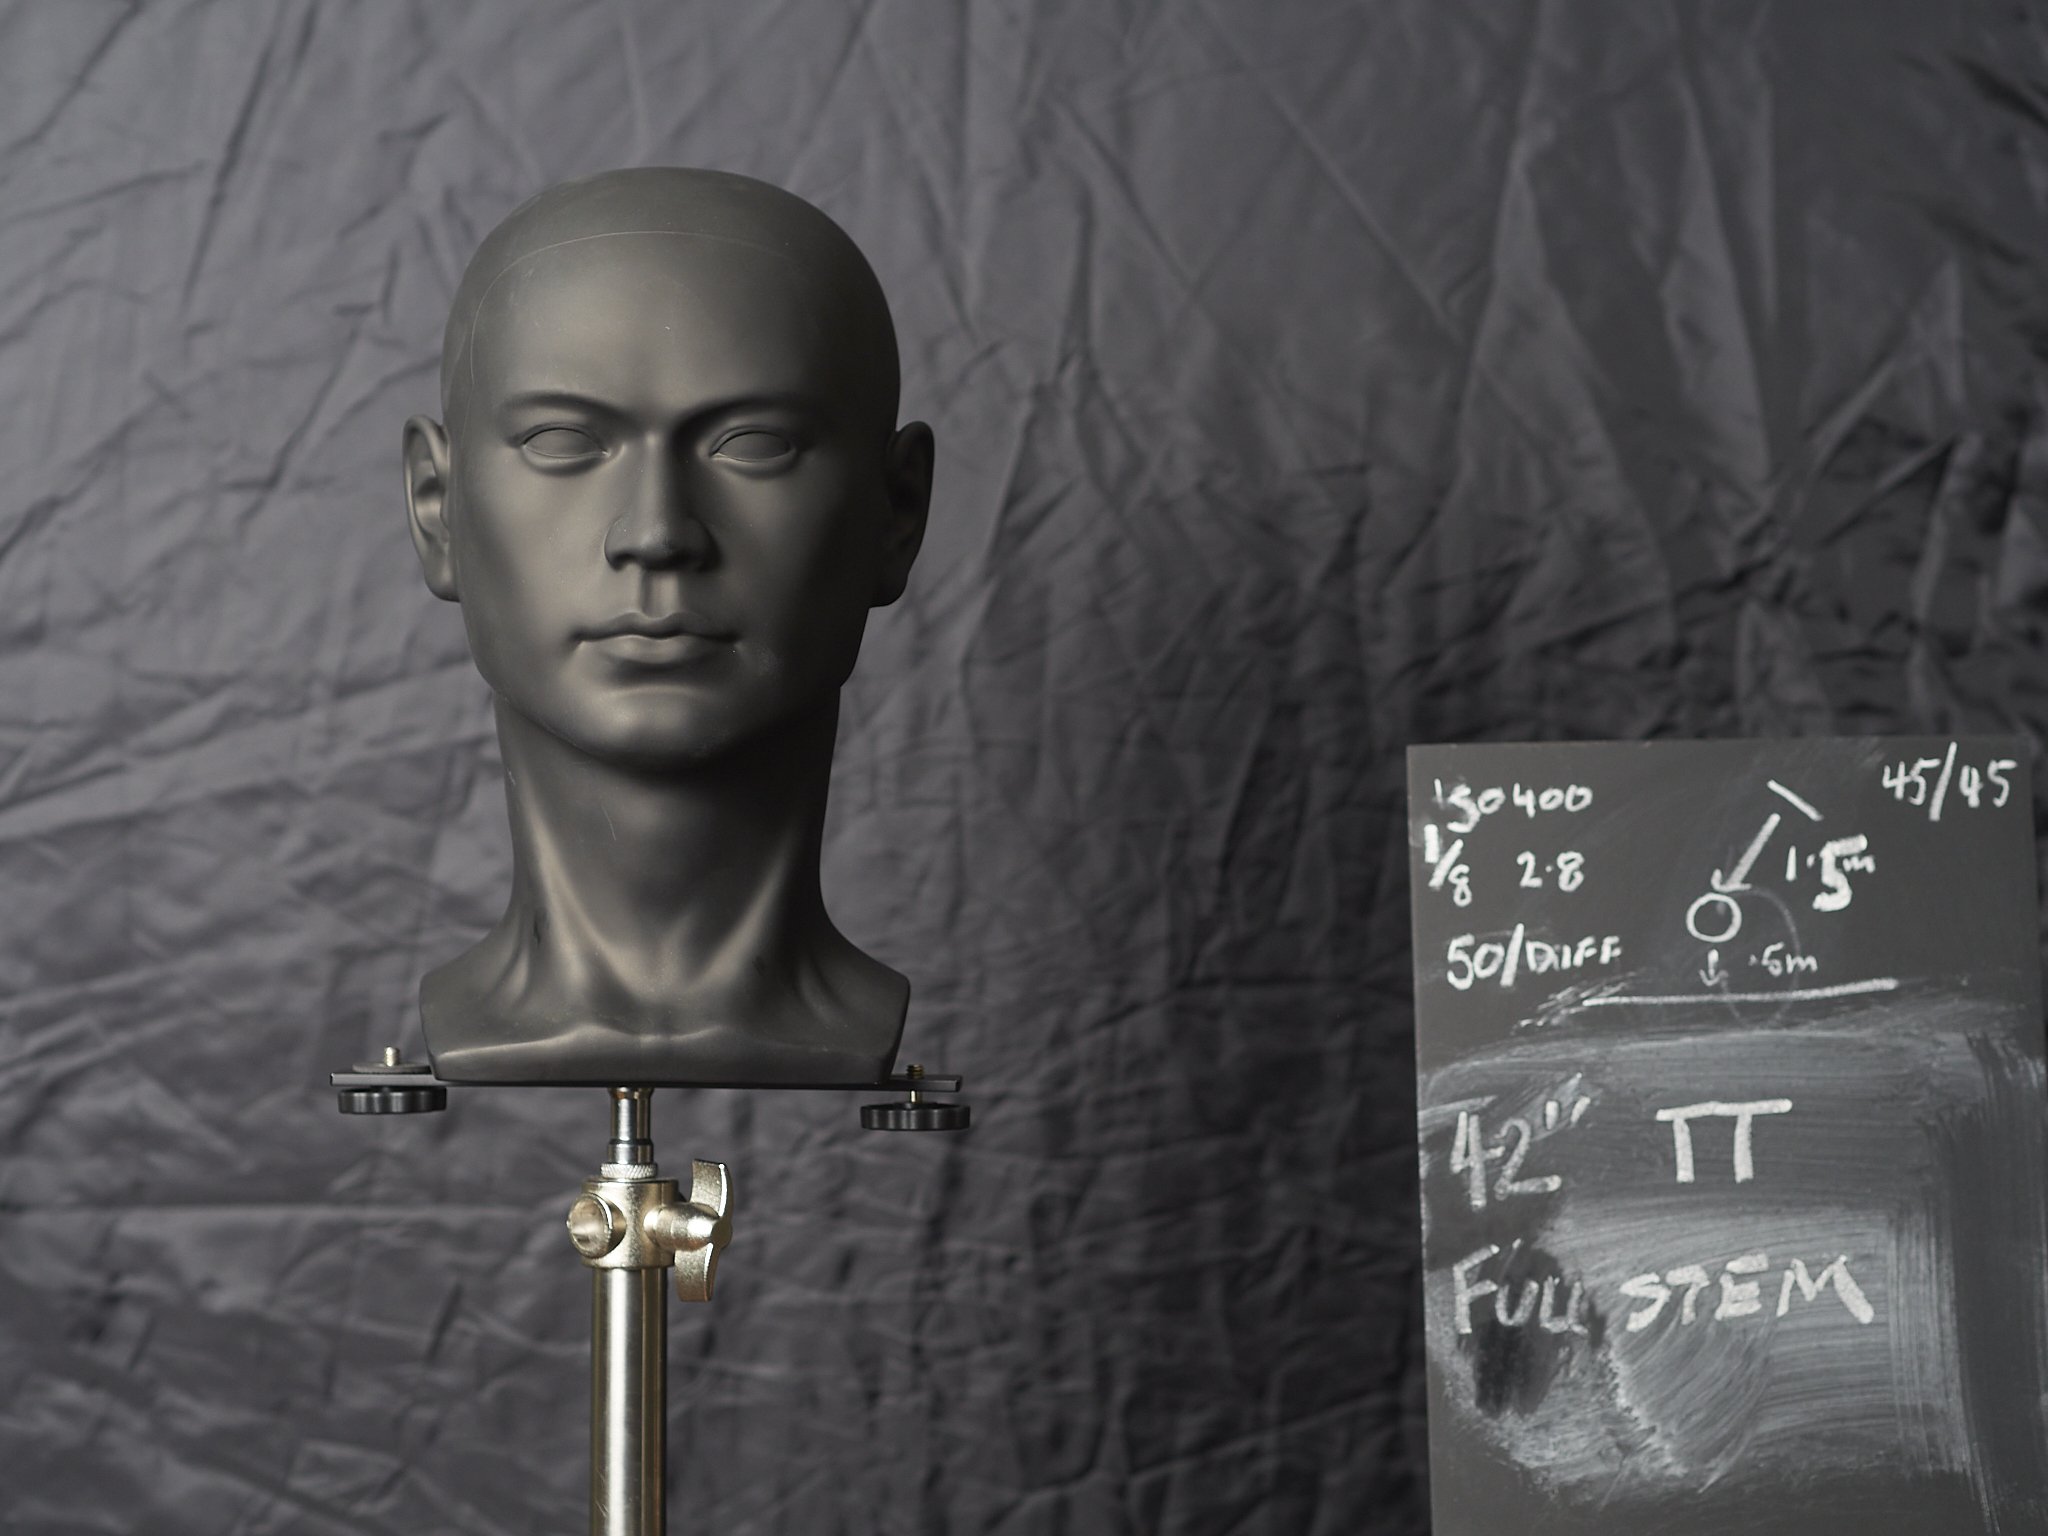
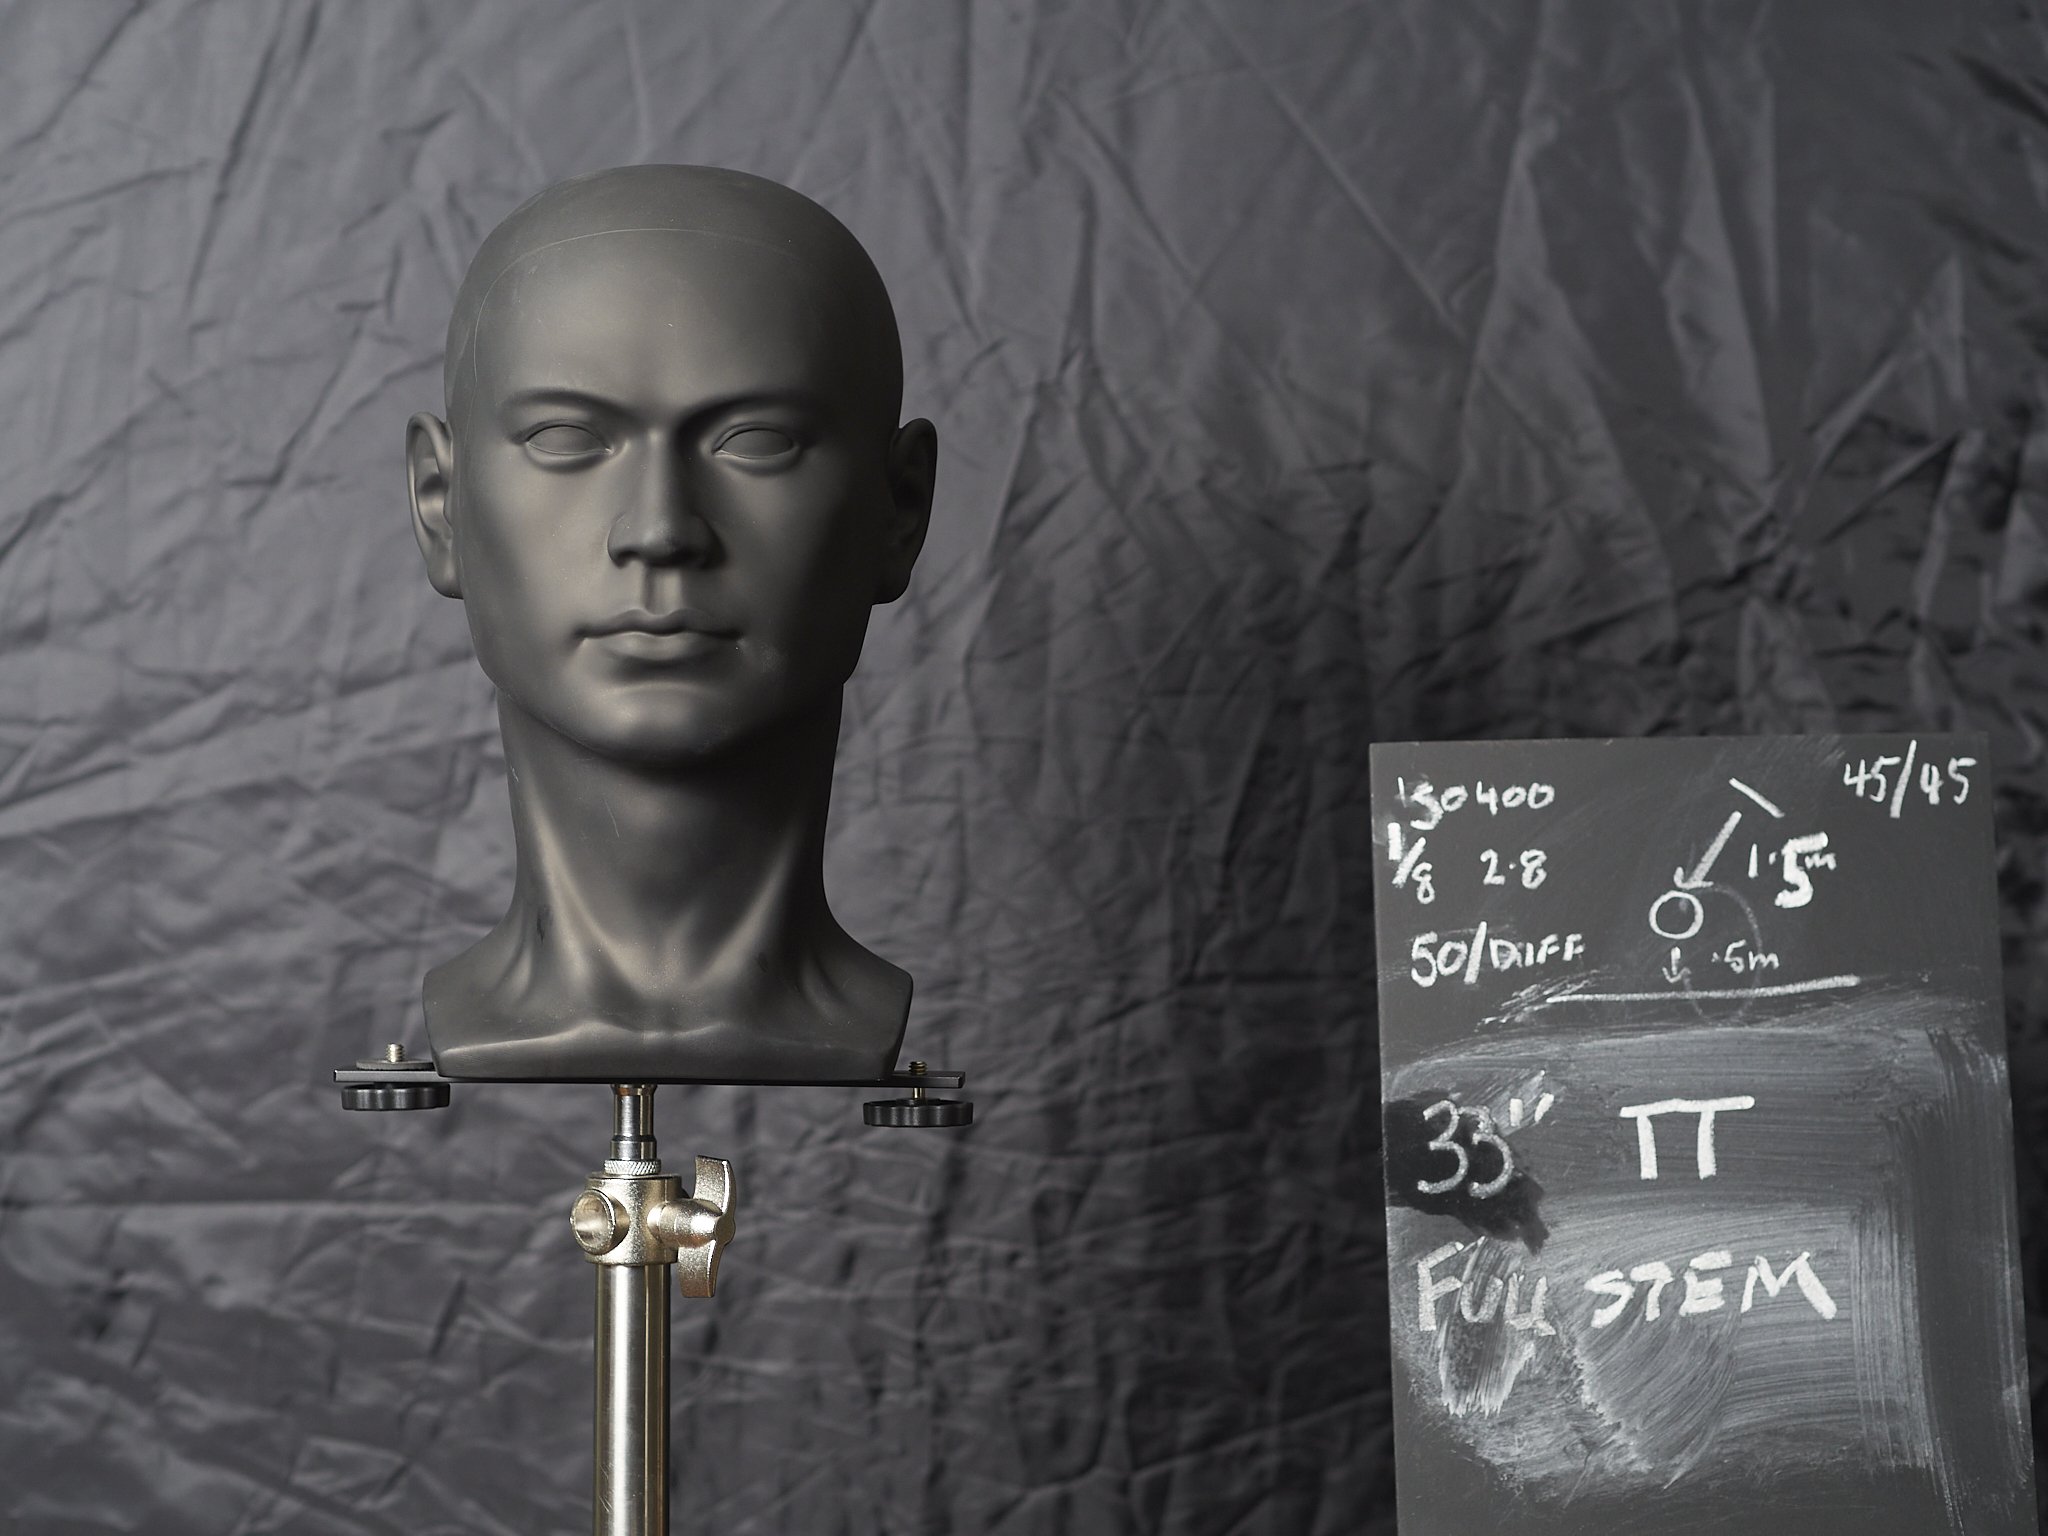
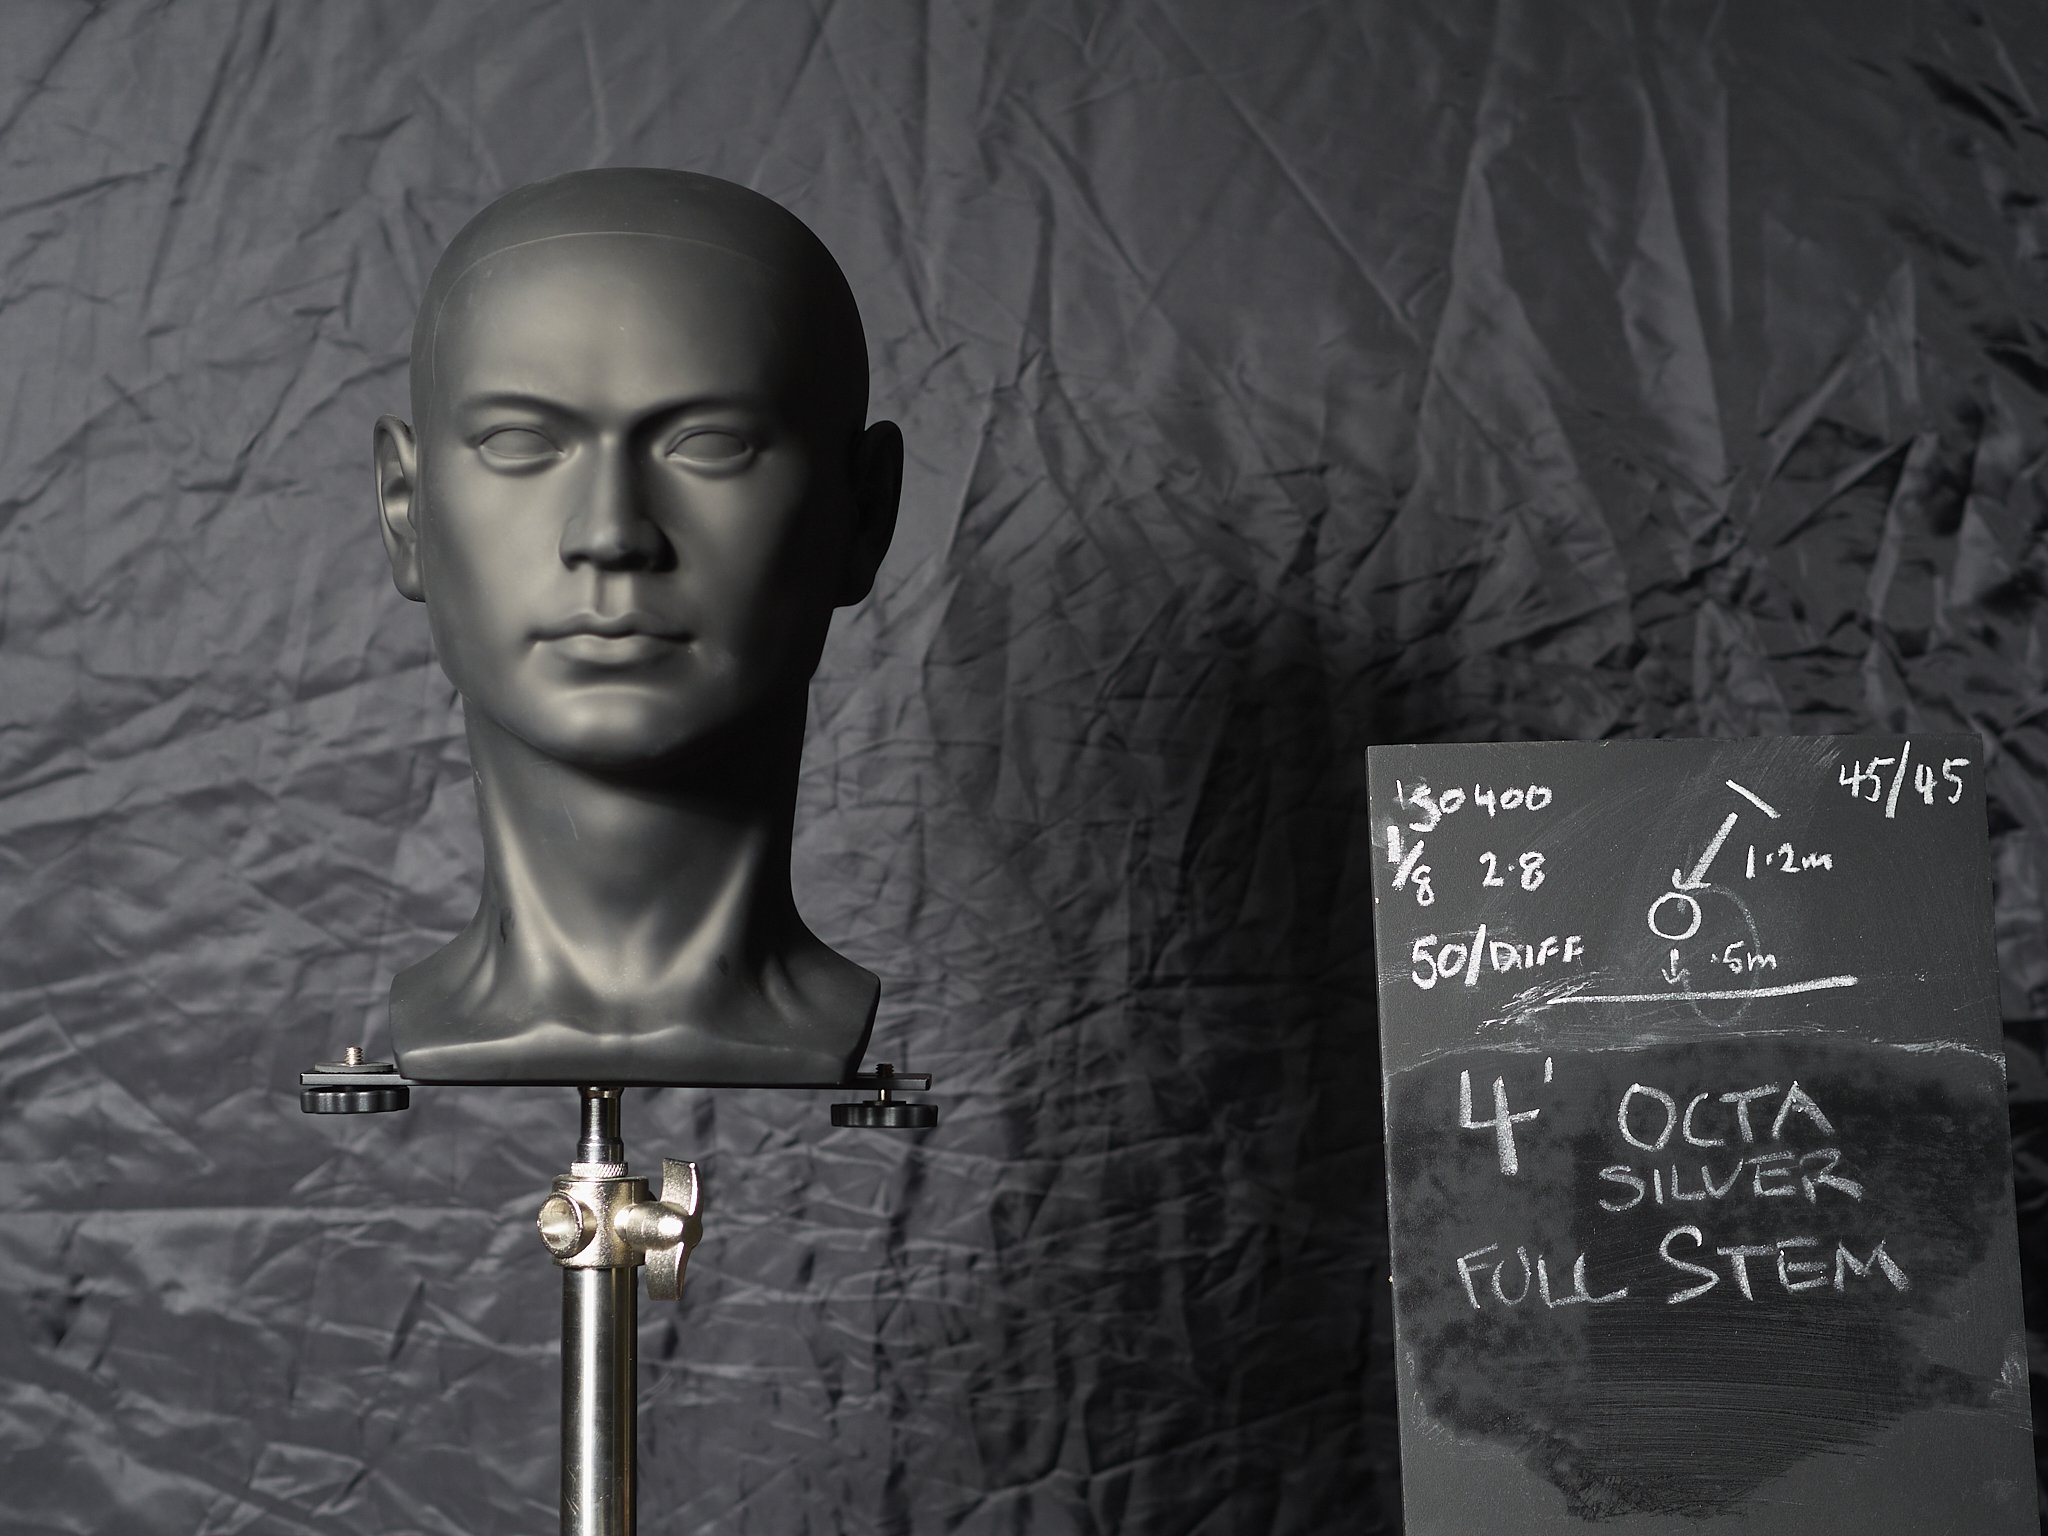
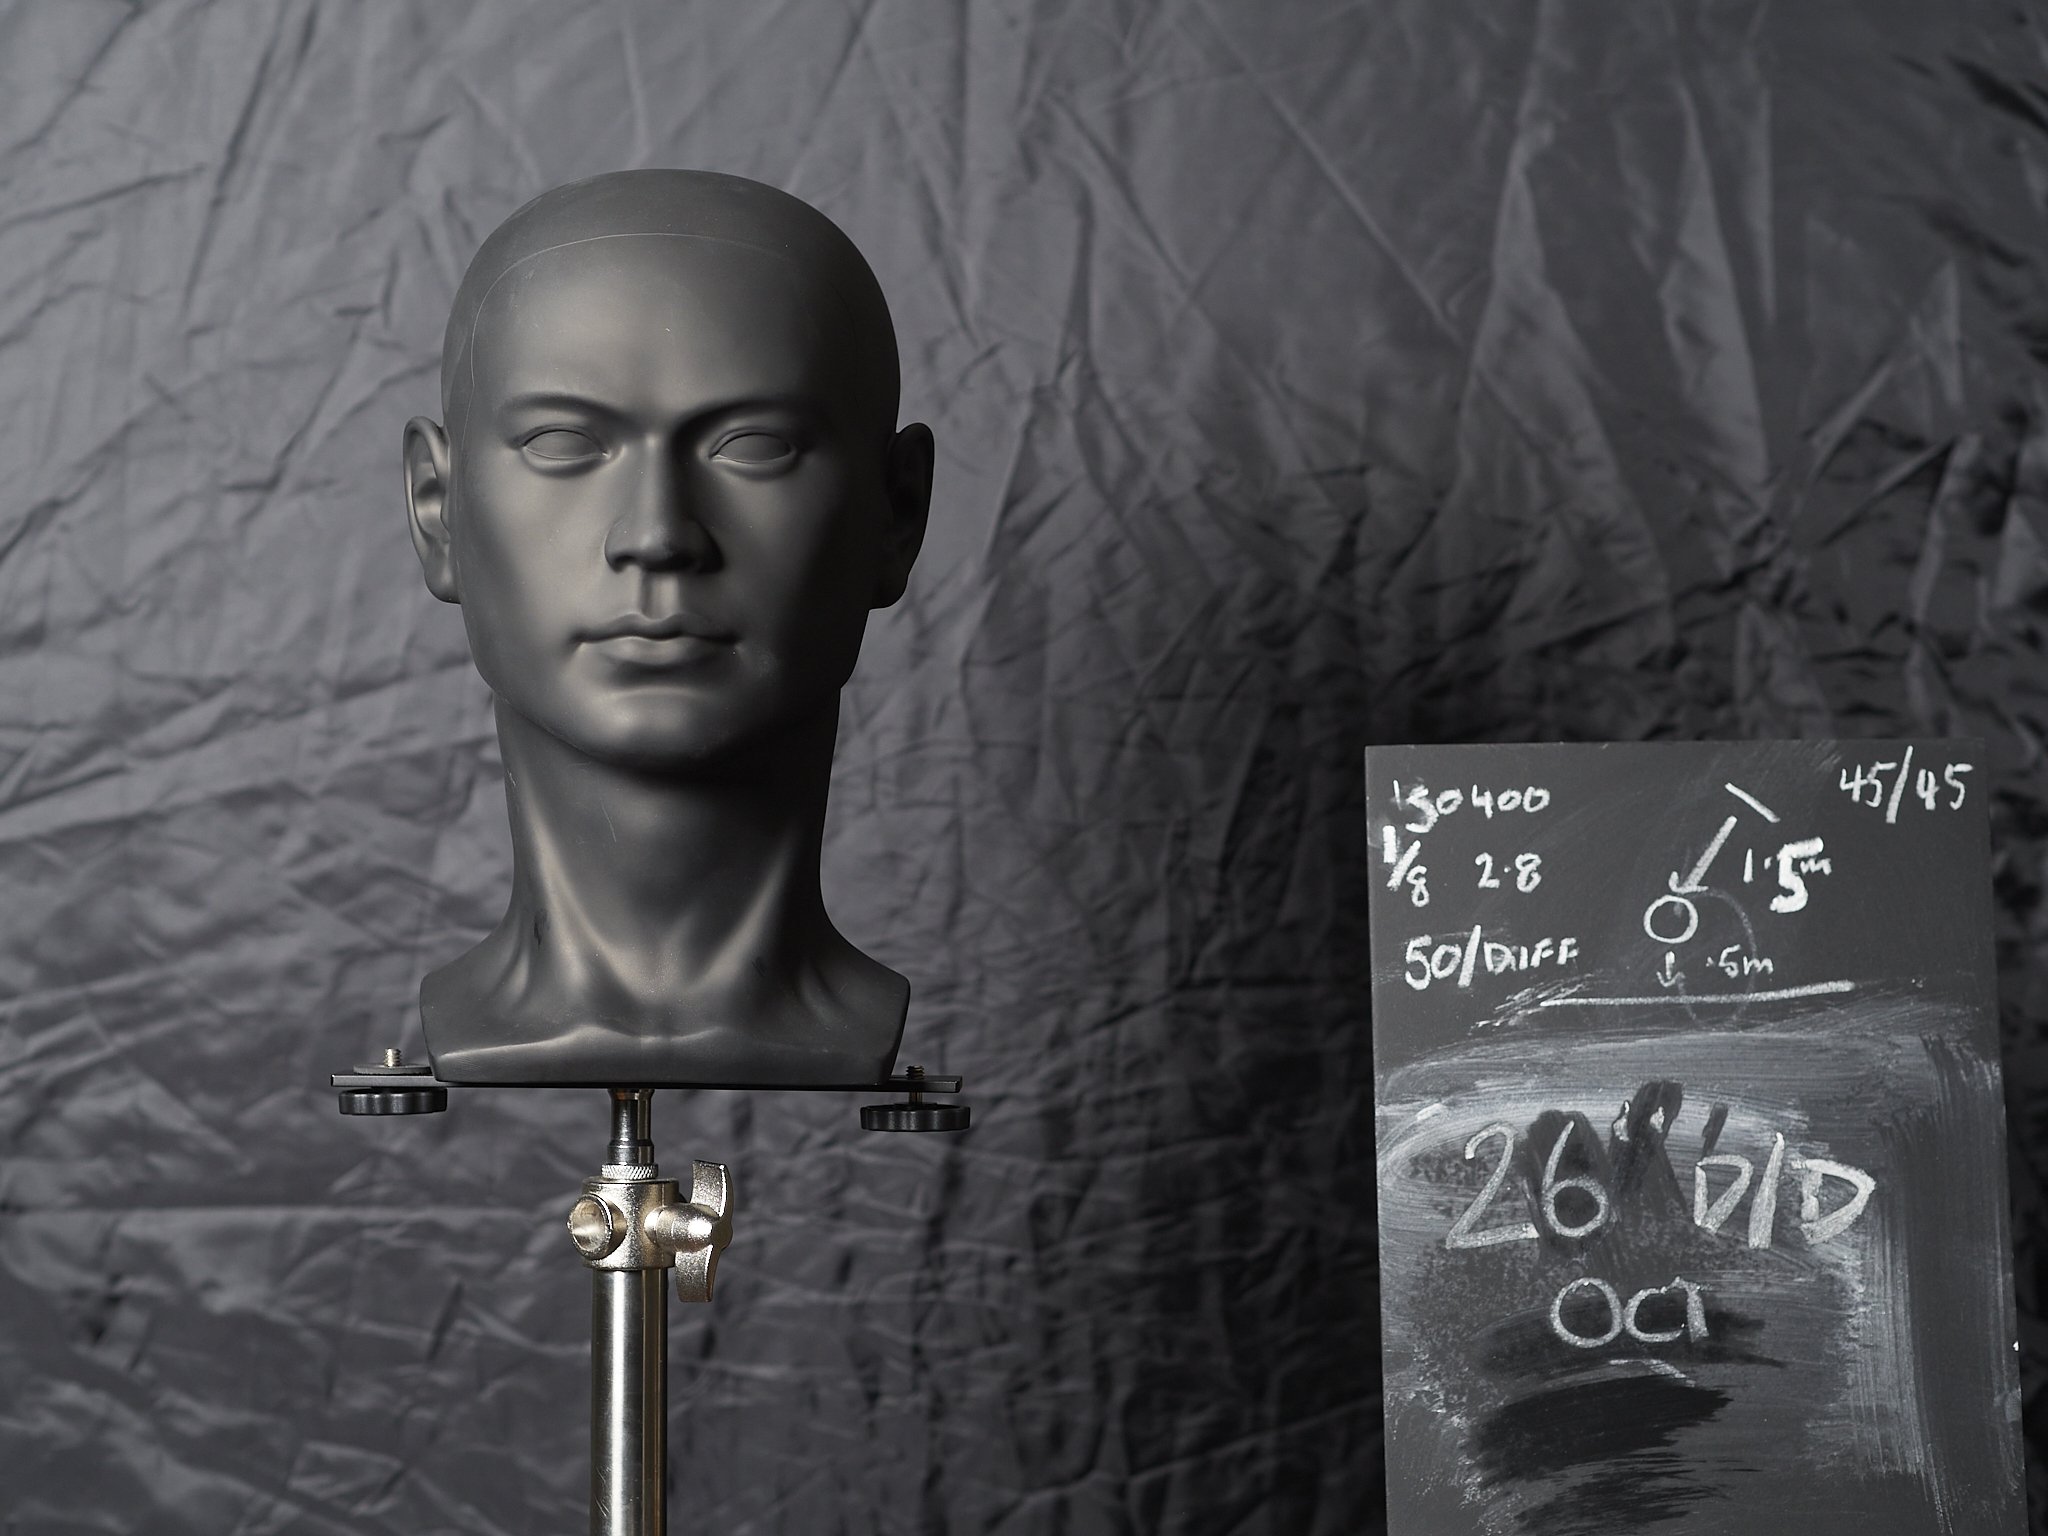
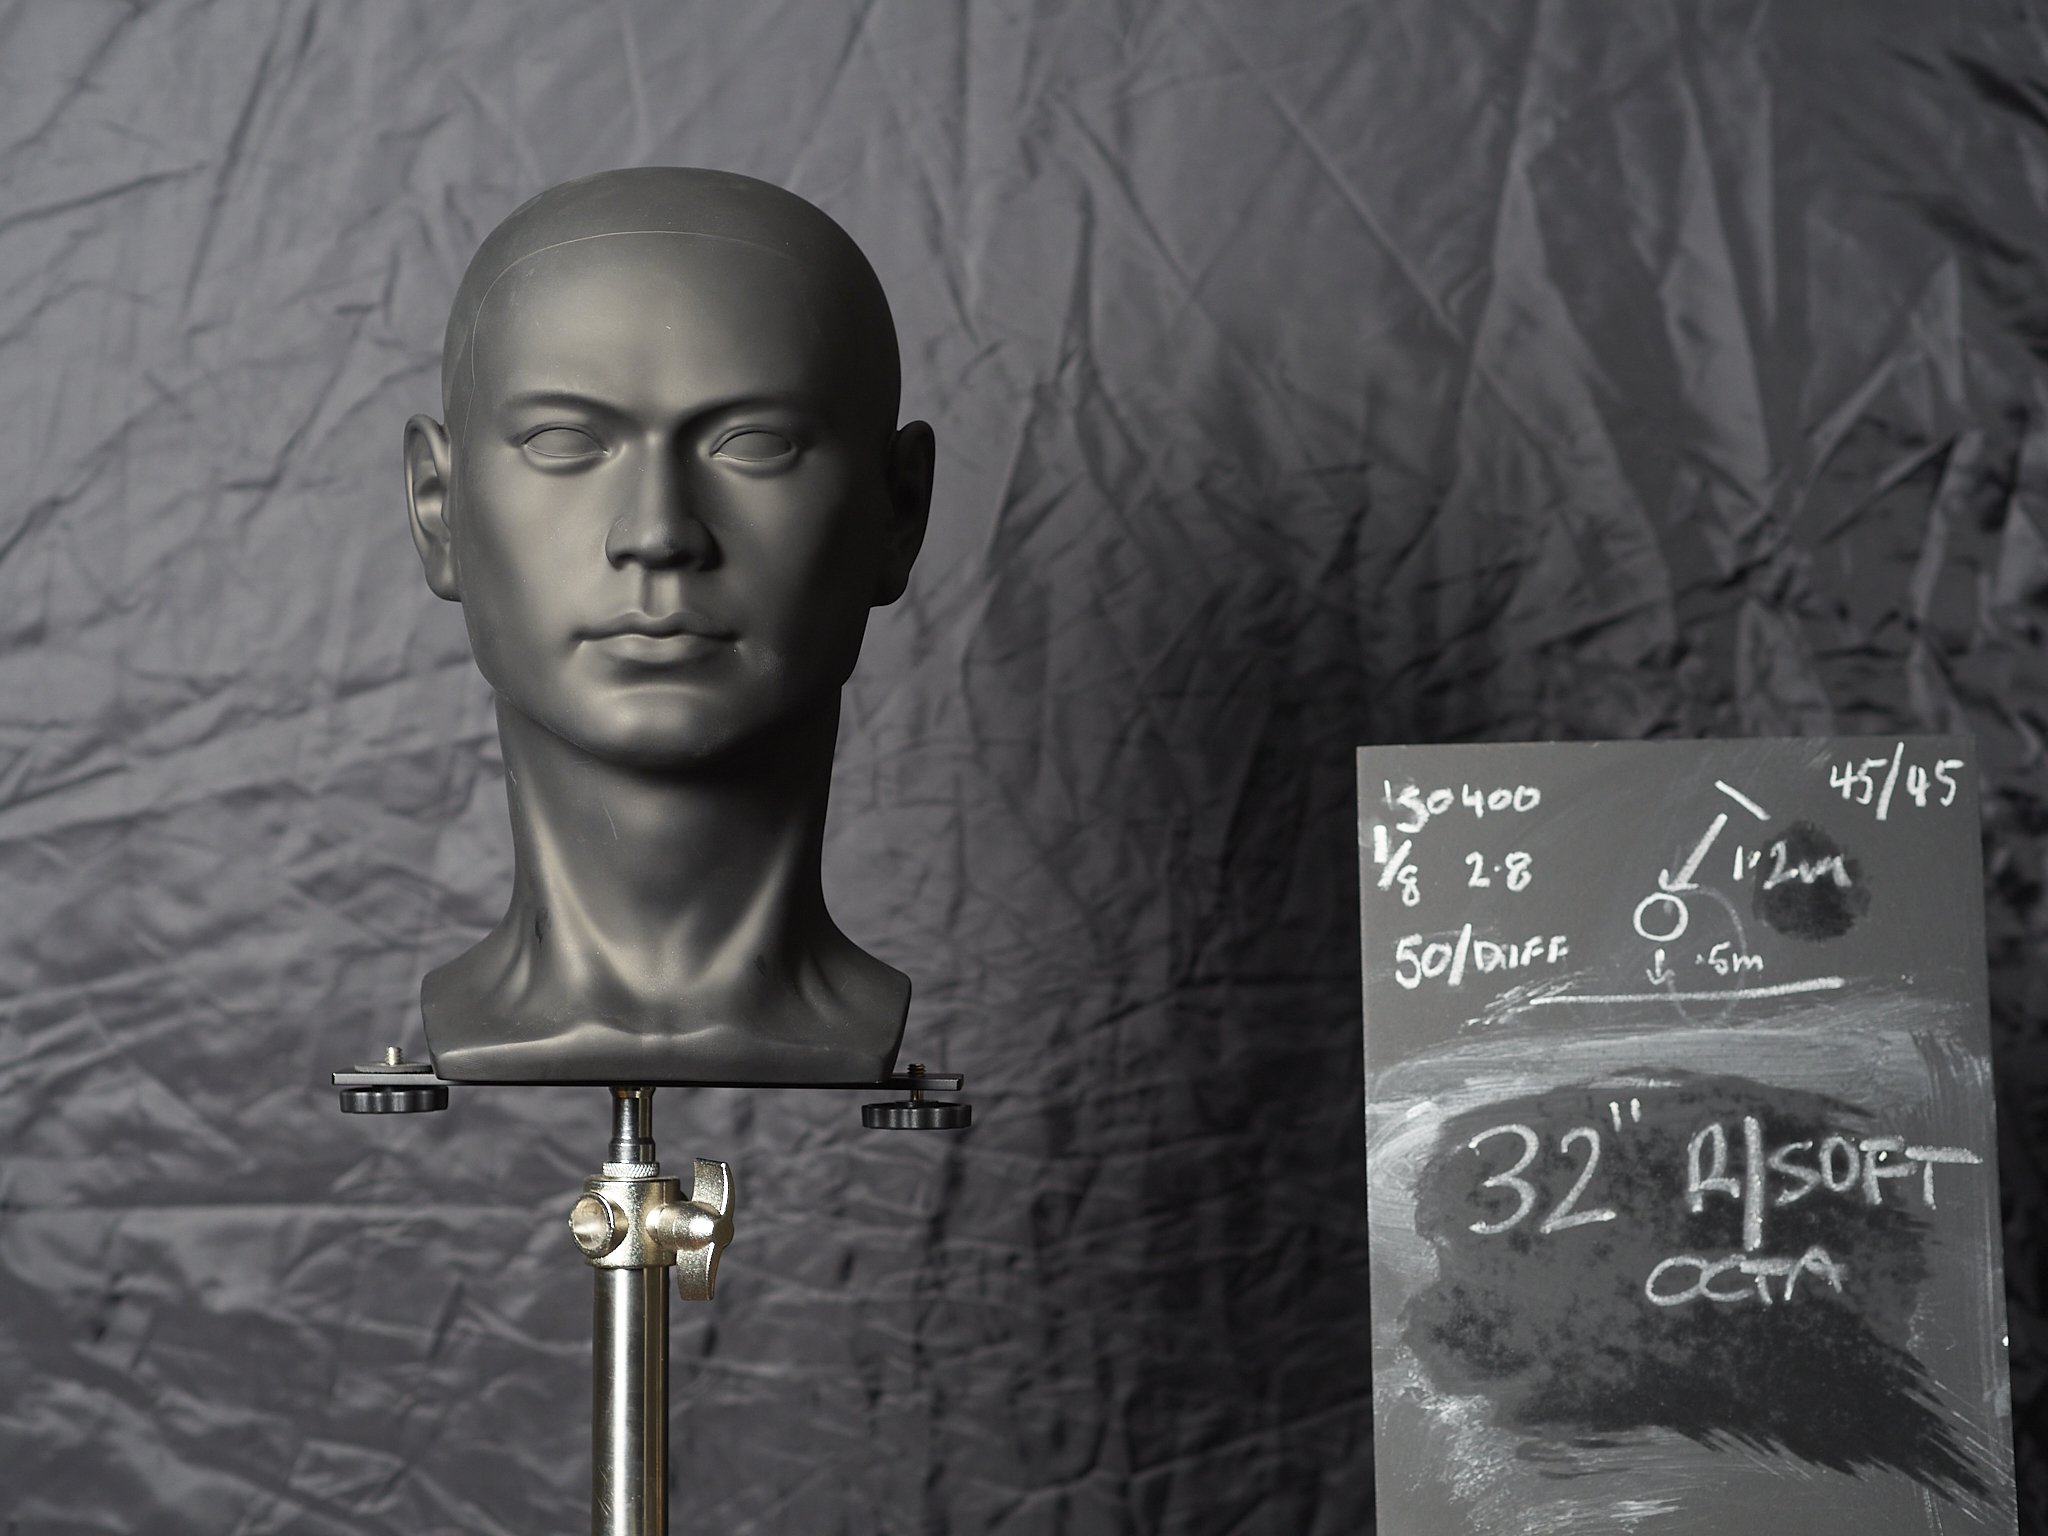
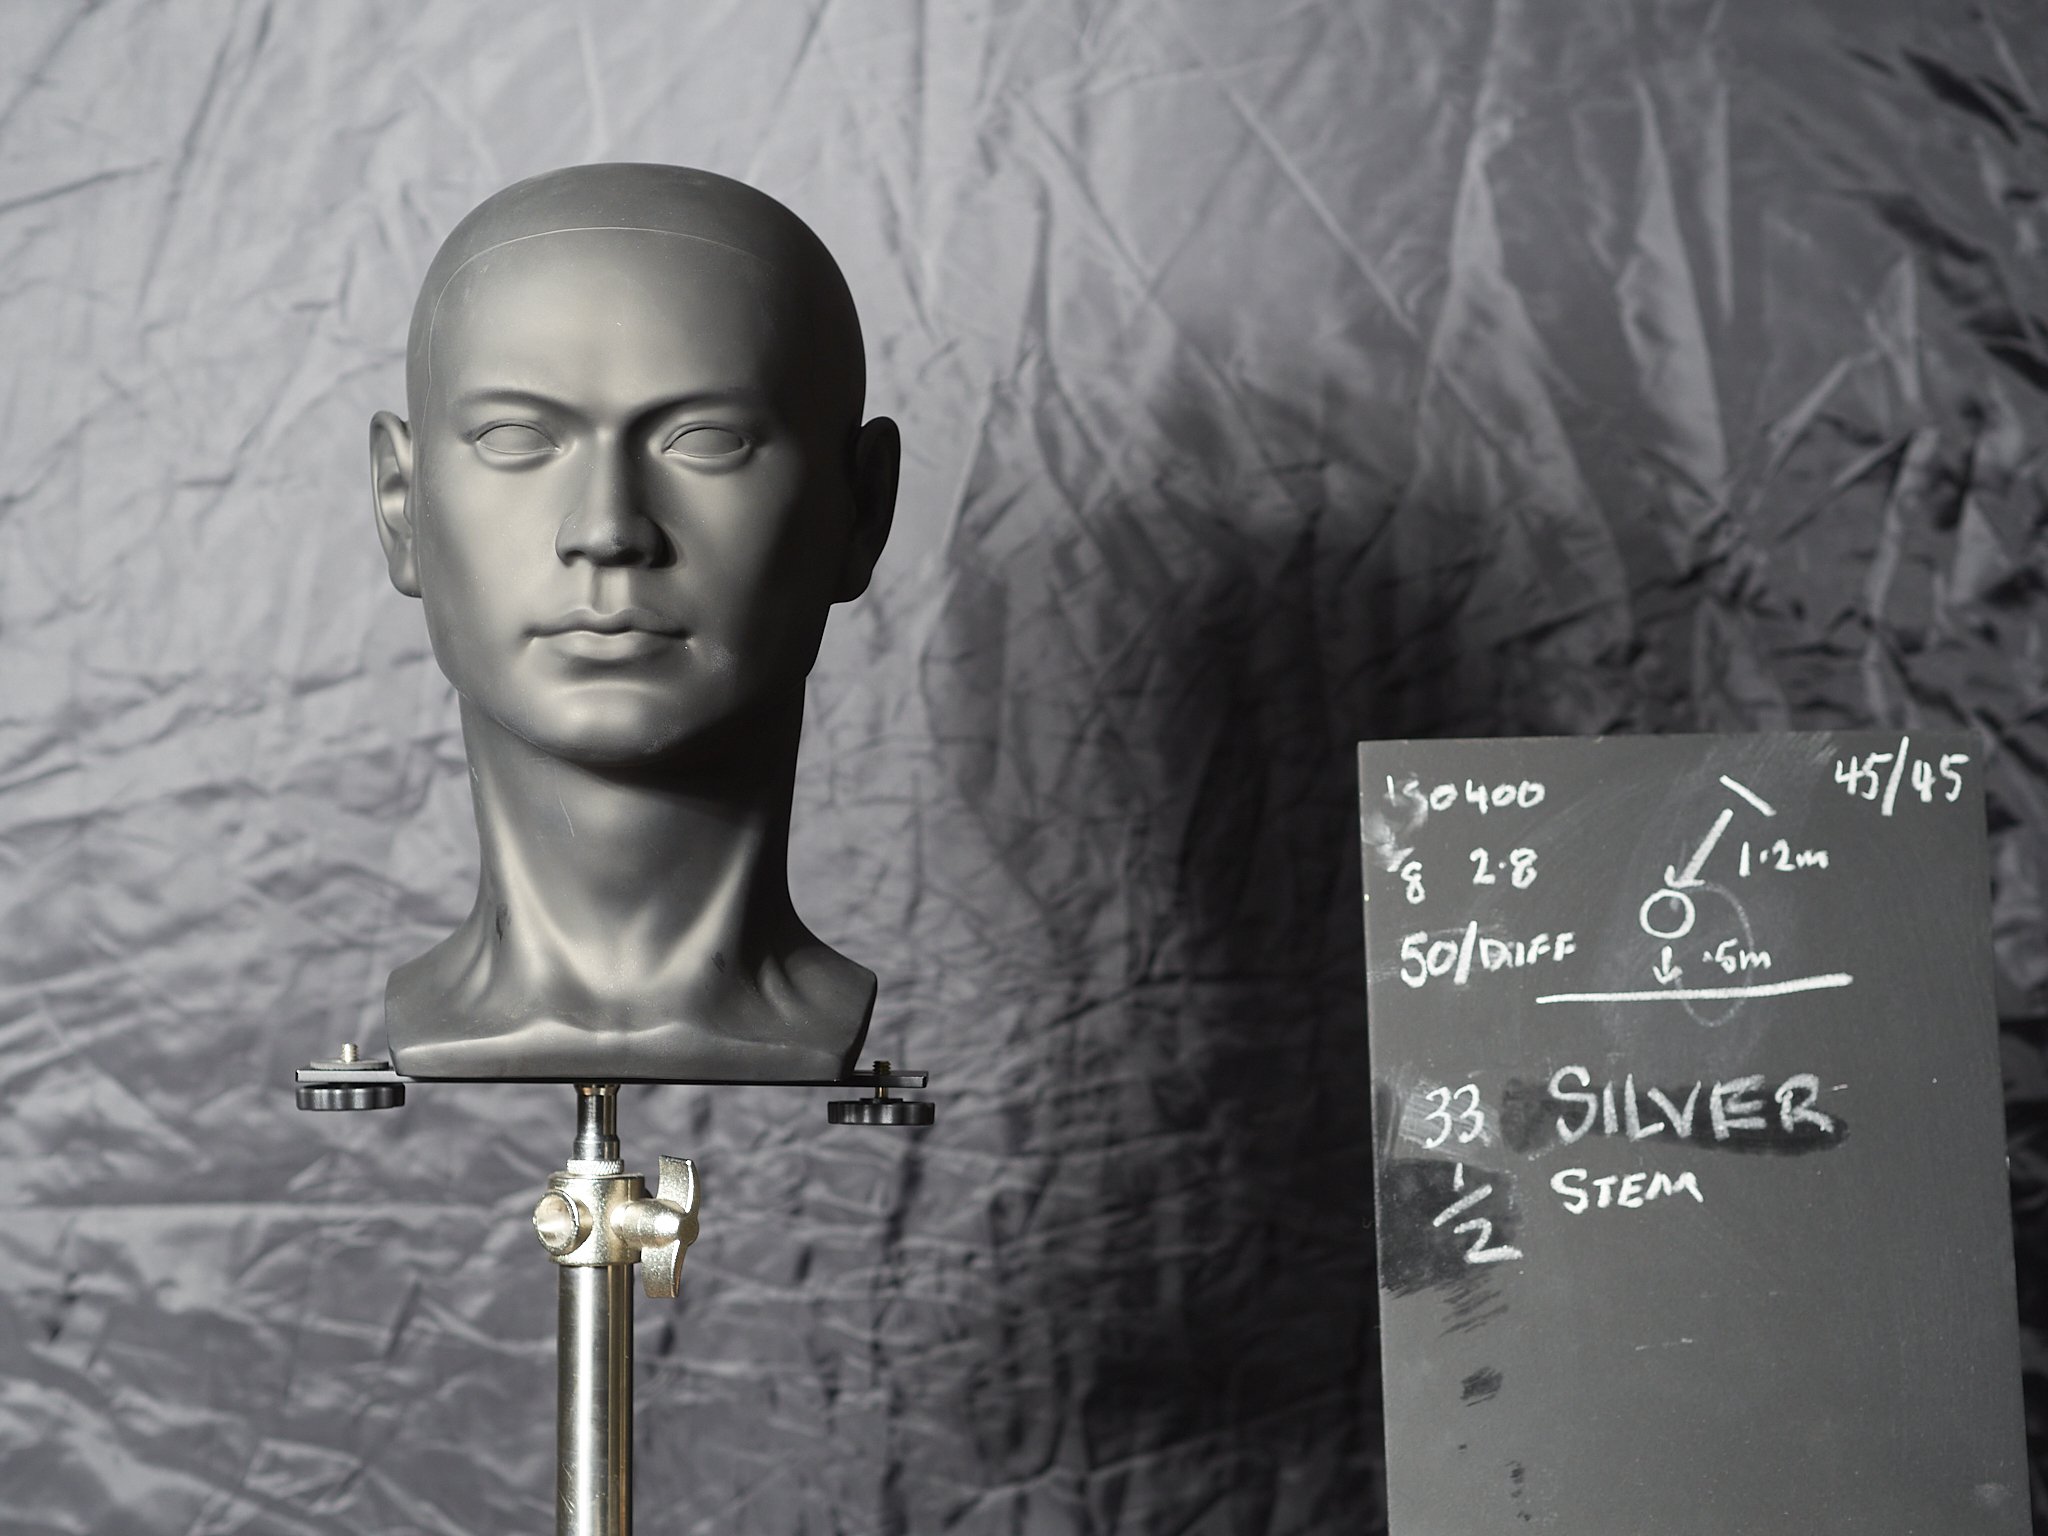
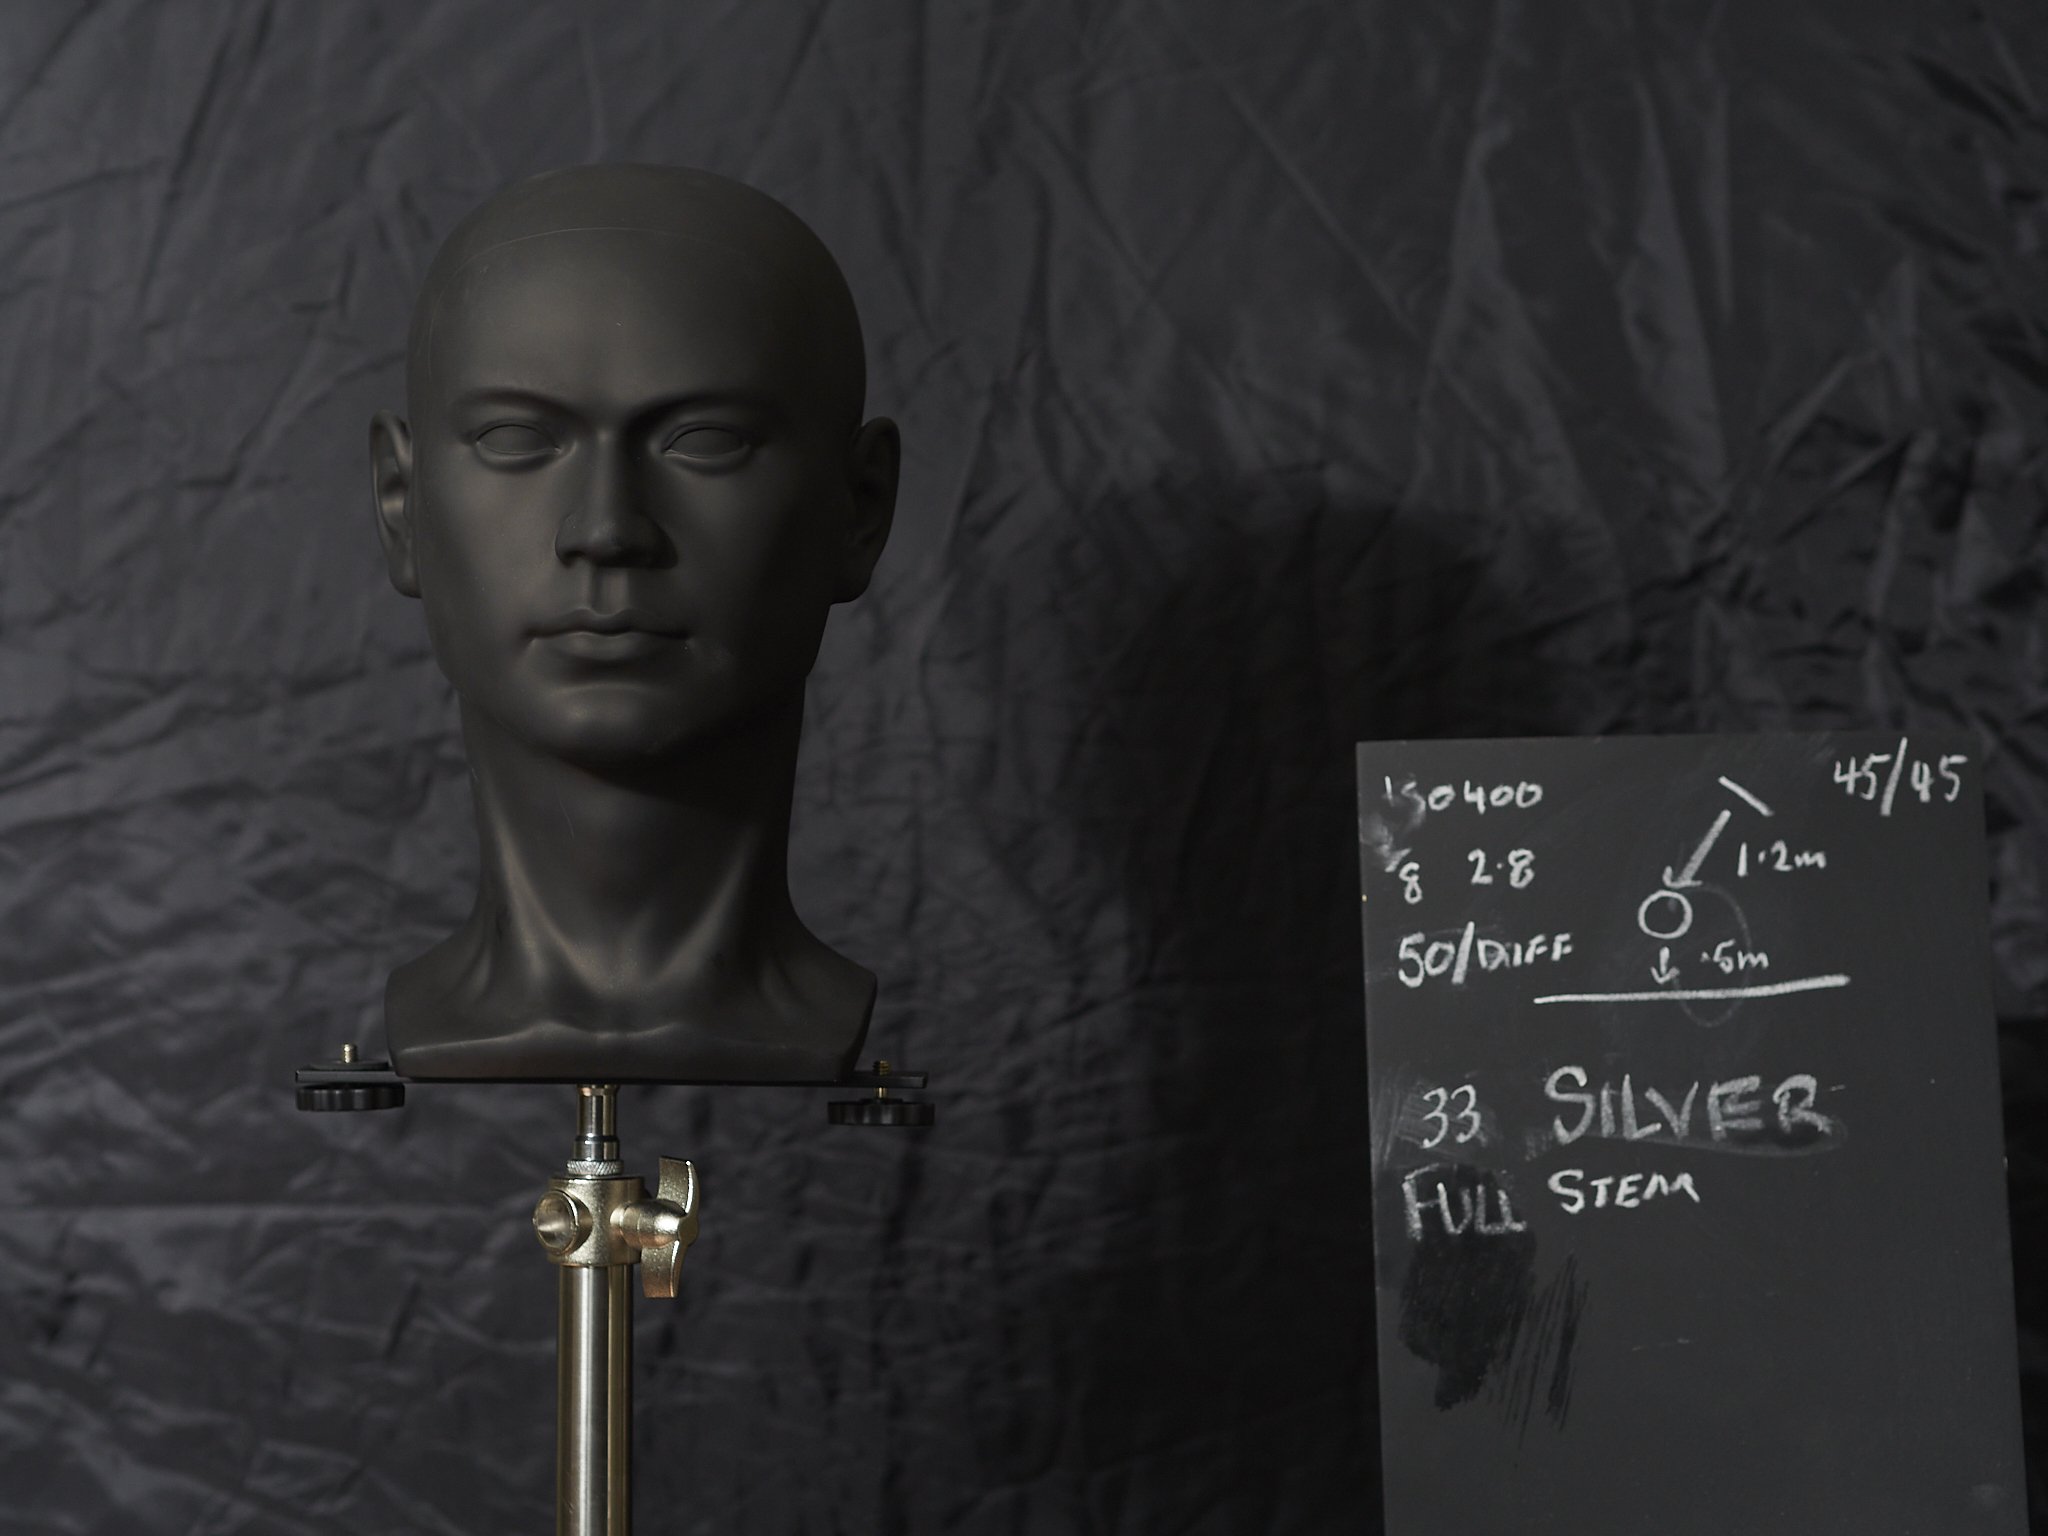
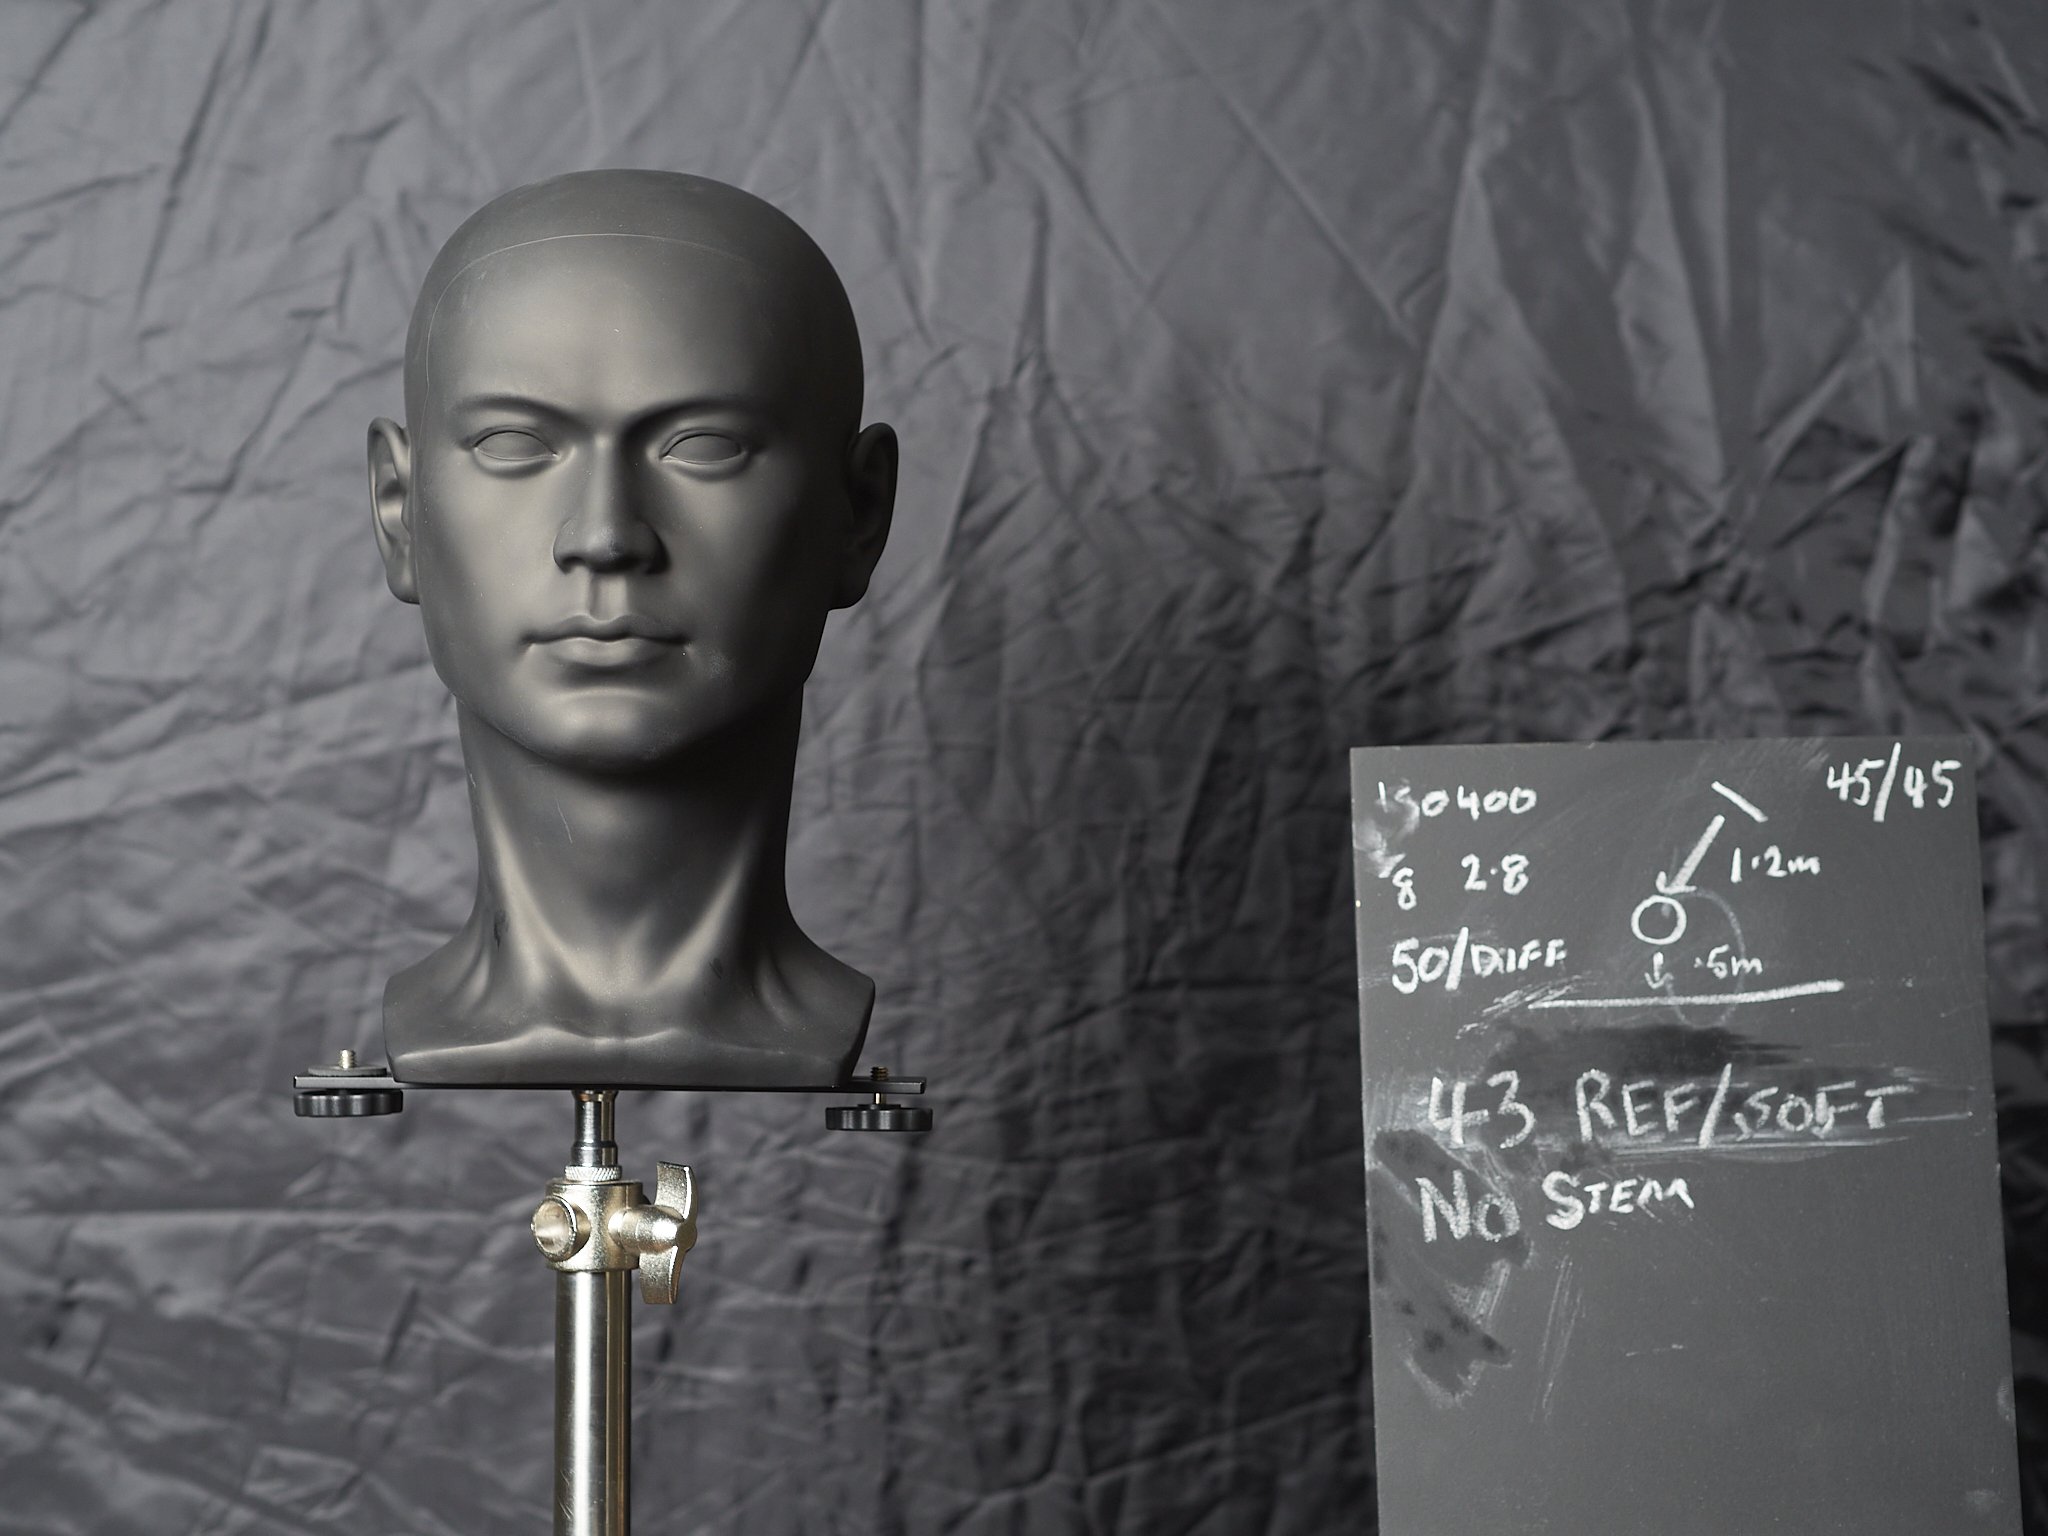
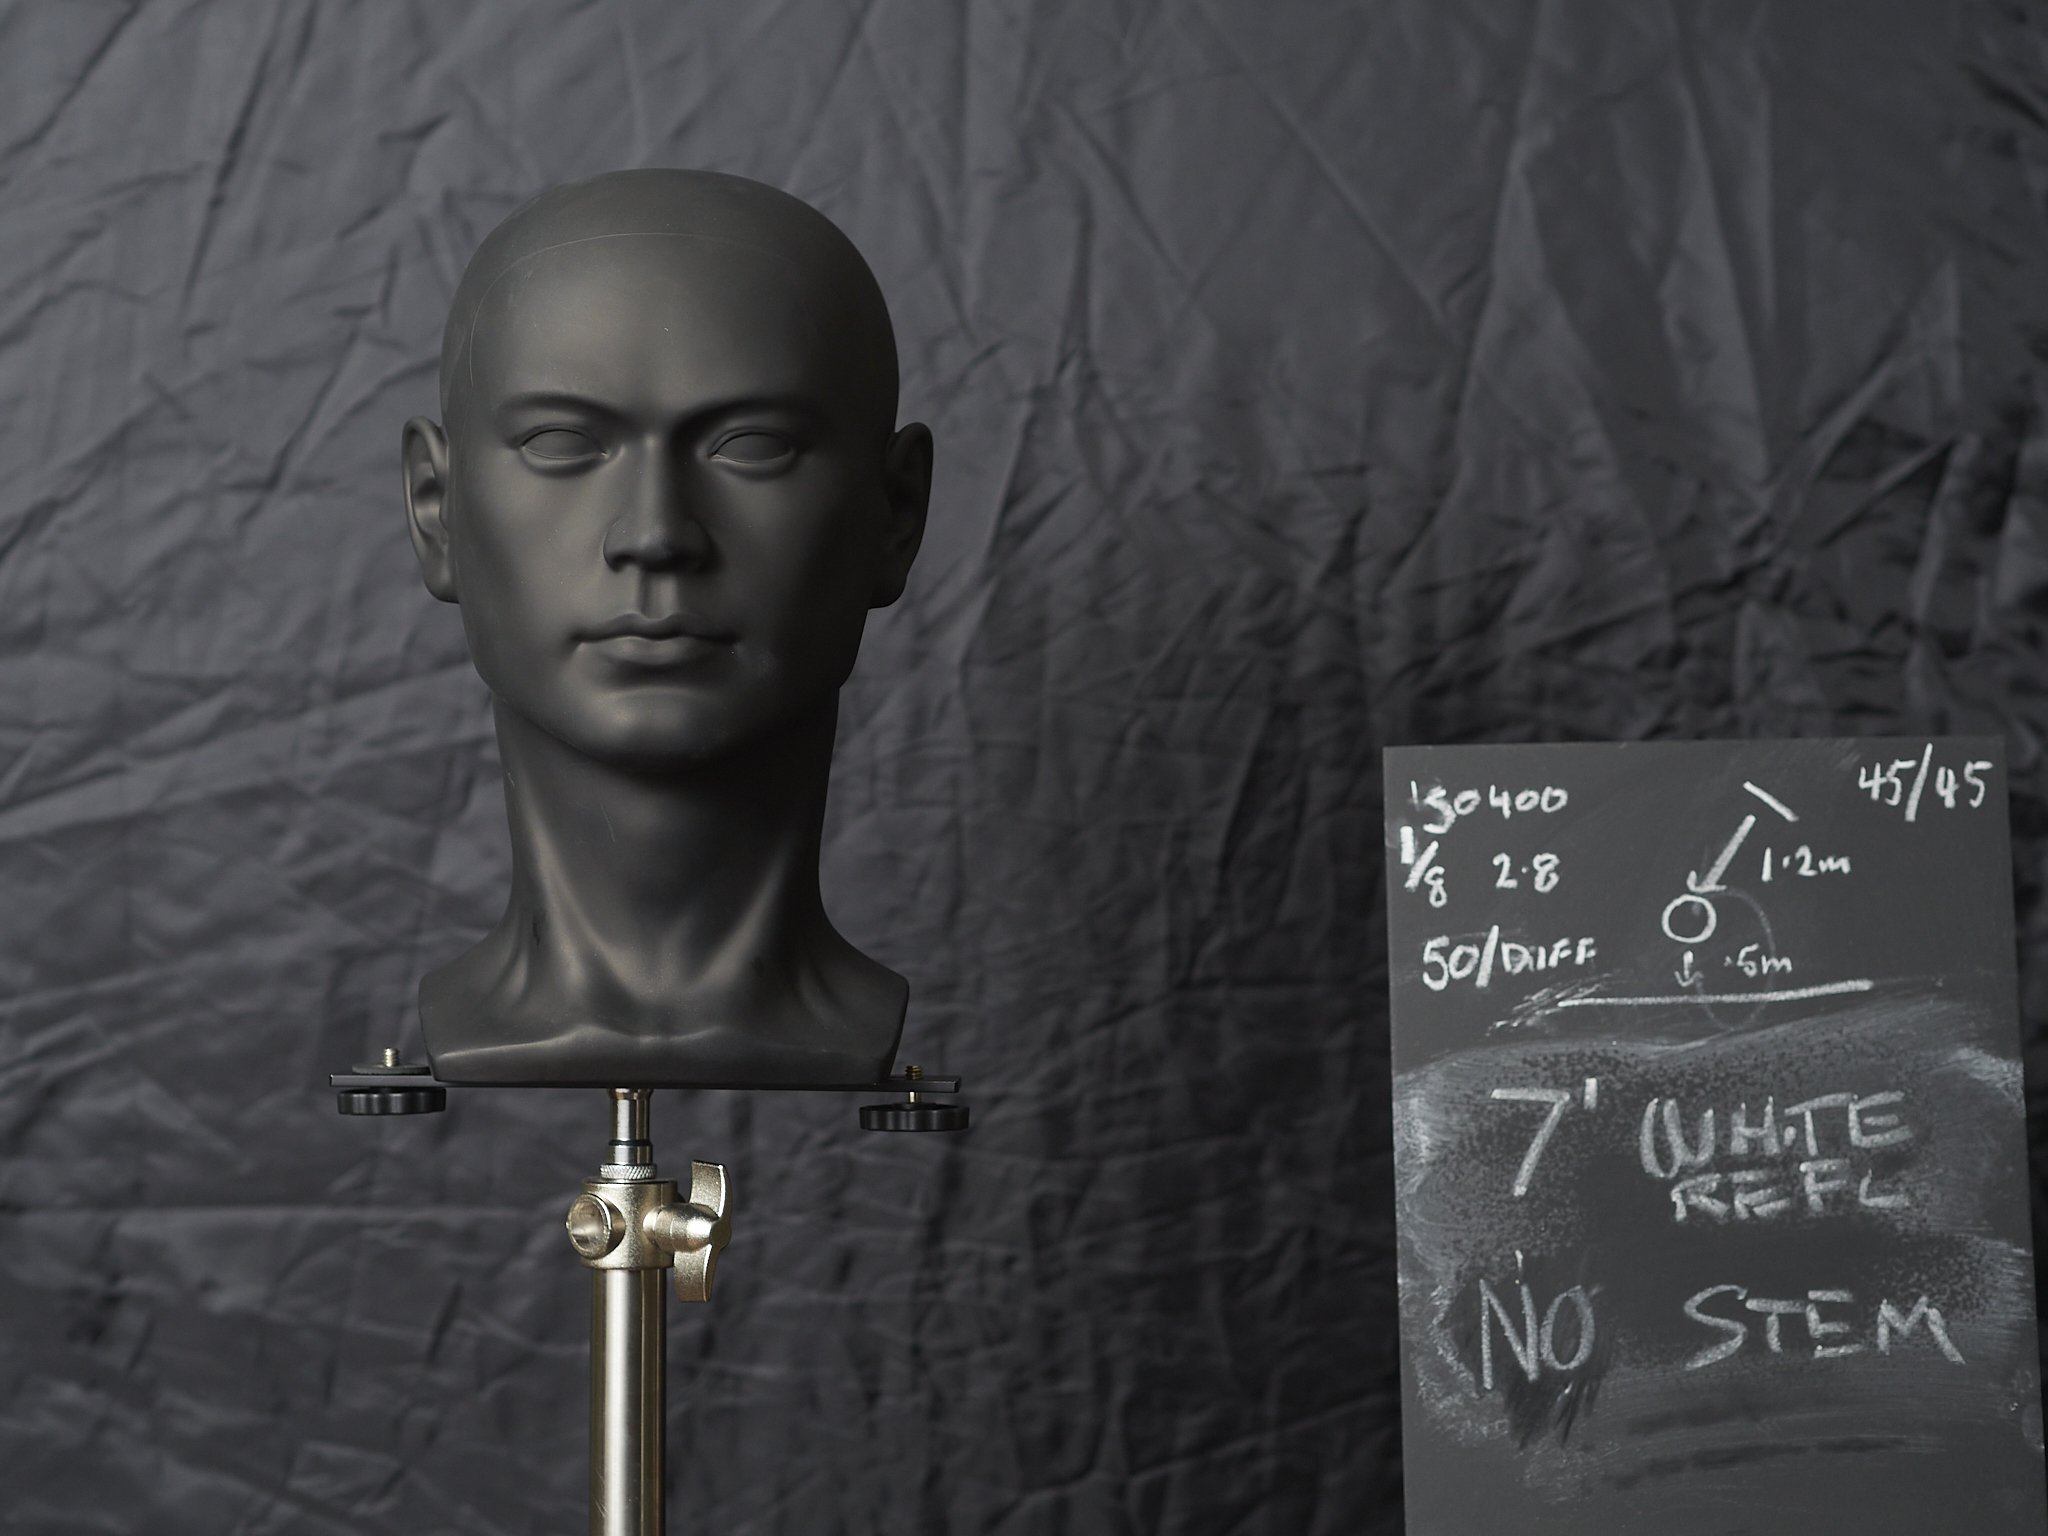
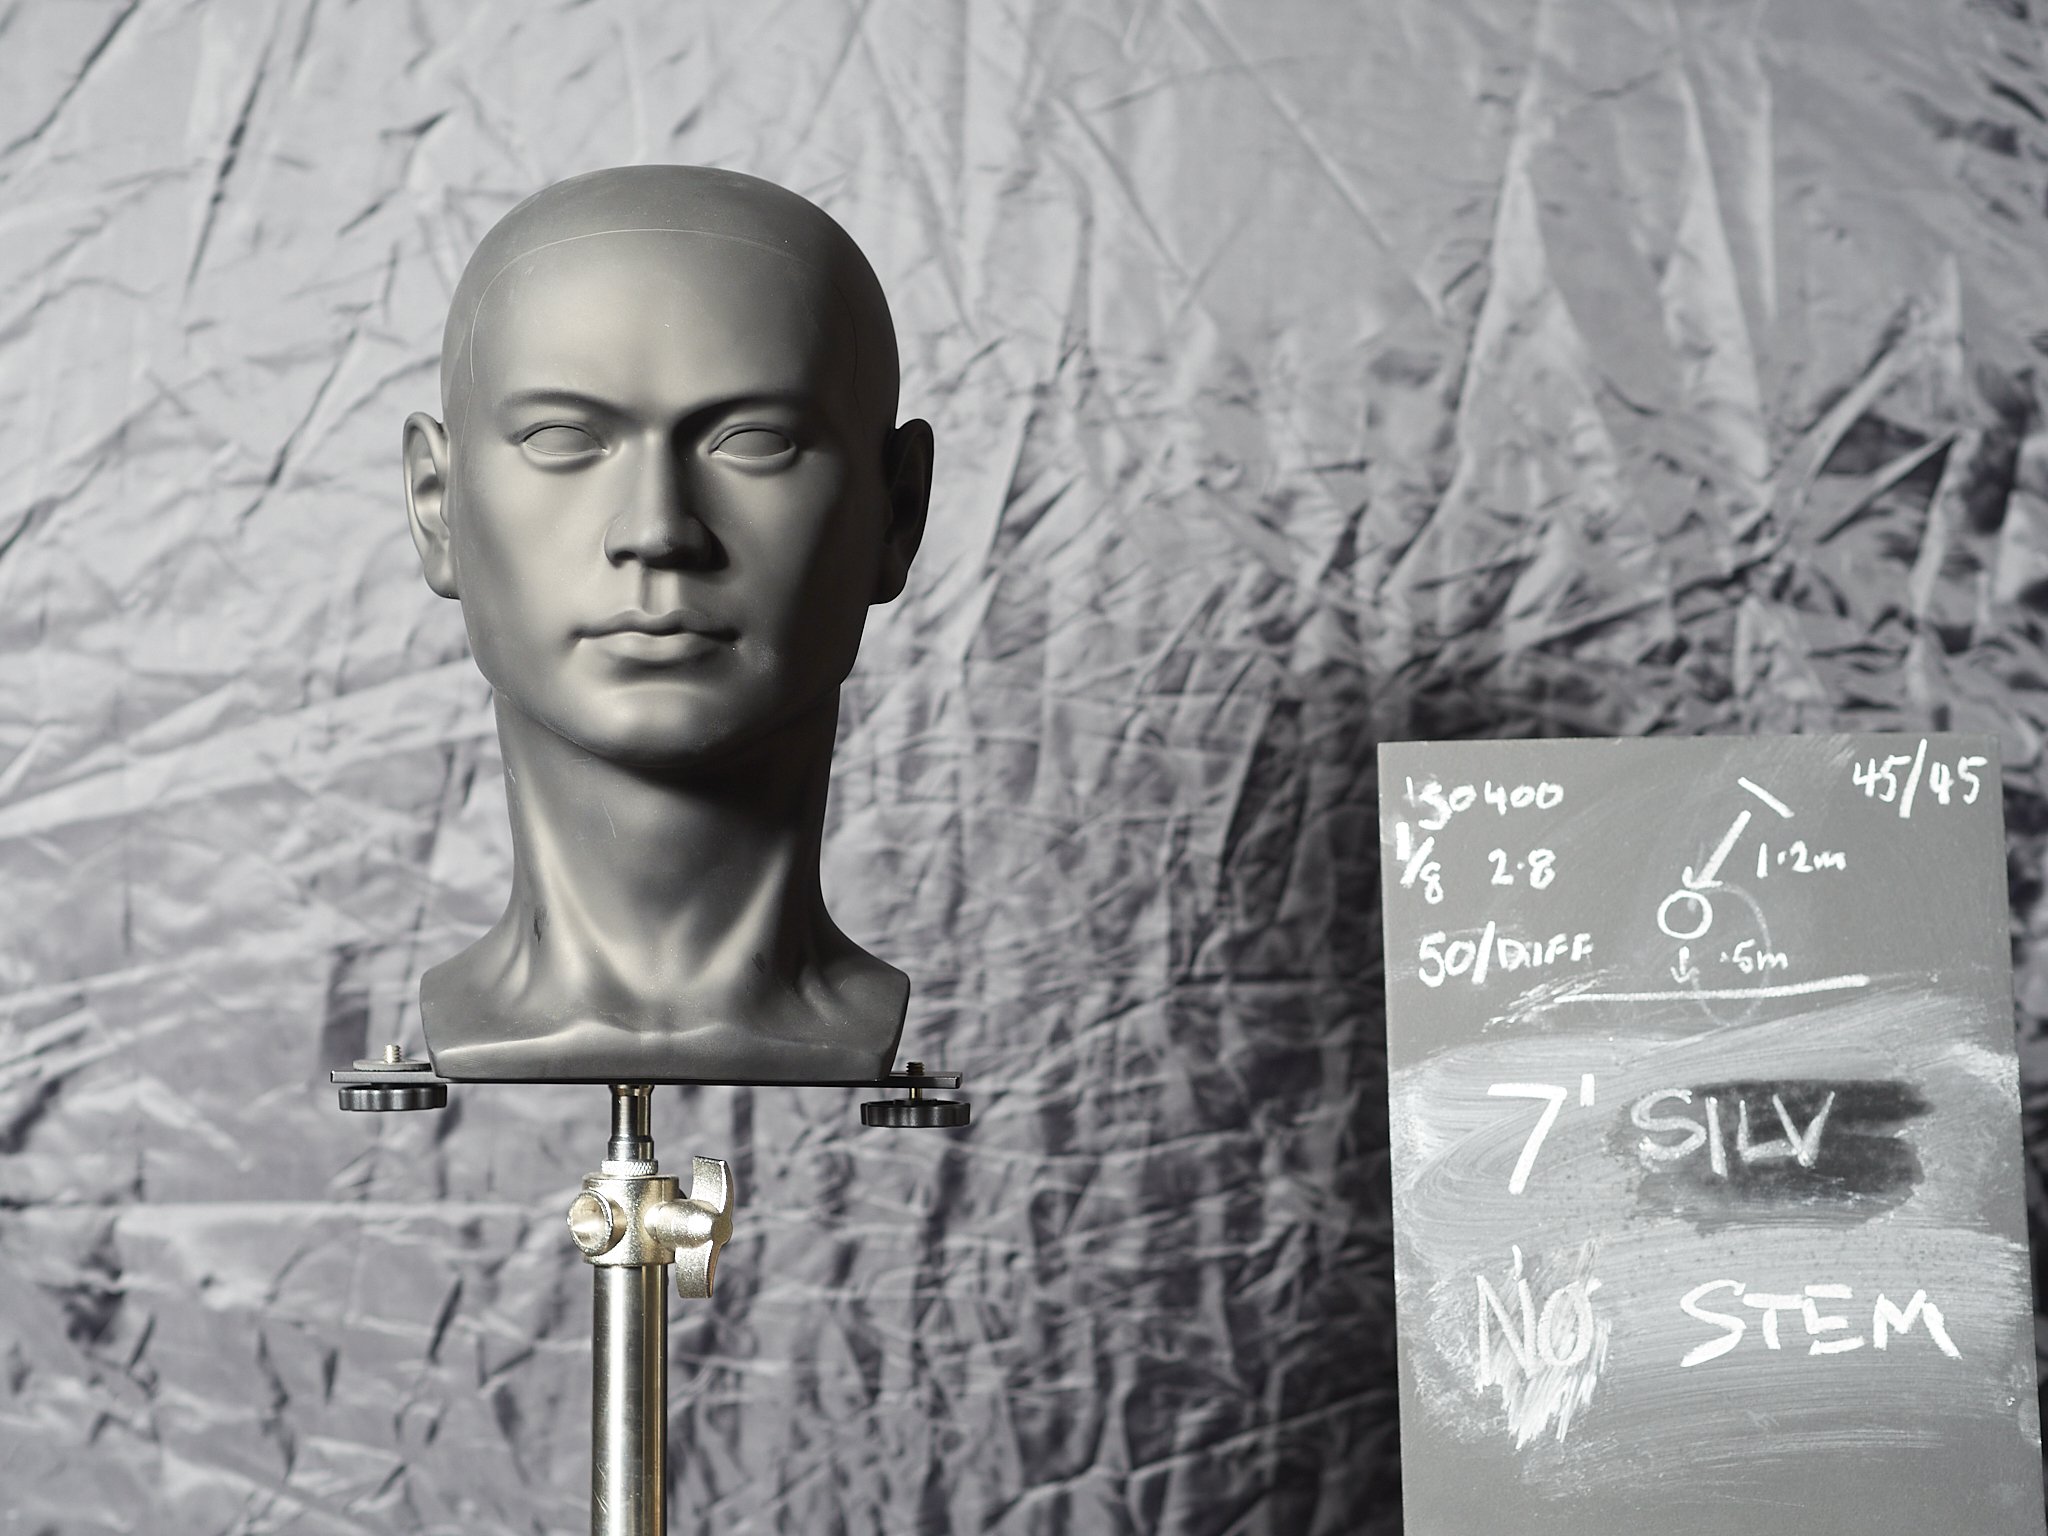
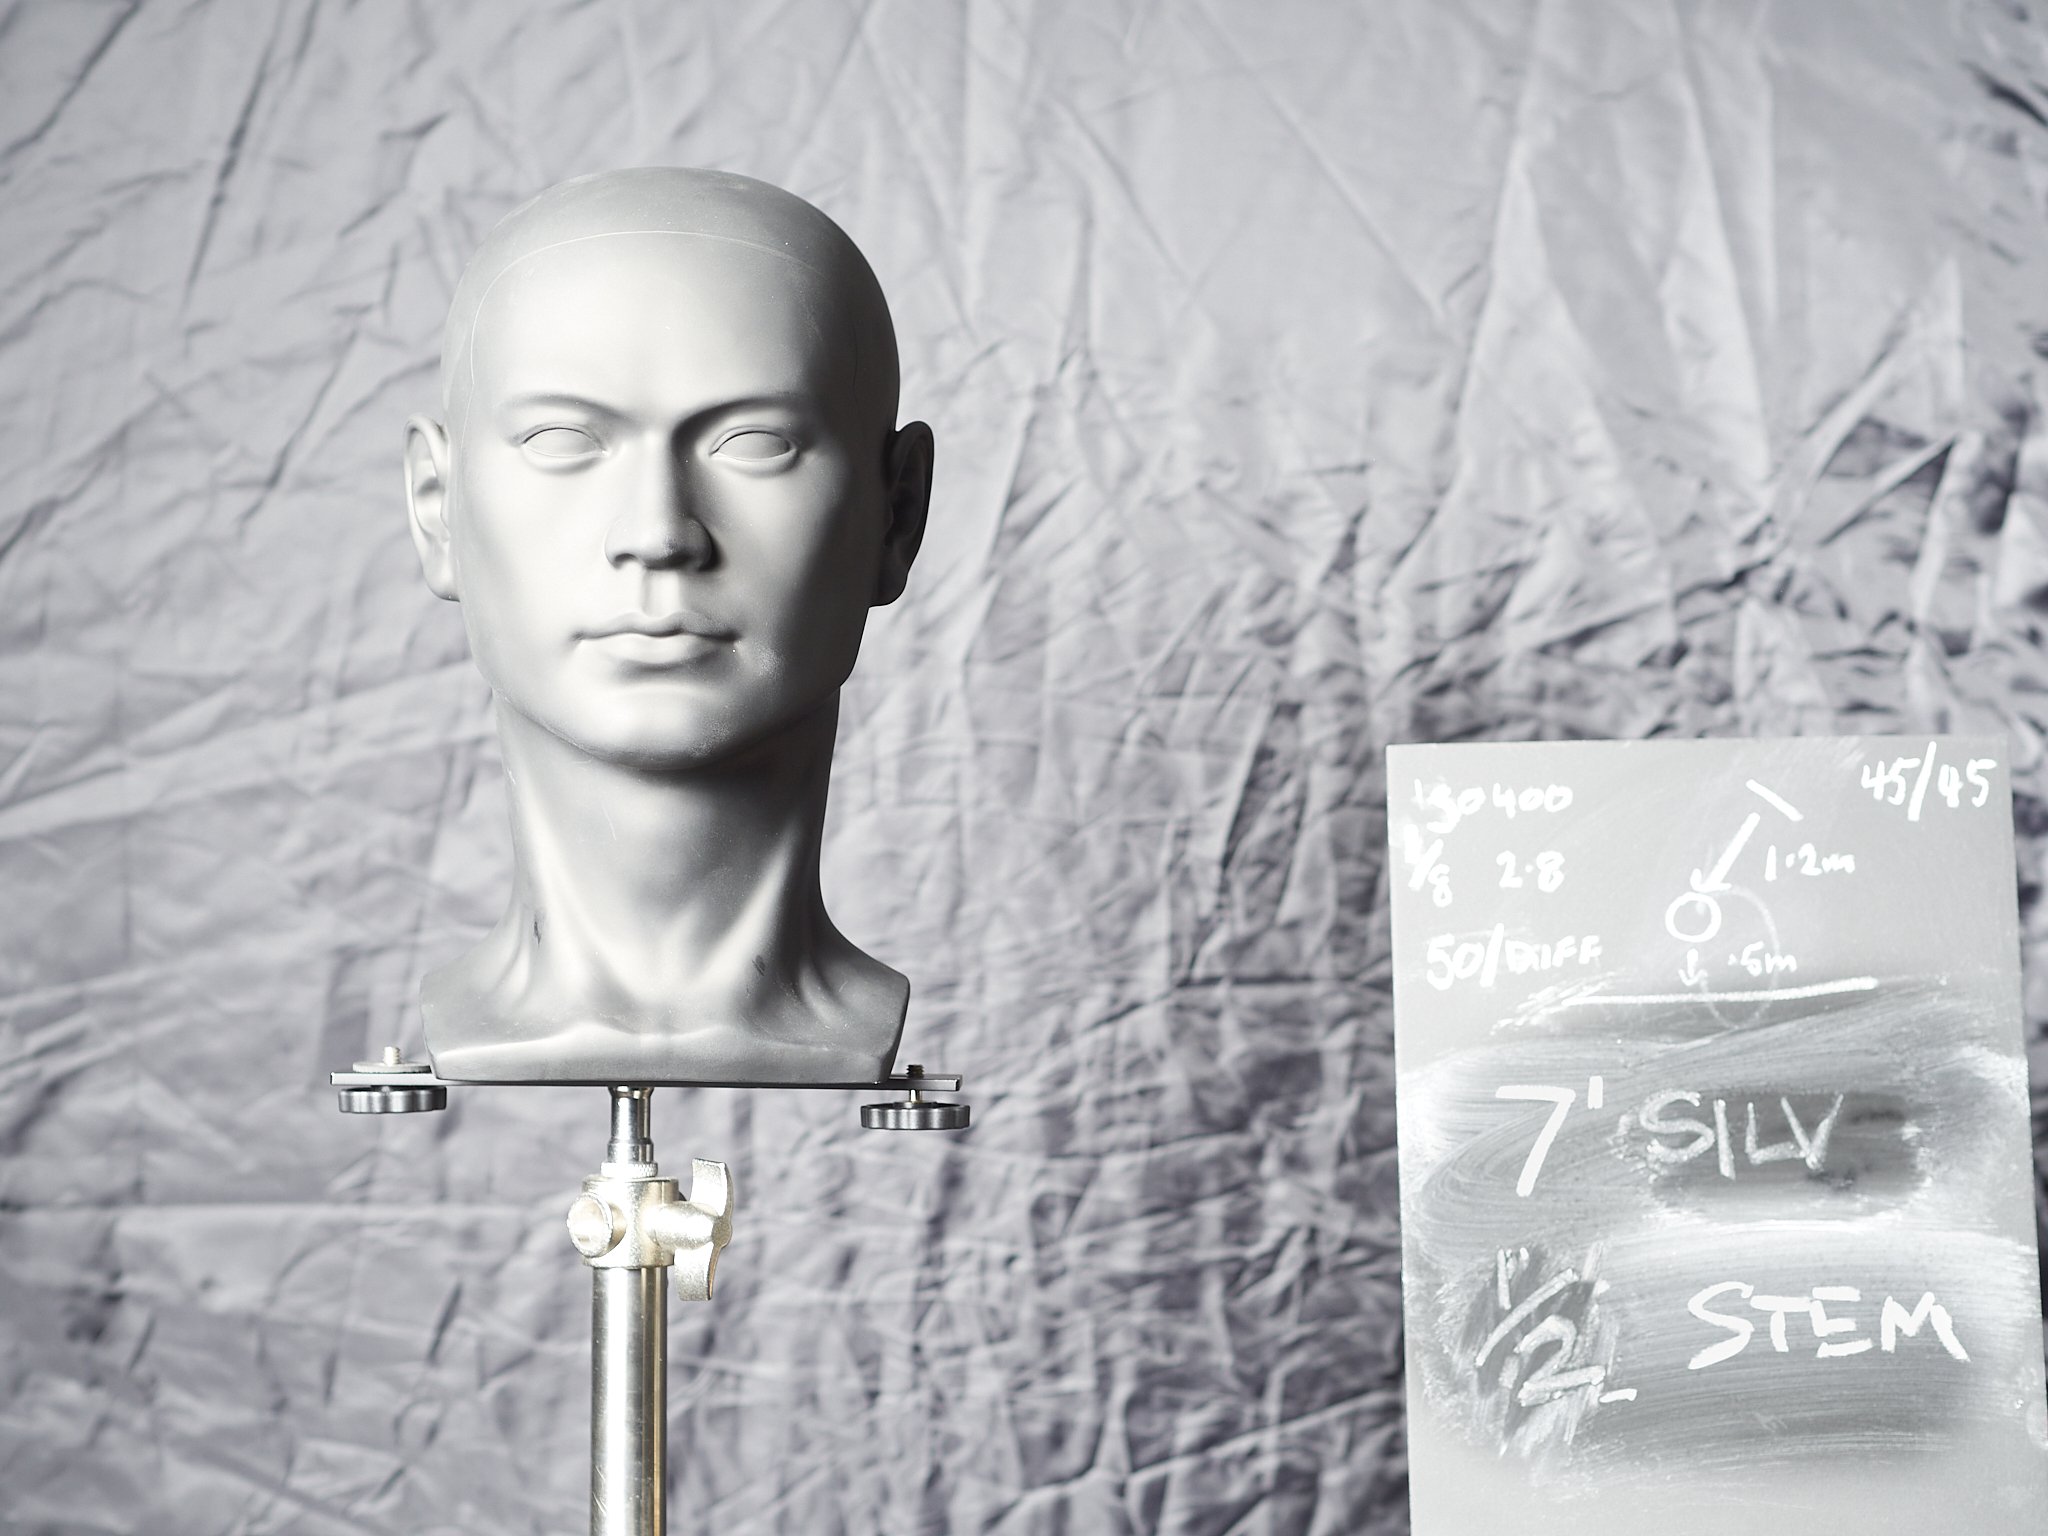
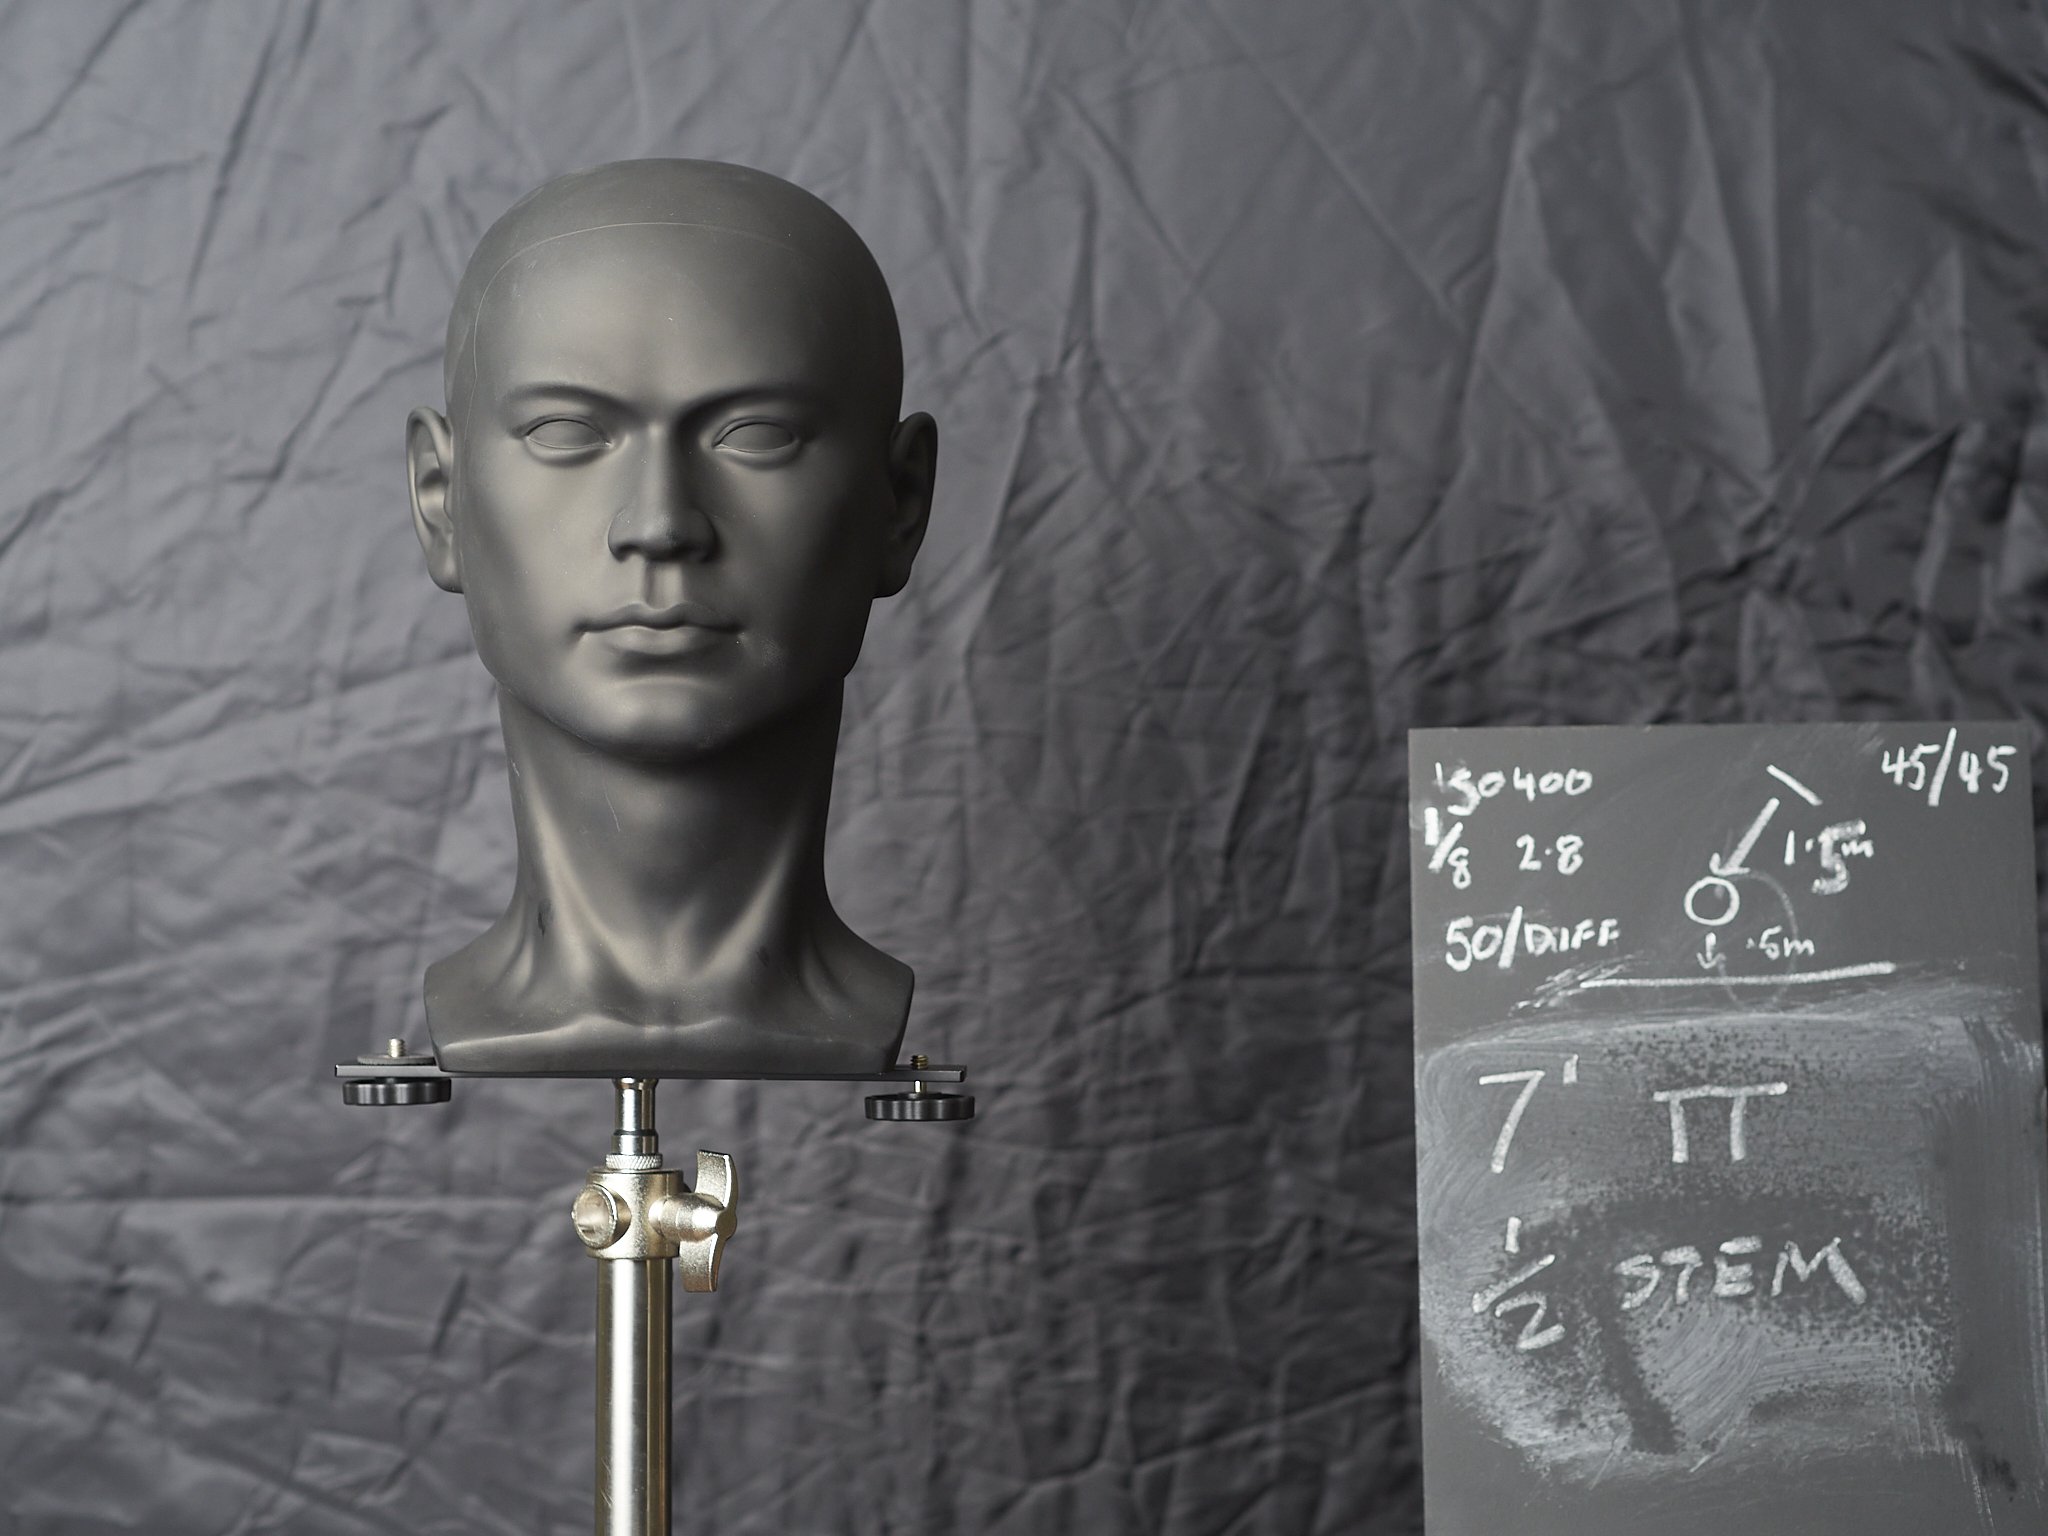
If you cast your mind back to the relatively recent past, many 35mm photographers regularly complained that they often got too little DOF. Shooting at very fast apertures with manual or barely adequate auto focus resulted in many misses, often more misses than hits. This is also before face detection or super fine AF points, so accuracy was a loose term anyway. Studio shooters use lights and clean back drops so they can use f8+ when ever they can.

The right amount of DOF is subjective, but my personal ideal is a useable and cooperative DOF. Creative only (read super shallow) DOF is a one trick pony. Blurring out ugly backgrounds habitually only works when small levels of detail of the main subject or single plane points of interest are all you are interested in. This may be the case for one image, but how do you tell a story with only one sentence? M43 does give you the tools for creative, very shallow depth of field (for example a 75mm f1.8 lens in any format has very shallow DOF), but it also offers a welcome boost to practical DOF when using fast lenses in low light.

M43 may let me shoot a hand held landscape at ISO 200 and F8, where ISO 800 at F16 is the full frame equivalent (and that is not counting the superior stabiliser). Conversely, I can use f1.8 regularly without fear of it being too shallow to be practical. Even the f1.2 Pro lenses are actually rendering at about f2 equivalent in full frame terms, an aperture I rarely used when using that format. Bokeh quality, meaning the quality of transition in an image at any aperture is more important to me than sheer quantity of blur and M43 has paid as much attention to that as anyone in the market.

Focus Accuracy and Options

Mirrorless in general has more focus accuracy than a mirrored system. Both calibration issues (I have had and seen plenty) and the ability to read the sensor to highlight focus priorities (Face/eye detection and touch focus in particular) make mirrorless cameras more accurate. The ability to use this accuracy with an eye piece as well as rear screen adds to their usefulness.

Tracking focus has been an issue in the past, although the sheer one-shot speed of some cameras has allowed surprising sports performance, but this is now becoming a thing of the past. Sony, Olympus, Panasonic and Fuji have all put their focus speed issues behind them adding tracking that sometimes beats the very top flight SLR cameras and there is no doubt if they continue to improve at the rate they have so far, they will leave purely phase detection focussing cameras in their dust.

What-you-see-is-what-you-get

This is the reason mobile phones and compact cameras are often more satisfying to casual photographers than SLR’s with their mystical science. The disconnect of the prism finder and mirror to someone learning photography is a tough learning curve. You could argue that this difficulty forces them to learn “old school” practices making them better photographers, but take it from someone who teaches photography, there is no easier way than WYSIWYG to teach fundamentals such as exposure compensation or white balance. I cannot think of a photographer now or in the past who would shun the preview over review system. Why would you?

Subjective Quality

The real difference between M43, or even a 1” sensor compared to a full frame in quality when printed to A2 or bigger is negligible. There are lots of users out there happy to compare and share, but you have to want to open your eyes. No good hiding behind the over used shield of biggest, latest and most is not only superior but mandatory. This argument lost it’s meaning during the pixel race when photographers started to remember they worked successfully with 4-6 mp cameras and even film.

The industry relentlessly drives the more is more wagon, but their own argument nullifies itself. I recently came across a 1997 copy of American photo competition edition. Apart form many stunning and highly accomplished images in the issue there is a an add for the F5, taking a series of Olympic Kayak slalom pictures. The caption hints broadly at something like “only with the F5 this is possible”. This is the same B&%S#@& that the industry has used for years to sell it’s wares (as has every other technology based industry from cars to kitchen appliances). If it is true at any time, then everything before is inadequate, which any user will tell you was not the case. Seismic shifts in technology like the first SLR, AF, digital and mirrorless will change usability and habits, but small evolutions within that are just minor time stamps in an ever changing dynamic.

So is a 16-20mp M43 sensor relevant in the modern world? Well it is better than anything we had available up until about 8 years ago short of large format film*, but that difference is just as irrelevant as it has ever been (only a small part of a big process). As added proof of this, I have compared the high res mode from the Pen F to a standard file and can only tell the minor difference on a large screen at magnifications printing cannot match.

Seriously, is this not enough quality for most shooters needs? Only on a screen at 100, possibly 200% or a 6x4 foot print, viewed way too close, could you find fault by comparison and the full frame image would only be a hair in front. For any real differences we need to look to medium format sensors, everything else is hair splitting.

*The OMD EM5 sensor matches or exceeds the full frame Canon 1Ds Mk2 sensor, hailed as the “king of kings” in it’s not so distant day. The Pen F looks to match or better the 5d mk2.

For me personally, I suffered from some dissatisfaction with Olympus colour in the early stages (EM5 mk1 mainly), but found an easy work around with a fairly strong Lightroom preset. The newer sensors have reduced the need to modify to almost zero. After that size and quality were never an issue.

ISO performance

This concern is partly nullified by the DOF difference (above). The M43 user can honestly claim a 2 stop ISO benefit in some situations. High speed indoor sports with very fast lenses is where they fall short at the moment if all else is equal (but as I have found they are still ore than adequate). This will likely be addressed with super fast lenses, available to M43 designers with the 2x crop factor.

No serious fine art or technical photographer will avoid using the very best ISO their camera offers. If this is the case for them, then M43 is a benefit, allowing them to use faster shutter speed in exactly the same circumstances, due to the DOF/aperture benefit.

For these sport shooters, a 300mm f2 (600 f2 equiv!) is possible as is a 200mm f1.8 (400mm f1.8 e), making up the difference in formats with smaller and lighter lenses with Olympus and Panasonic/Leica’s pedigrees in lens design (Olympus and others have already made lenses similar to these in the past). Other benefits such as handy 500mm lenses that give birders a 1000mm hand holdable option or super small but powerful 200mm f4e etc are also looming.

As an aside, I have often found the “grain” in EM5 images at ISO 1600-3200 pleasant, even creatively beneficial. Much better than the ‘Fruit Tingles” colour blotching I see in other brands. Noise seldom prints as obviously as a screen renders it, so fine art printers fear it less than reviewers.

Shape

This is an odd one, but one thing some people find a hard shift to is the format’s ratio or shape. The 4:3 ratio actually pre-dates the 3:2 ratio of 35mm which was seen as a difficult shape and overly long one for much of it’s early life. Magazine editors would have preferred 4:3 as a page filler and many papers on the market suit it better, but the 4x6” print became a standard to fit the 3:2 35mm format, cementing it as the “true” ratio. No other standard format was ever so wide, only true panoramic ones. In reality, landscape photographers usual go wider, into panoramic ratios of 2:1 or 3:1 anyway.

I find M43 gives me less dead space in most crops and does not force a tall or wide choice as often. The 35mm 3:2 ratio often creates a lot of dead space in an image* or feet and head room can be curtailed. I now find 3:2 ratio portraits look too tall and landscapes seem to have two empty sides that need filling. M43 also fits a book page in horizontal better. From a printers perspective, 4:3 or square formats often provide more useable options.

*No doubt many accomplished 35mm shooters use this space to their advantage. This may be a case of the format creating style.

The “X” Factor

There is little doubt that Panasonic and Olympus are pushing the envelope when it comes to innovation. Between the two brands, stabiliser, buffer, sensor cleaning, AF, sensor and processor design just to name a few have been going forward in leaps and bounds. Panasonic releasing a full frame camera, will in my view only highlight the diverging paths of the “bigger is better” and “more is more” group compared to the elegant sufficiency group (1” to APSC) who will also gain benefits for their choice.

*

Olympus or Micro Four Thirds in general was my choice six or so years ago, prompted by size, accuracy, lens selection and image sharpness issues when compared to Canon at that time and I am still happy in this space. Take it from someone who can regularly try almost any camera on the market, the quality differences are minor, but the benefits of m43 or any mature mirrorless system are significant. Why else would Canon and Nikon both feel the need to answer the mirrorless question with expensive and risky offerings of their own?